How to Start Bitunix Trading in 2025: A Step-By-Step Guide for Beginners
How to Open Account on Bitunix
How to Open a Bitunix Account with Phone Number or Email
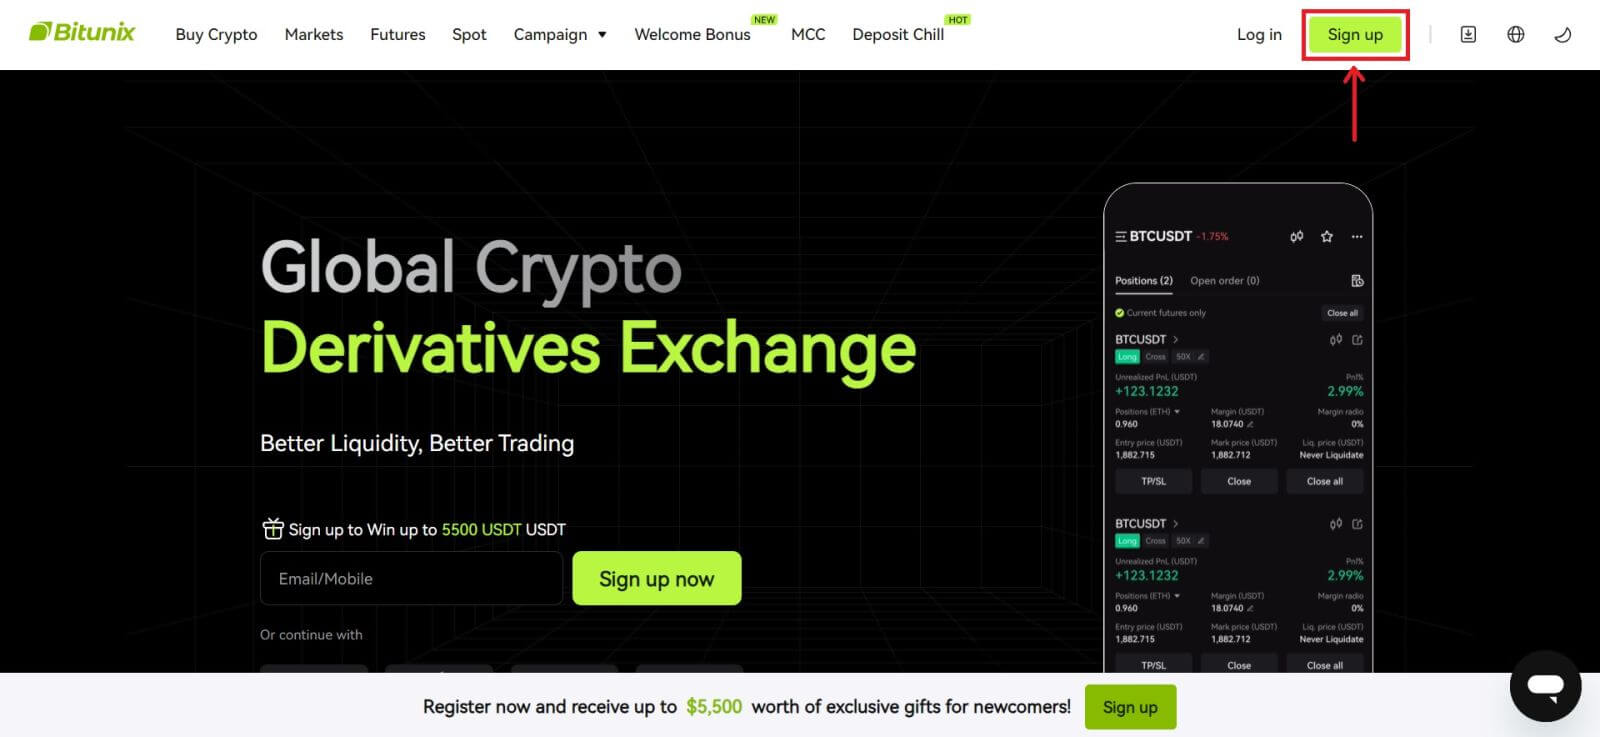
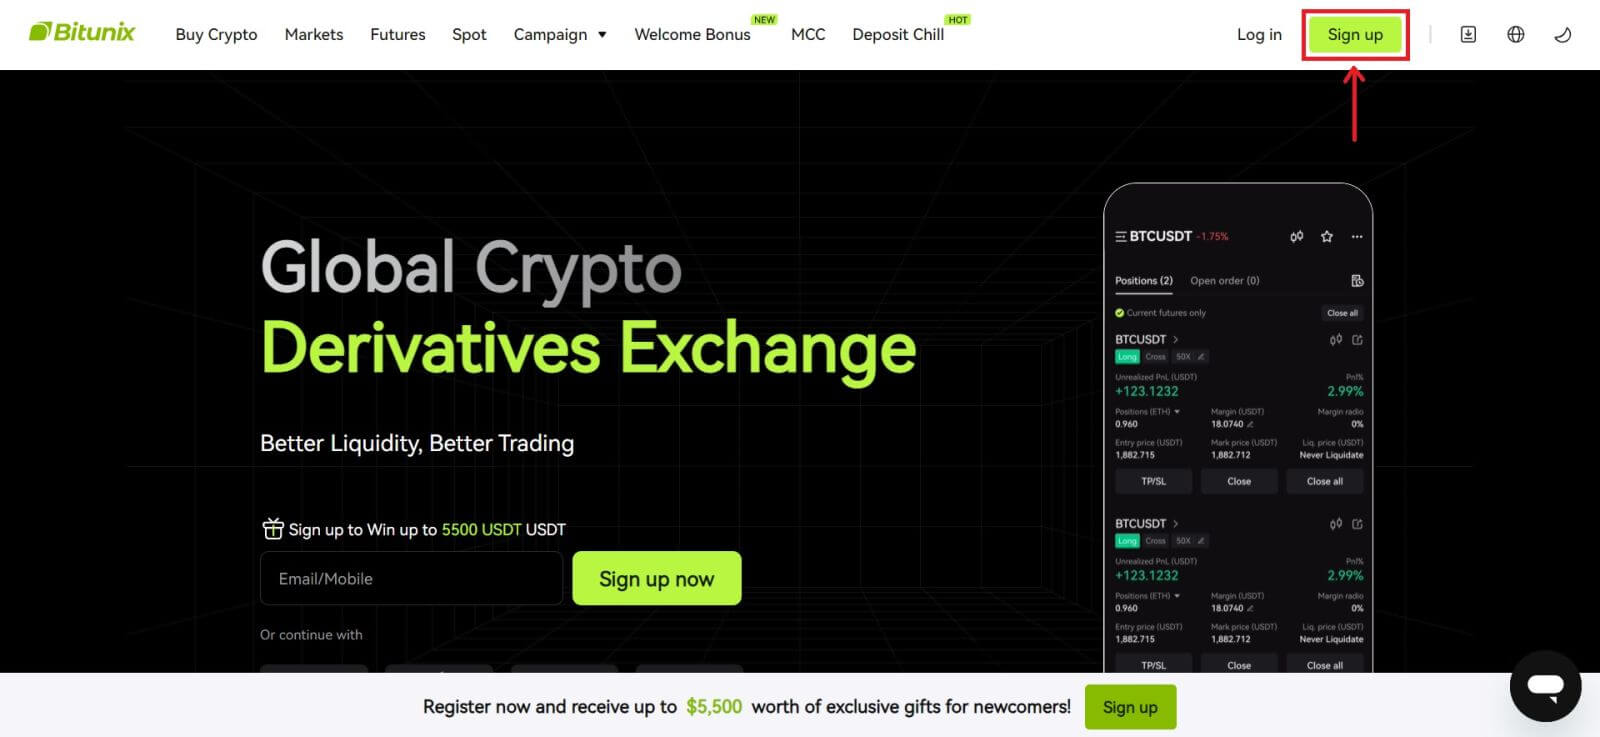
1. Go to Bitunix and click [Sign up].
 2. Select a registration method. You can sign up with your email address, phone number, Google, or Apple. (Facebook and X are currently not available for this app).
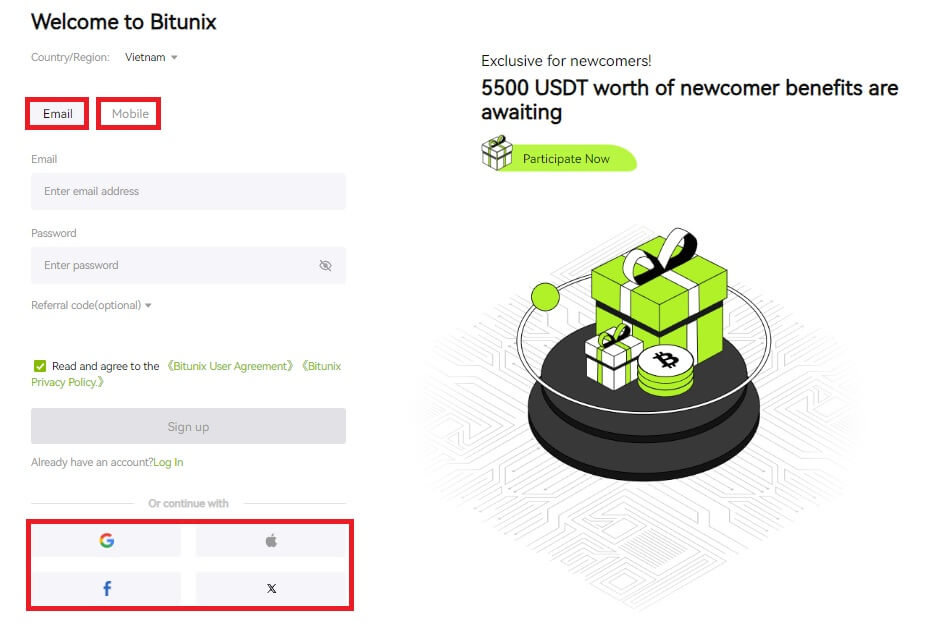 3. Select [Email] or [Phone Number] and enter your email address/phone number. Then, create a secure password for your account.
Note:
Your password must contain 8-20 characters with uppercase letters, lowercase letters, and numbers.
Read and agree to the Terms of Service and Privacy Policy, then click [Sign up].
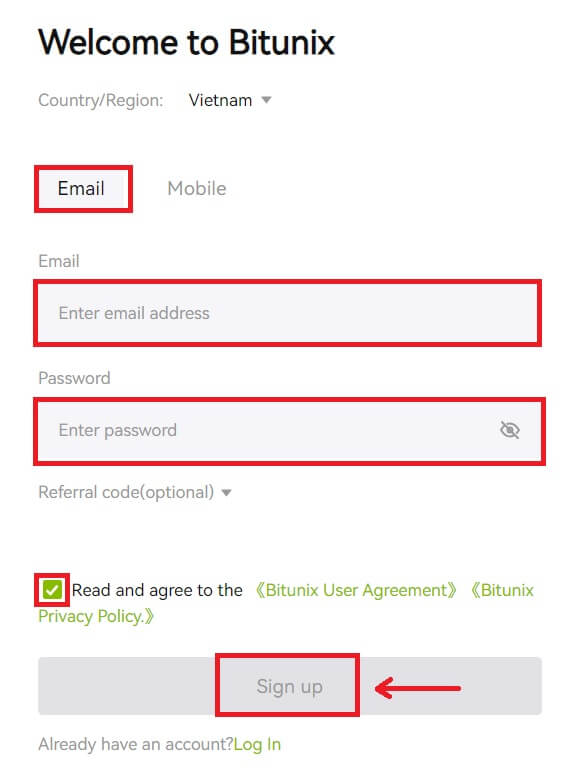
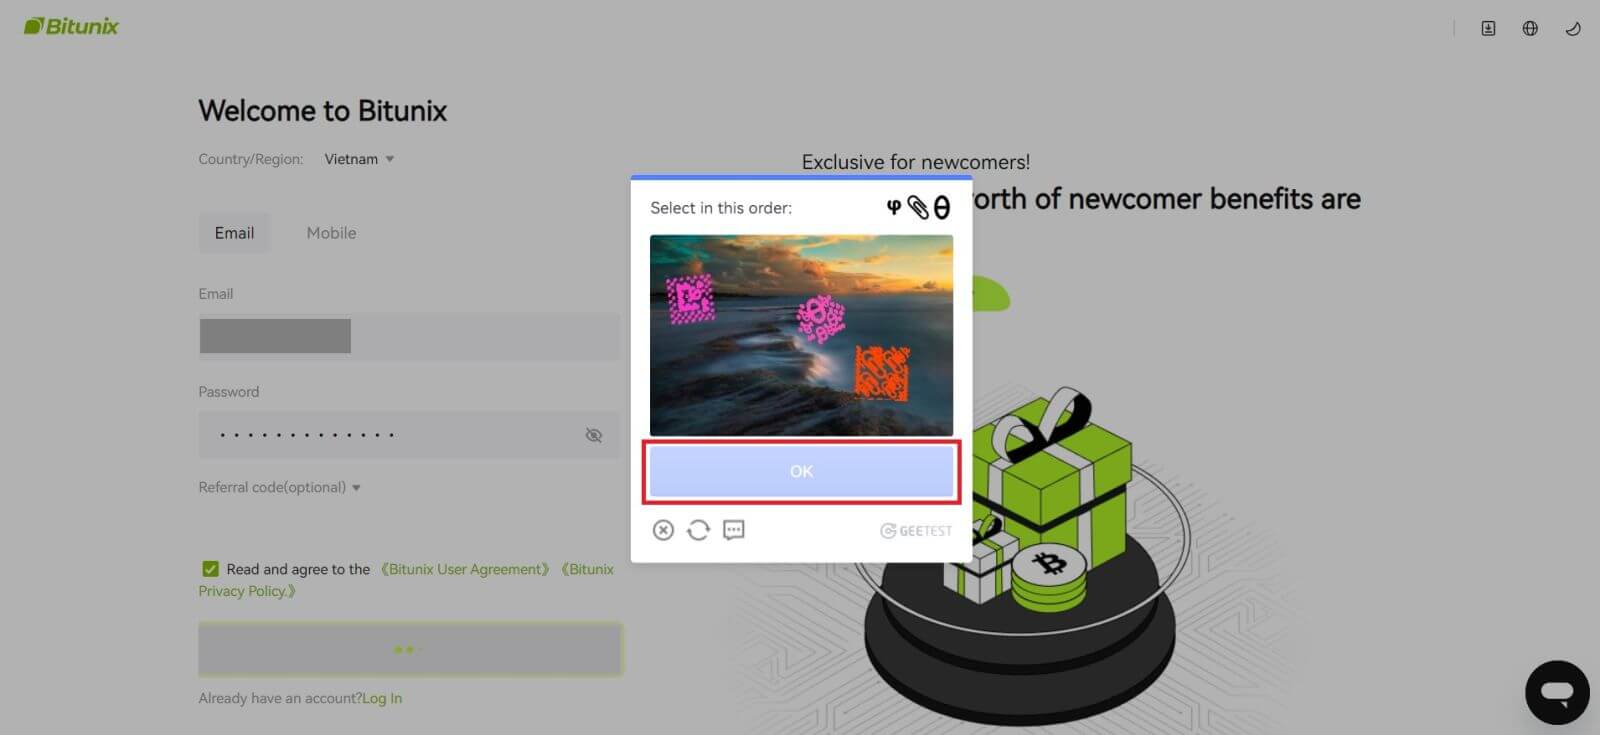
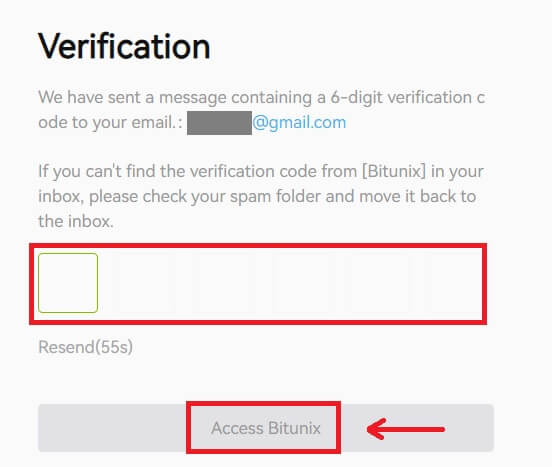
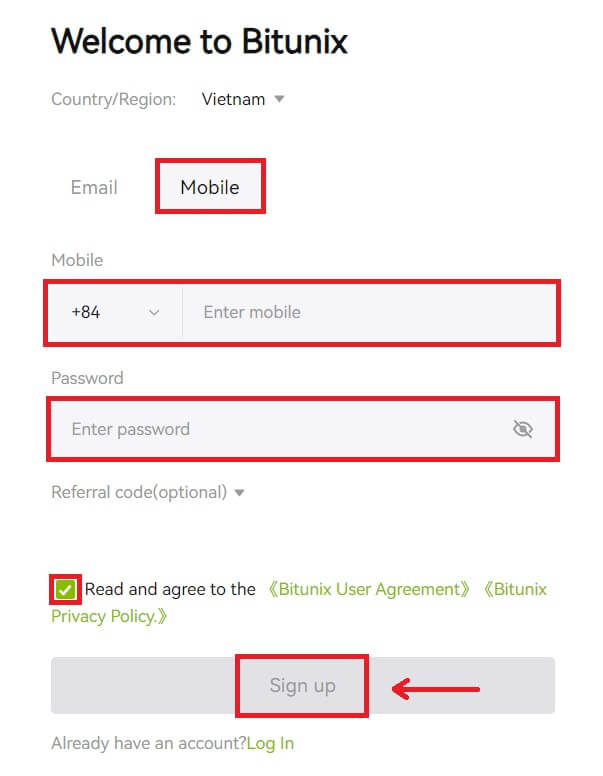 4. Complete the verification process and you will receive a 6-digit verification code in your email or phone. Enter the code and click [Access Bitunix].
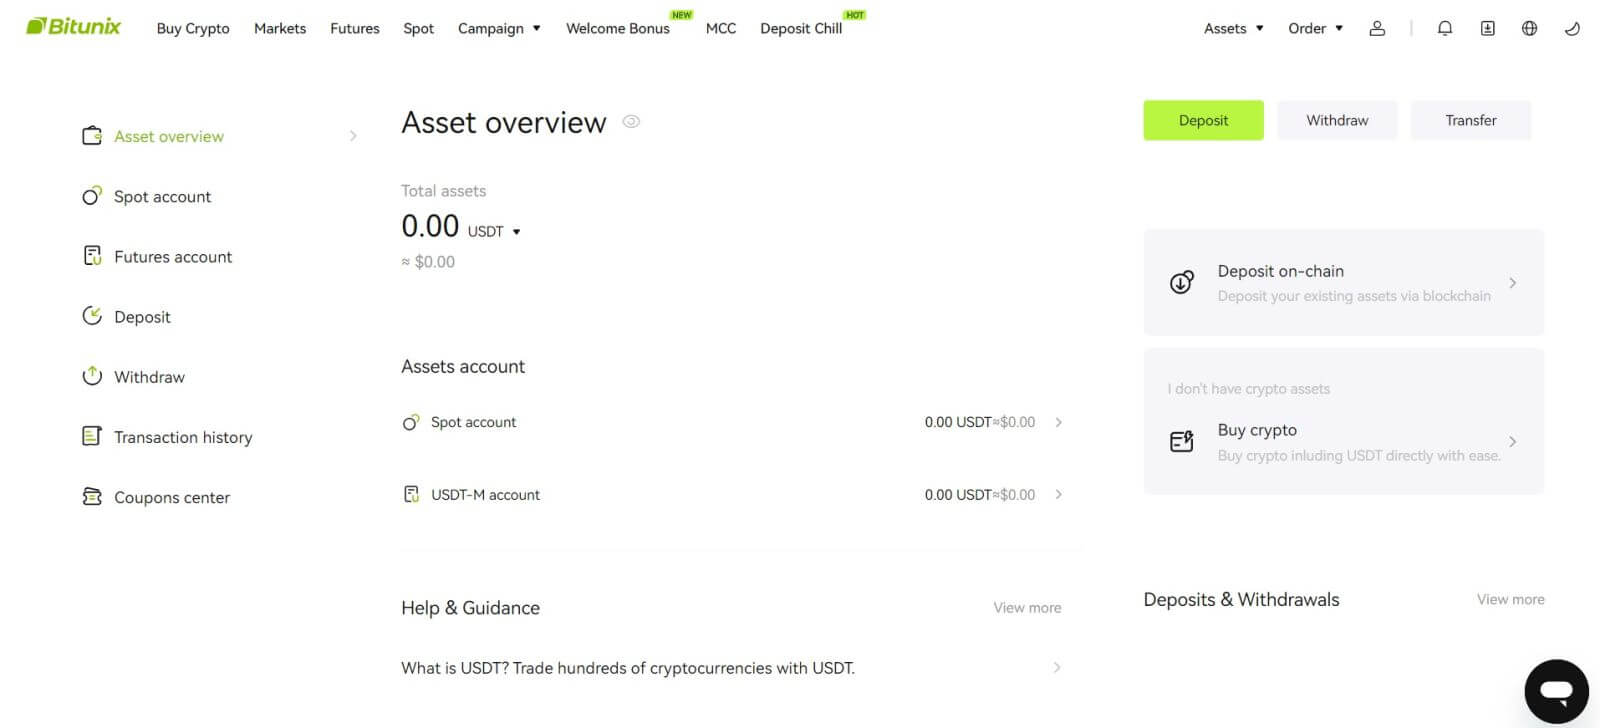
5. Congratulations, you have successfully registered on Bitunix.
How to Open a Bitunix Account with Apple
1. Alternatively, you can sign up using Single Sign-On with your Apple account by visiting Bitunix and clicking [Sign up].
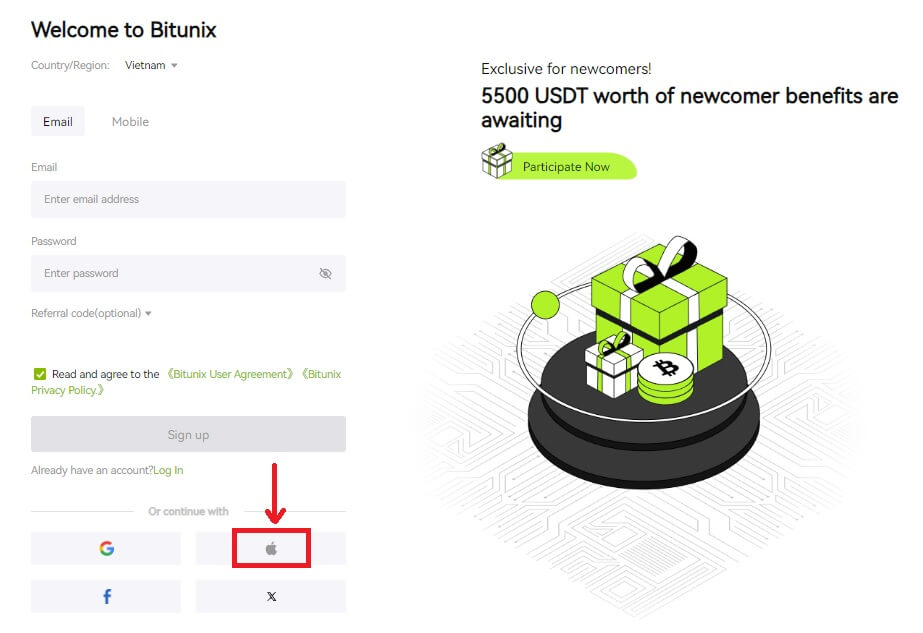
 2. Select [Apple], a pop-up window will appear, and you will be prompted to sign in to Bitunix using your Apple account.
 3. Enter your Apple ID and password to sign in to Bitunix.
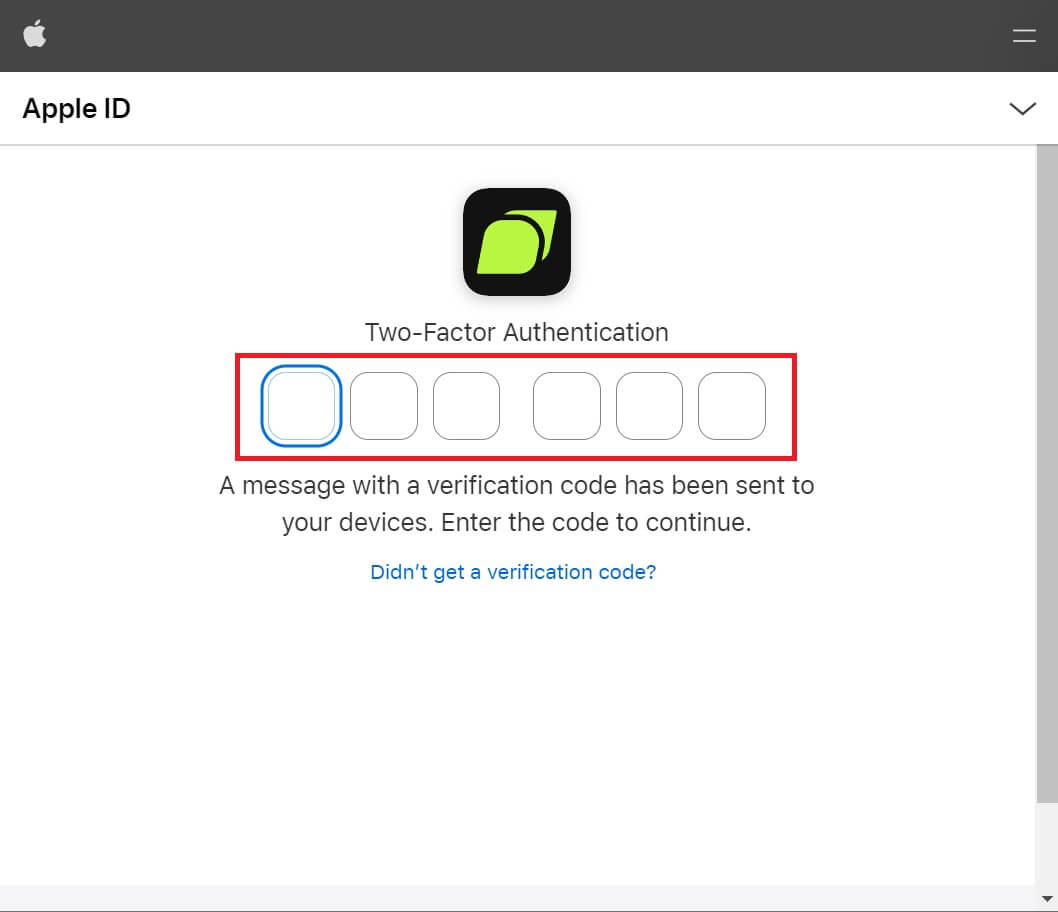
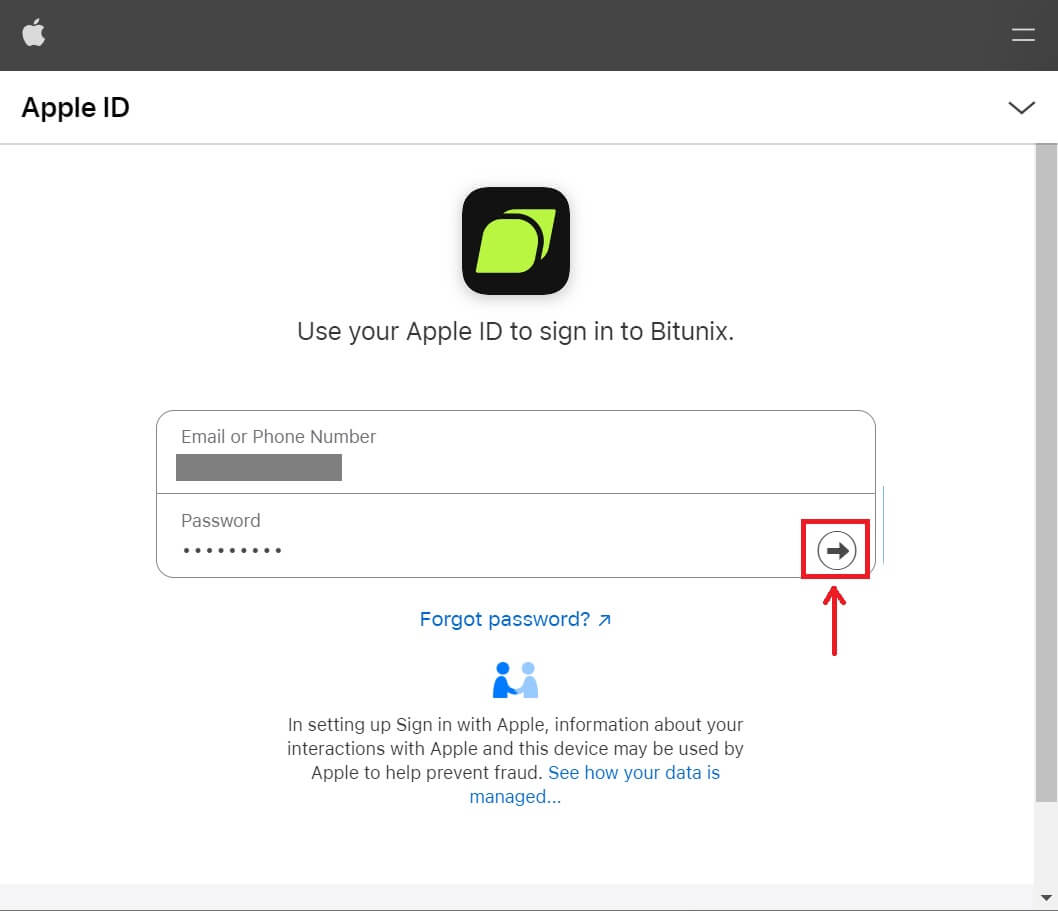 Click [Continue] and enter the verification code.
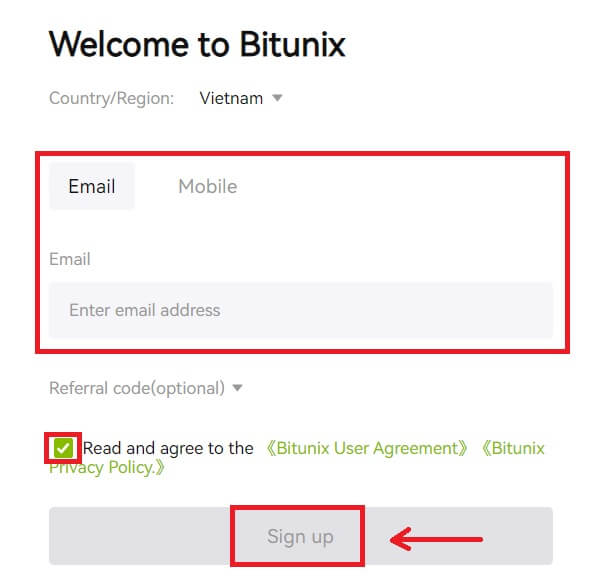
 4. After signing in, you will be redirected to the Bitunix website. Fill in your information, read and agree to the Terms of Service and Privacy Policy, then click [Sign up].
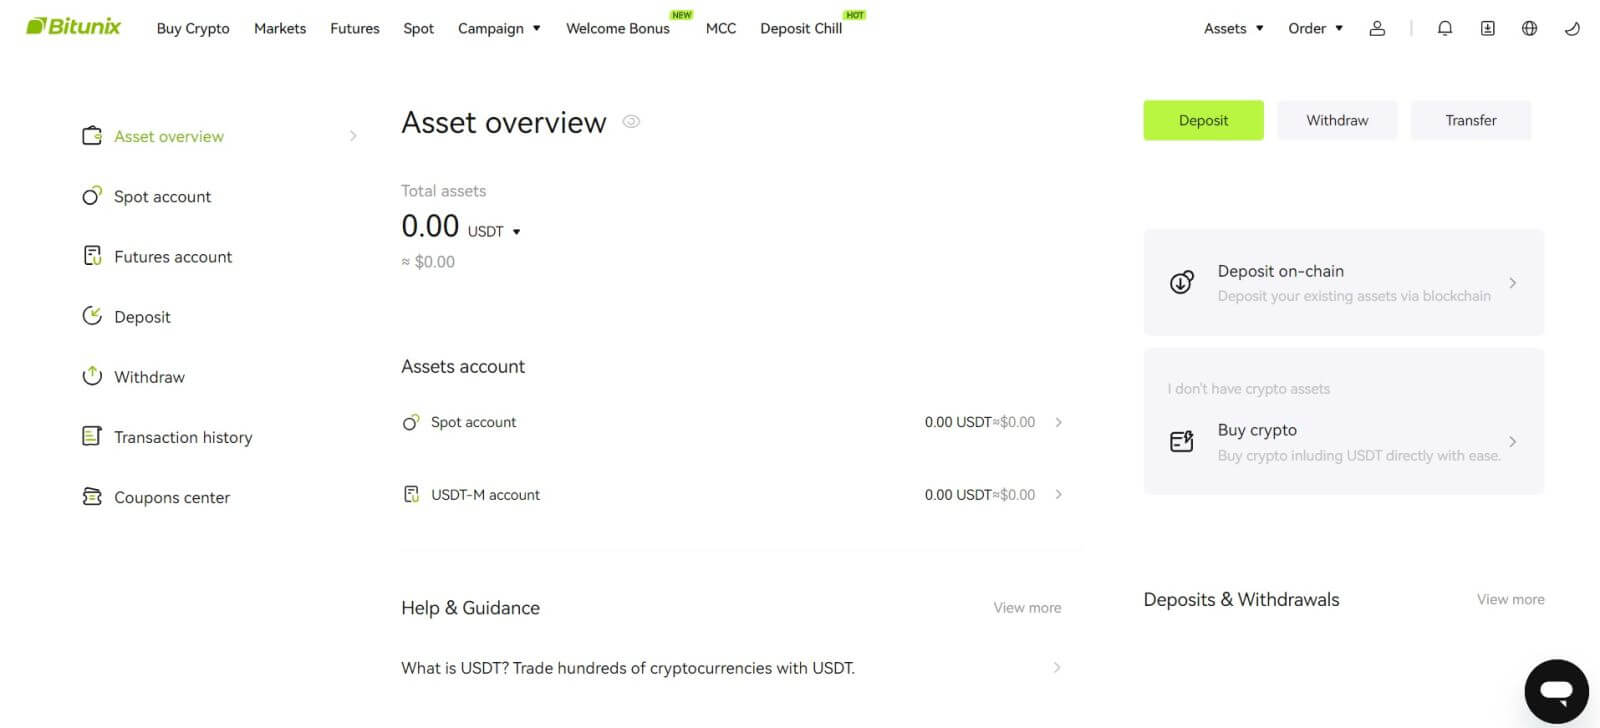
5. Congratulations! You have successfully created a Bitunix account.
How to Open a Bitunix Account with Gmail
Moreover, you can create a Bitunix account through Gmail. If you wish to do that, please follow these steps:
1. Firstly, you’ll need to head over to Bitunix and click [Sign up].
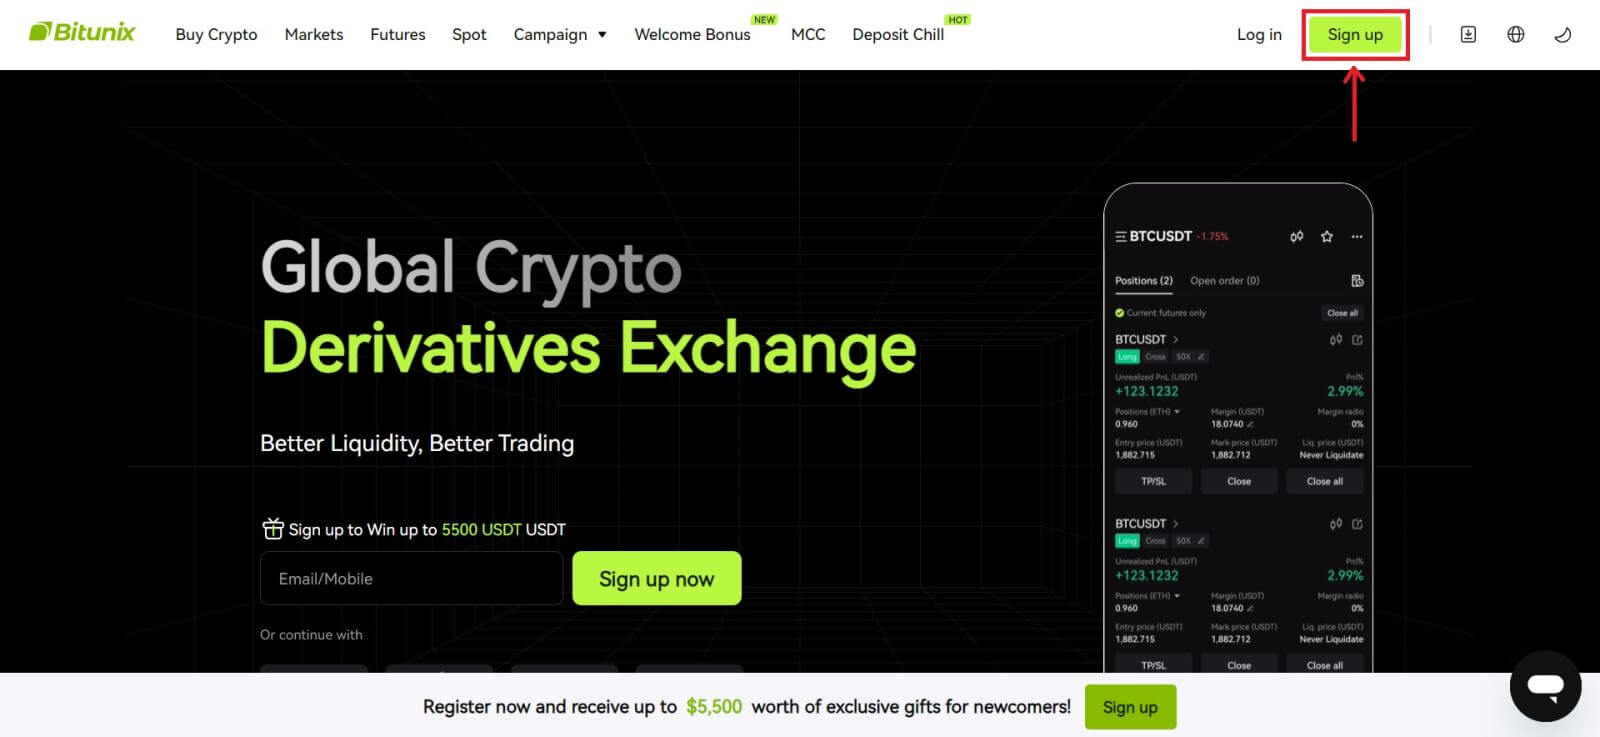 2. Click on the [Google] button.
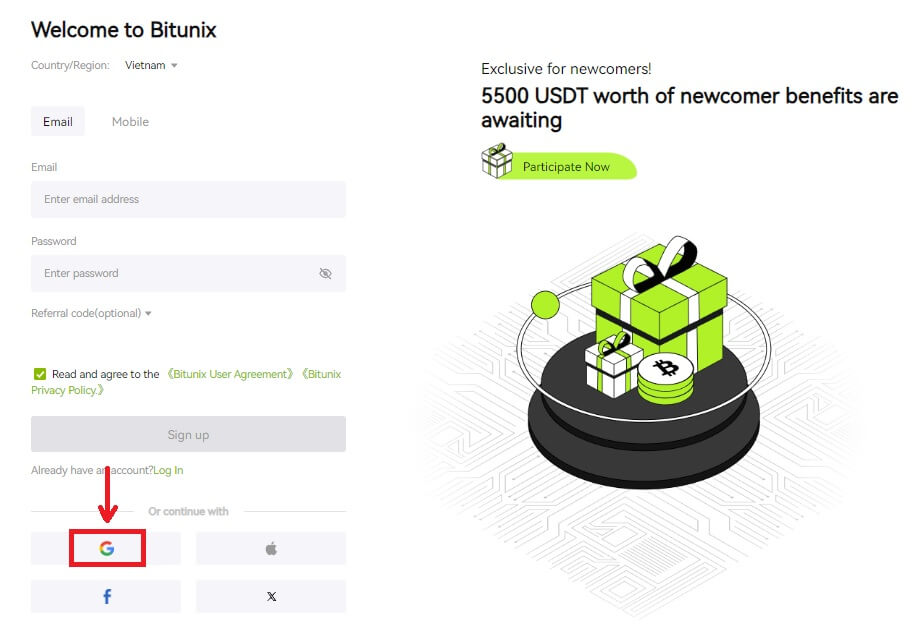 3. A sign-in window will be opened, where you can either choose an existing account or [Use another account].
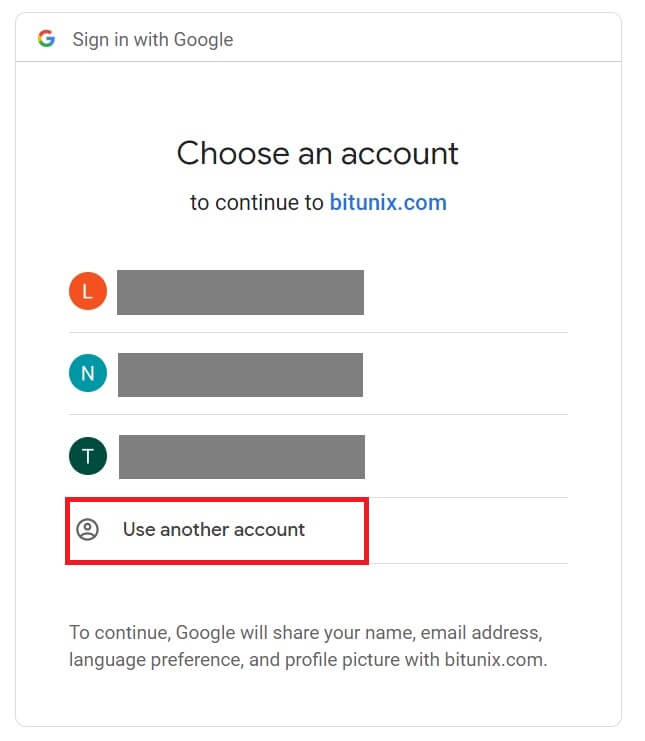
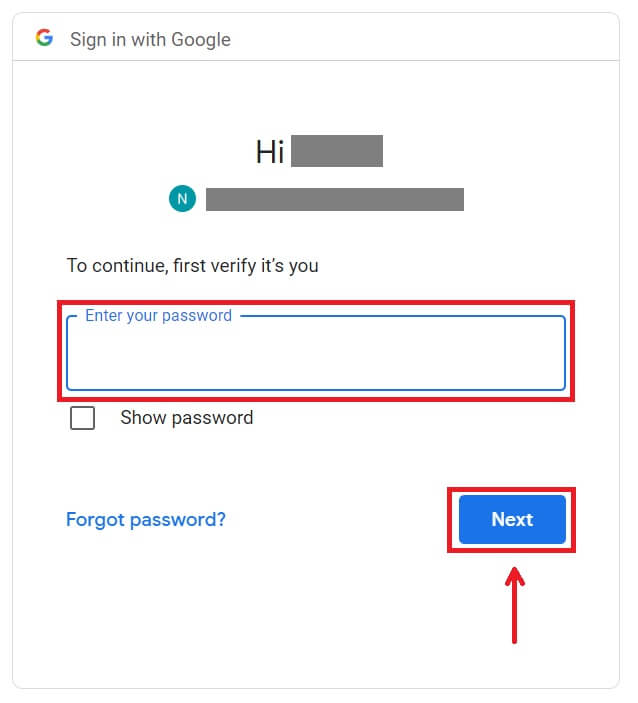
4. Enter your email and password, then click [Next].
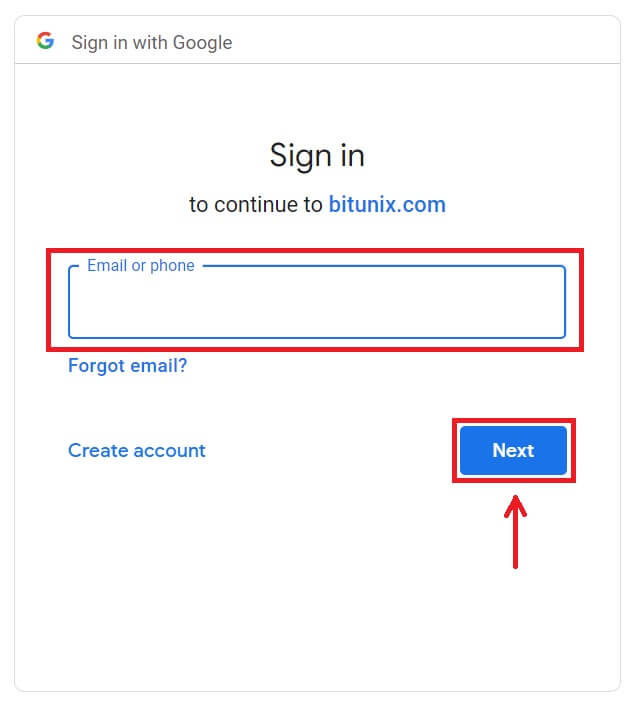
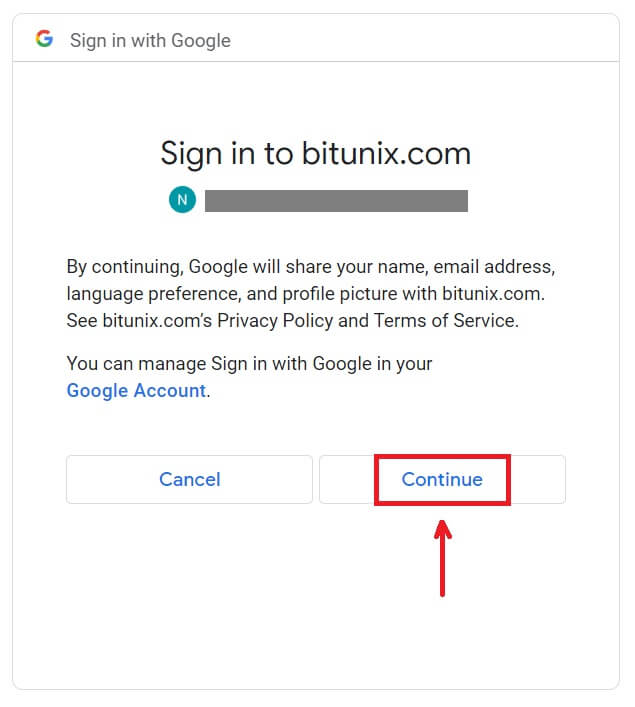
 Confirm the usage of the account by clicking [Continue].
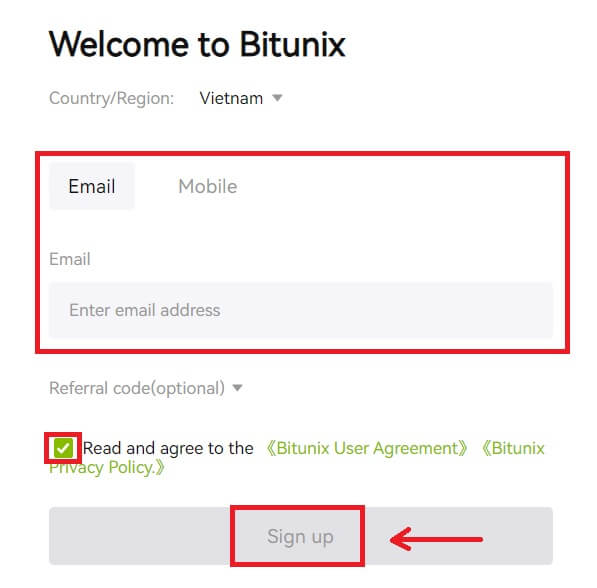
 5. Fill in your information to create a new account. Then [Sign up].
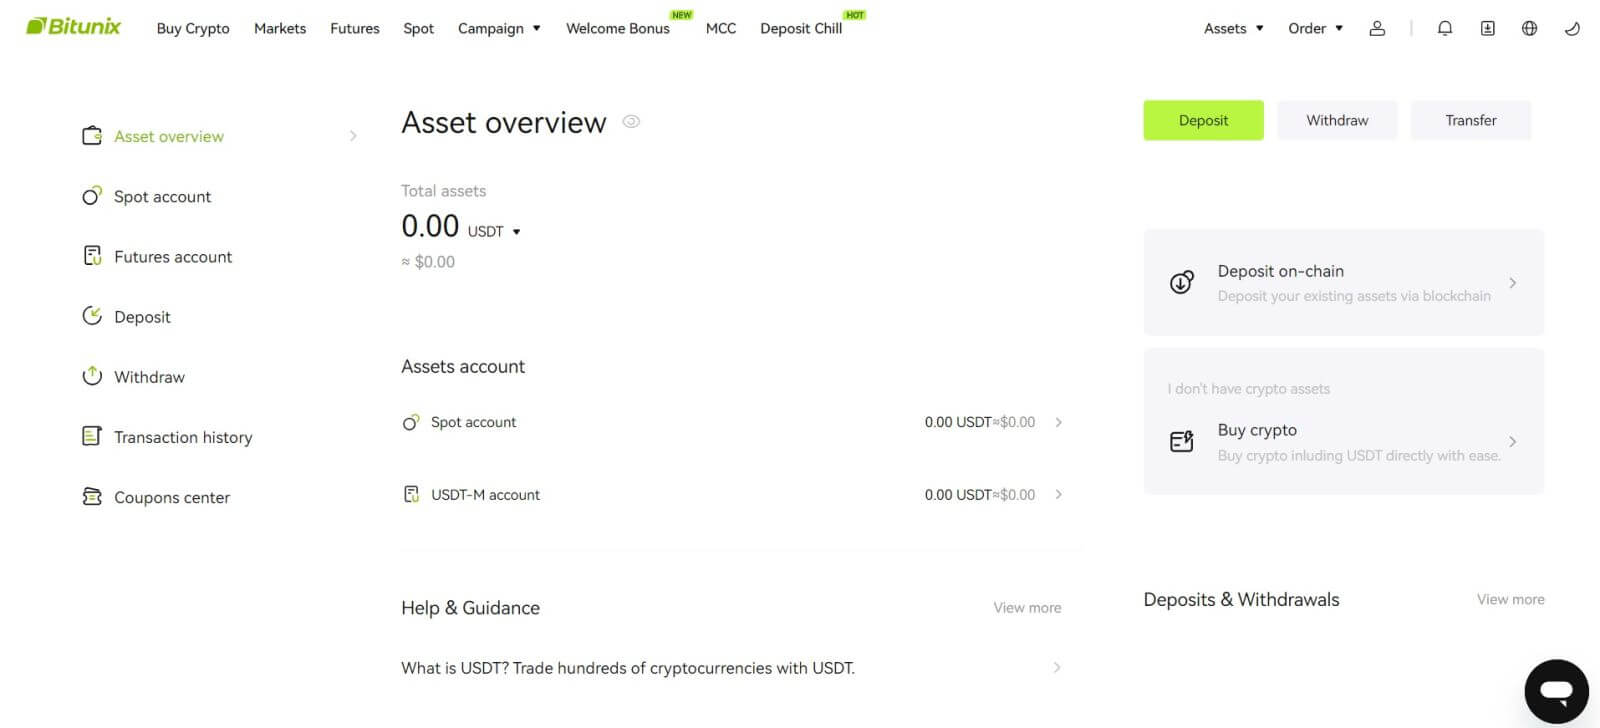
 6. Congratulations! You have successfully created a Bitunix account.
How to Open an Account on the Bitunix App
You can register for a Bitunix account with your email address, phone number, or your Apple/Google account on the Bitunix App easily with a few taps.
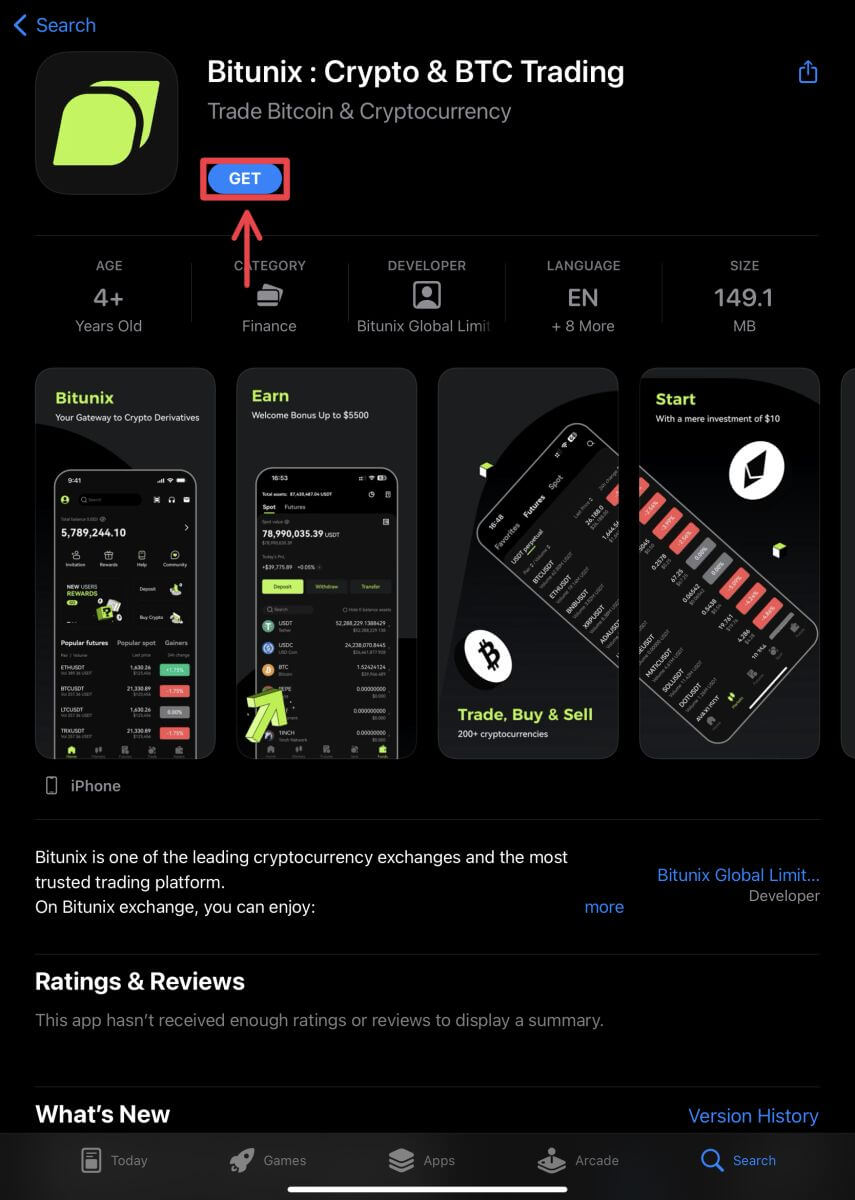
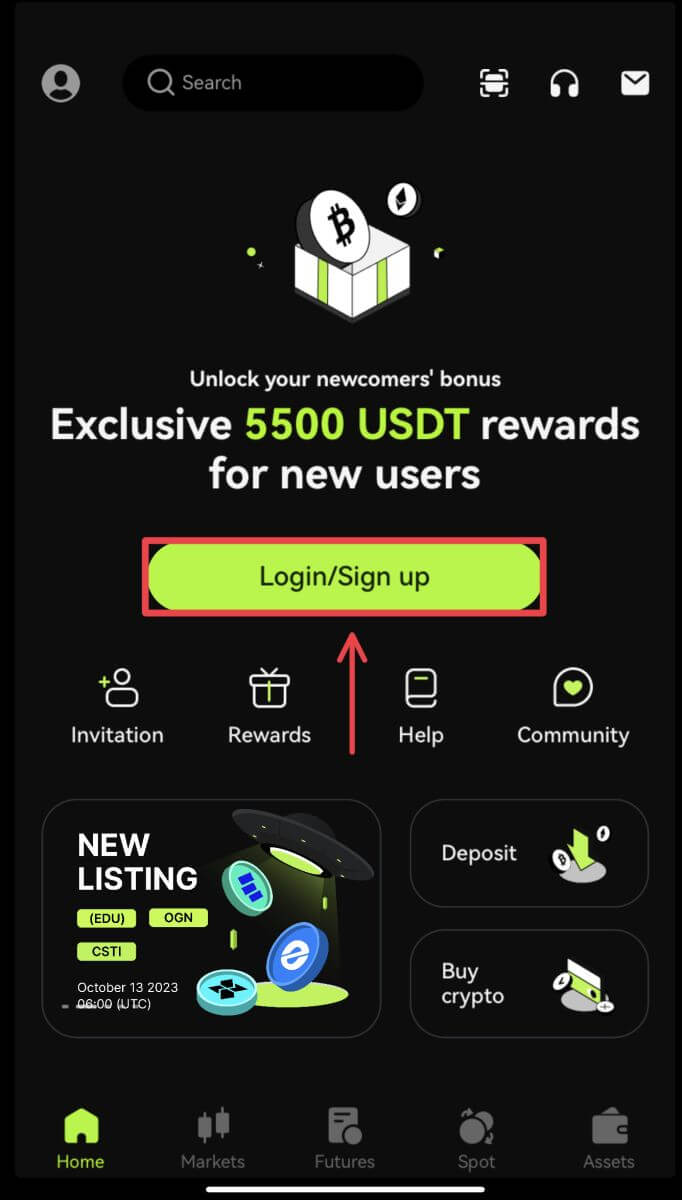
1. Download the Bitunix App and click on [Login/Sign up].
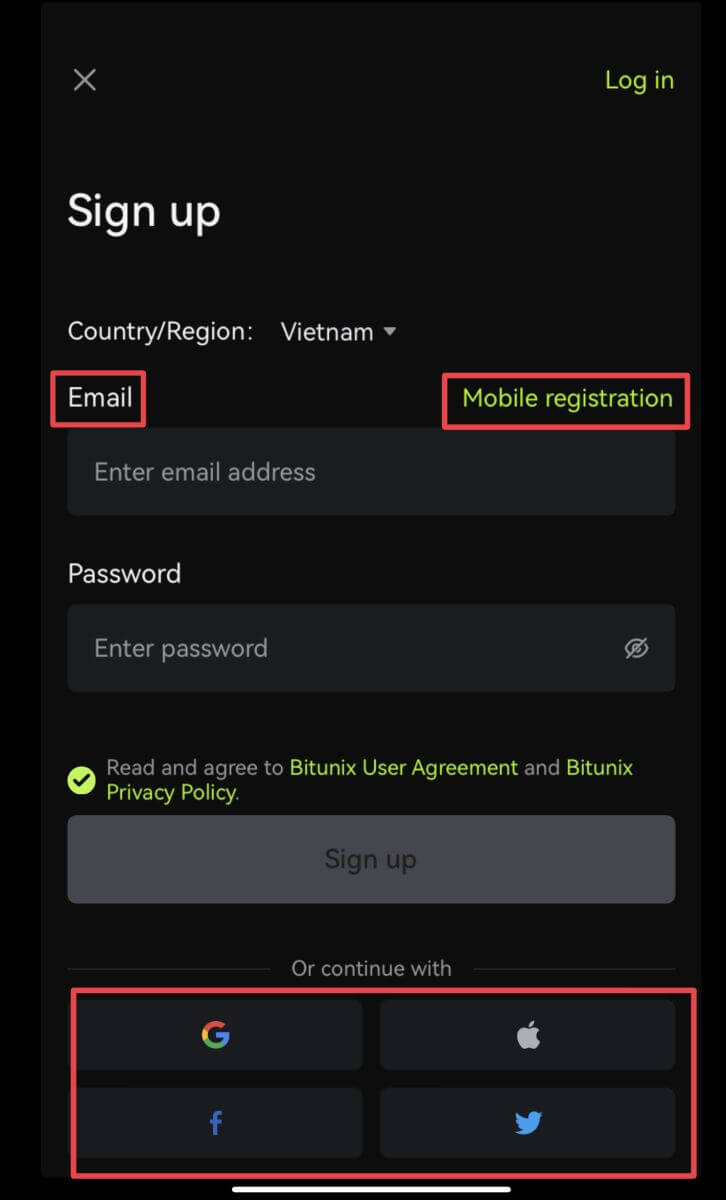
 2. Select a registration method. The option to Sign up using Facebook and X (Twitter) is currently unavailable.
Sign up with your email/phone number:
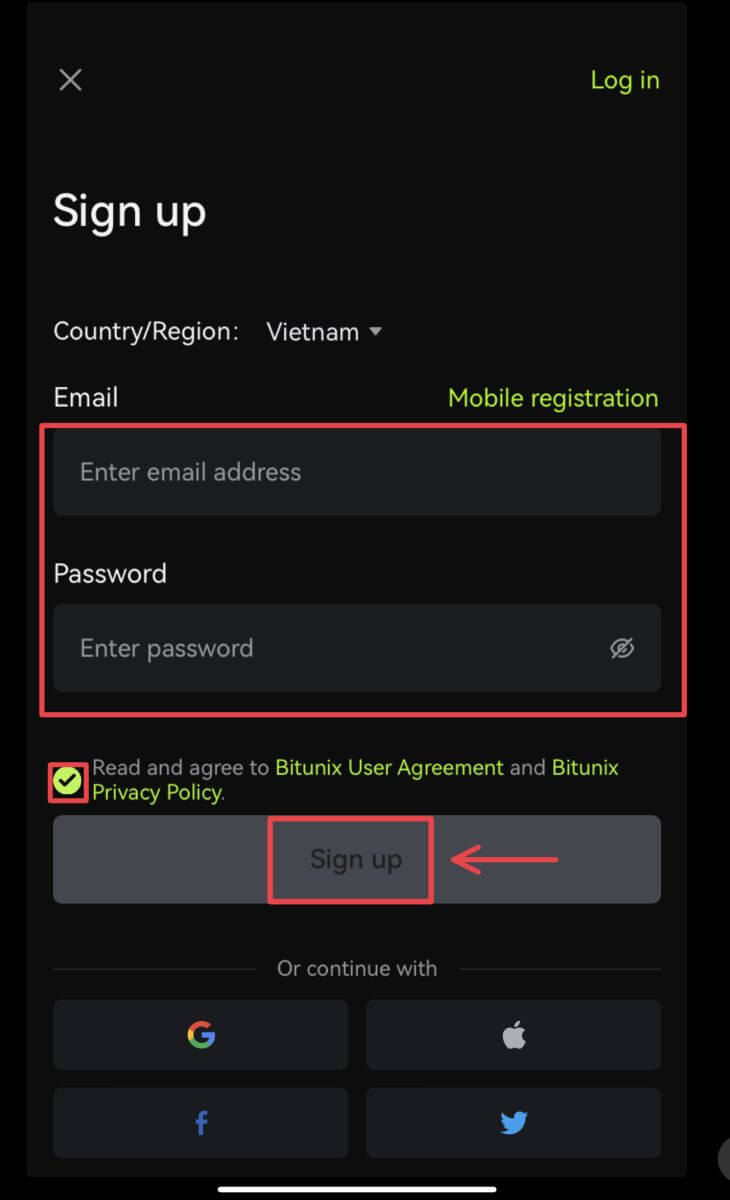
3. Select [Email] or [Mobile registration] and enter your email address/phone number and password.
 Note:
Note:
Your password must contain at least 8 characters, including one uppercase letter and one number.
Read and agree to the Terms of Service and Privacy Policy, then tap [Sign up].
4. Complete the verification process. You will then receive a 6-digit verification code in your email or phone. Enter the code and tap [Access Bitunix].
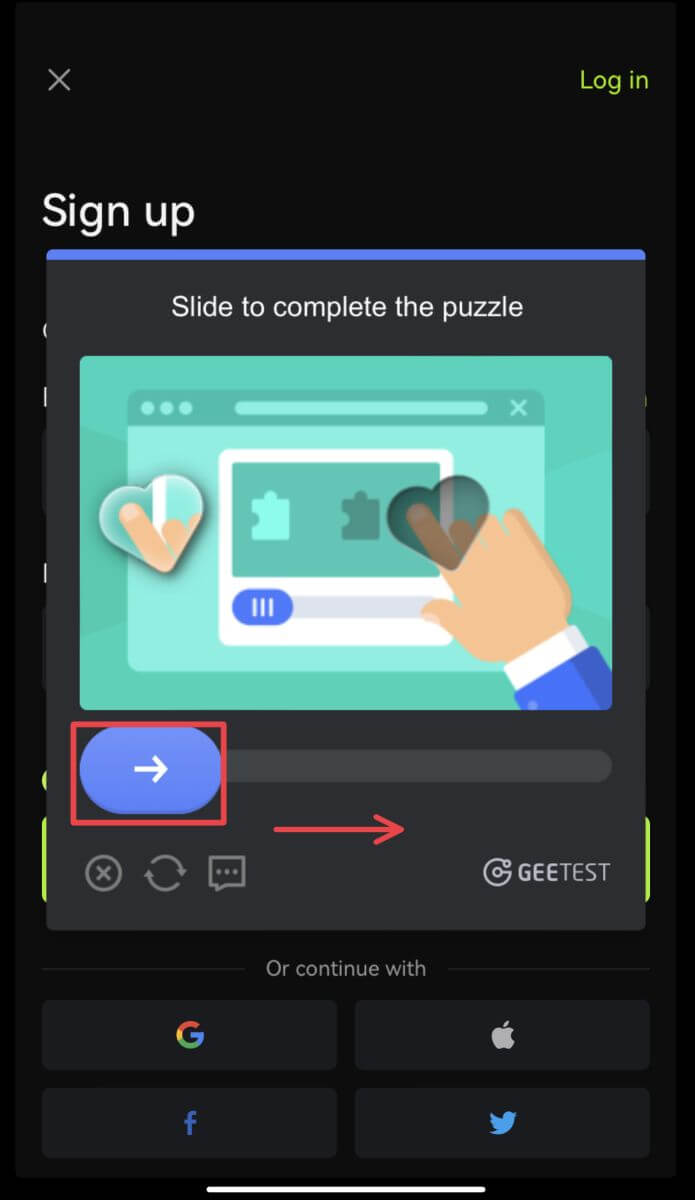
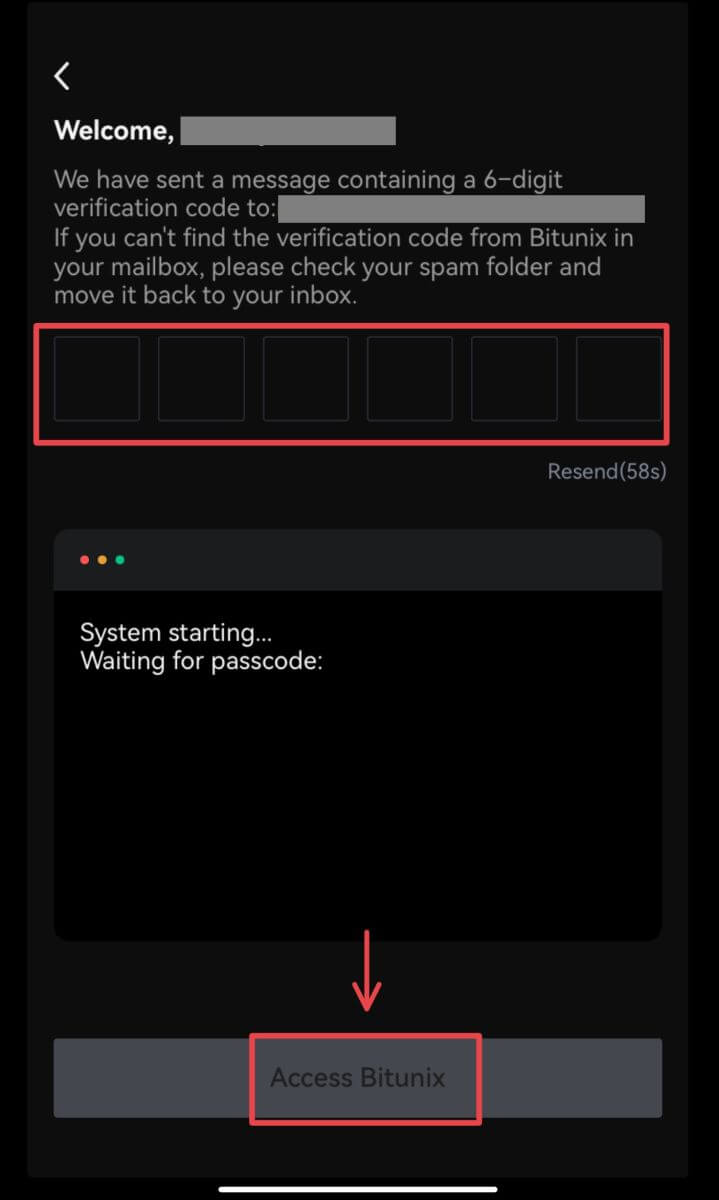 5. Congratulations! You have successfully created a Bitunix account.
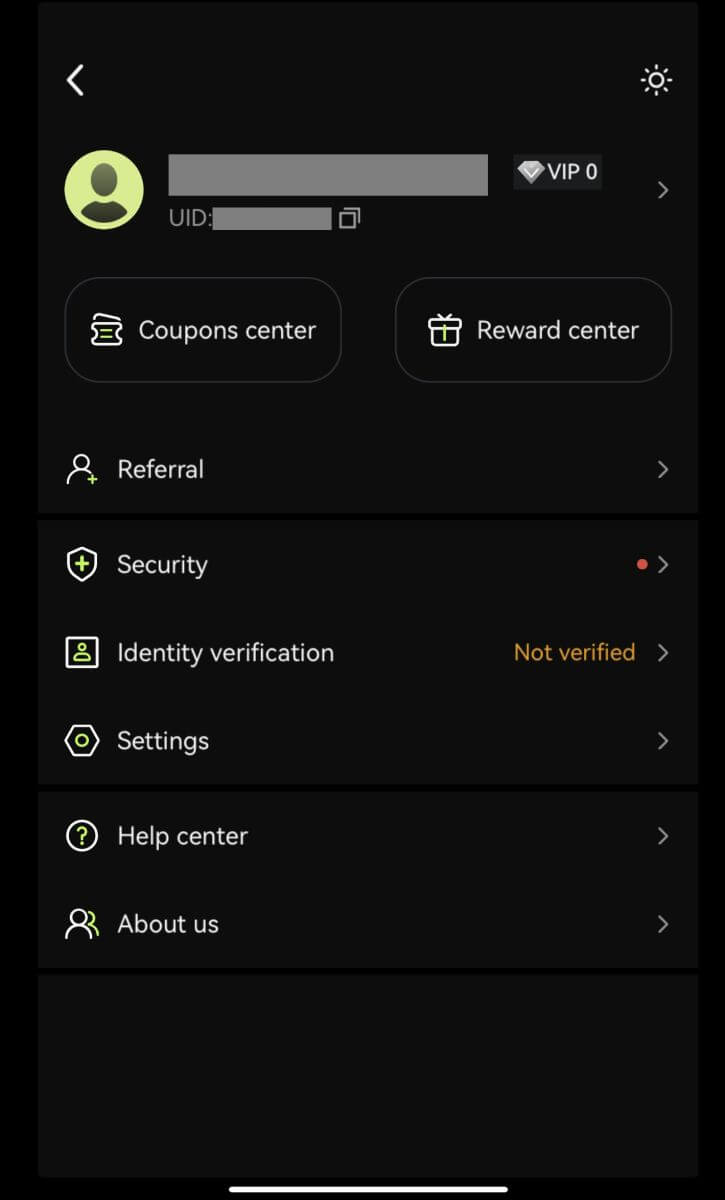
Sign up with your Google account
3. Select [Google]. You will be prompted to sign in to Bitunix using your Google account. Tap [Continue].
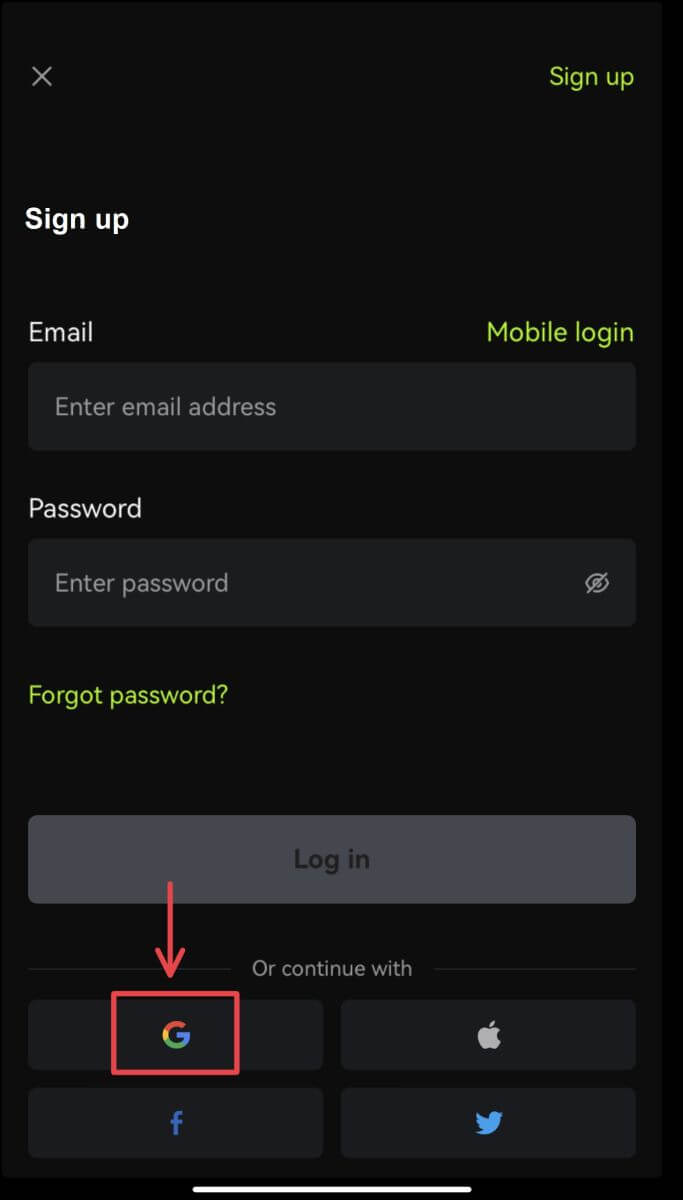
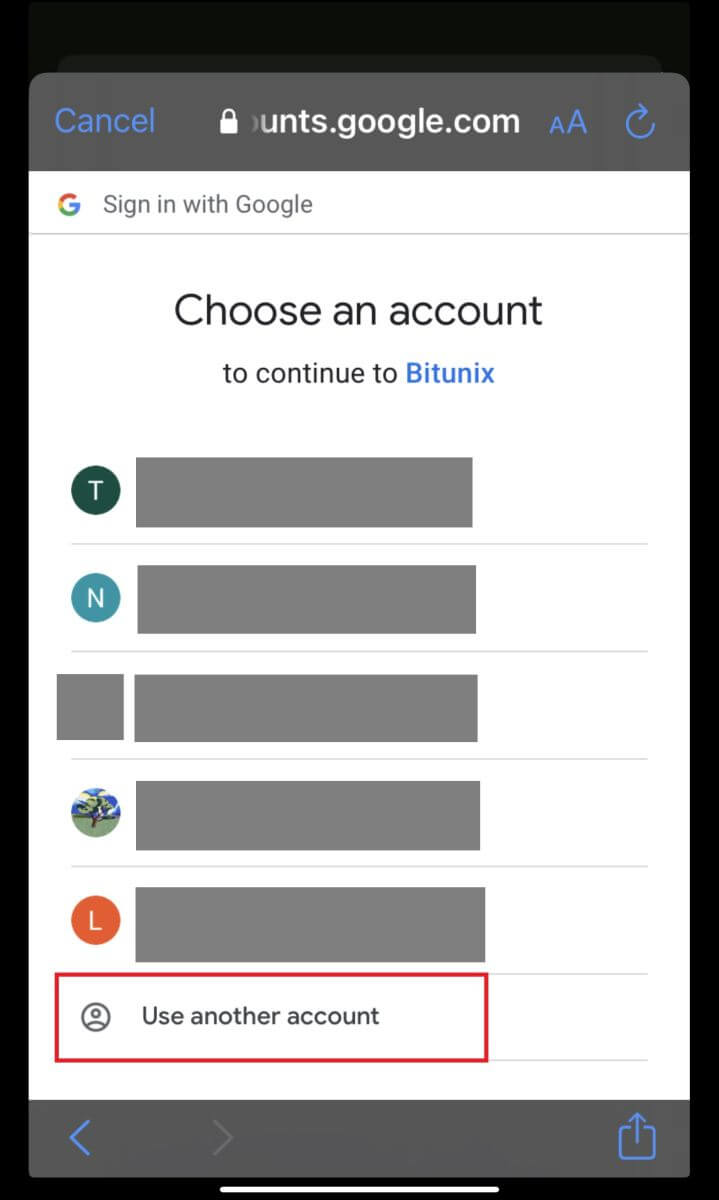
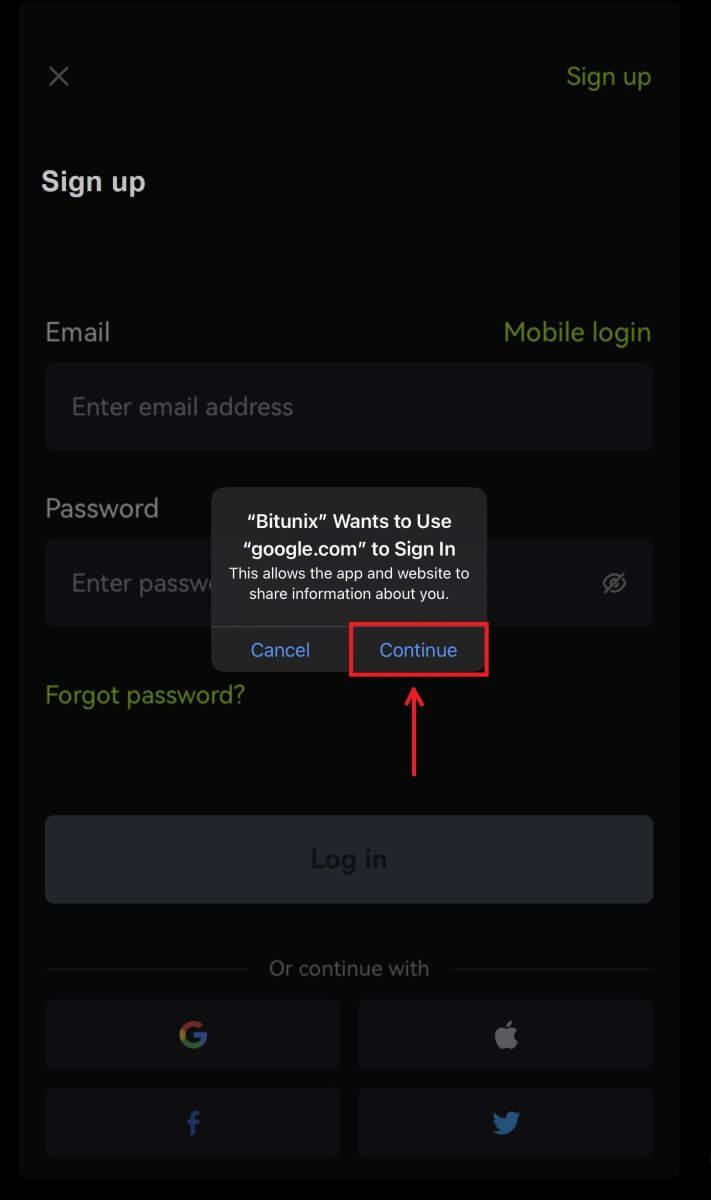 4. Choose your preferred account.
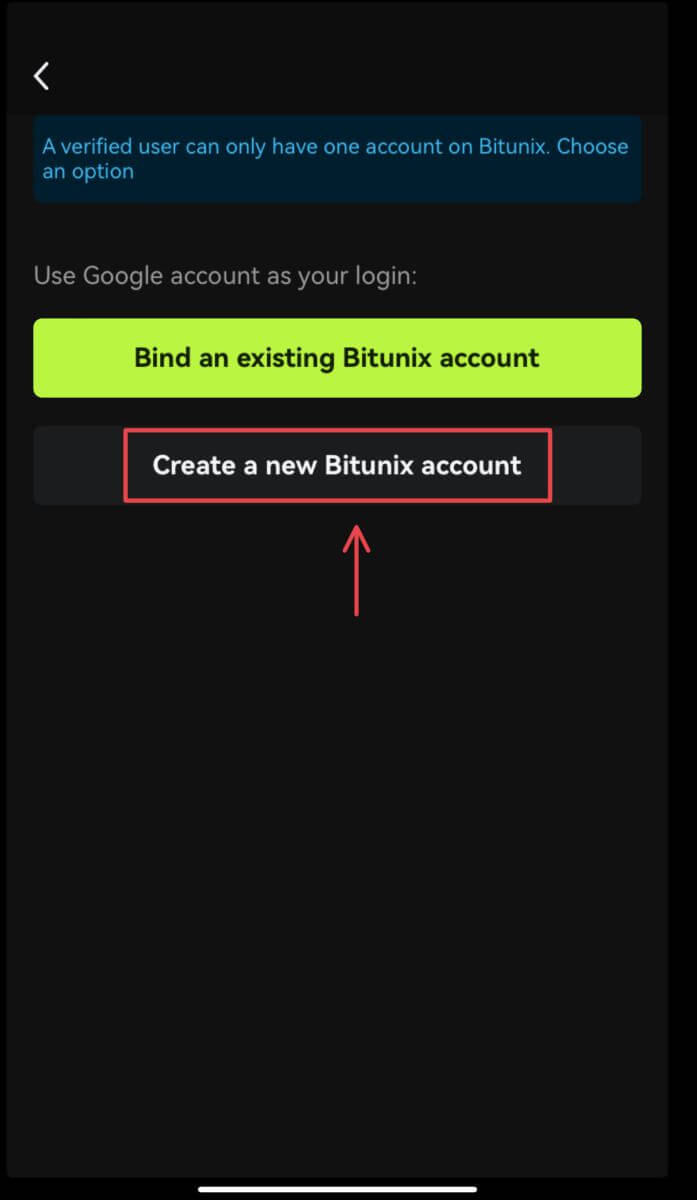
 5. Click [Create a new Bitunix account] and fill in your information. Agree to the terms and click [Sign up].
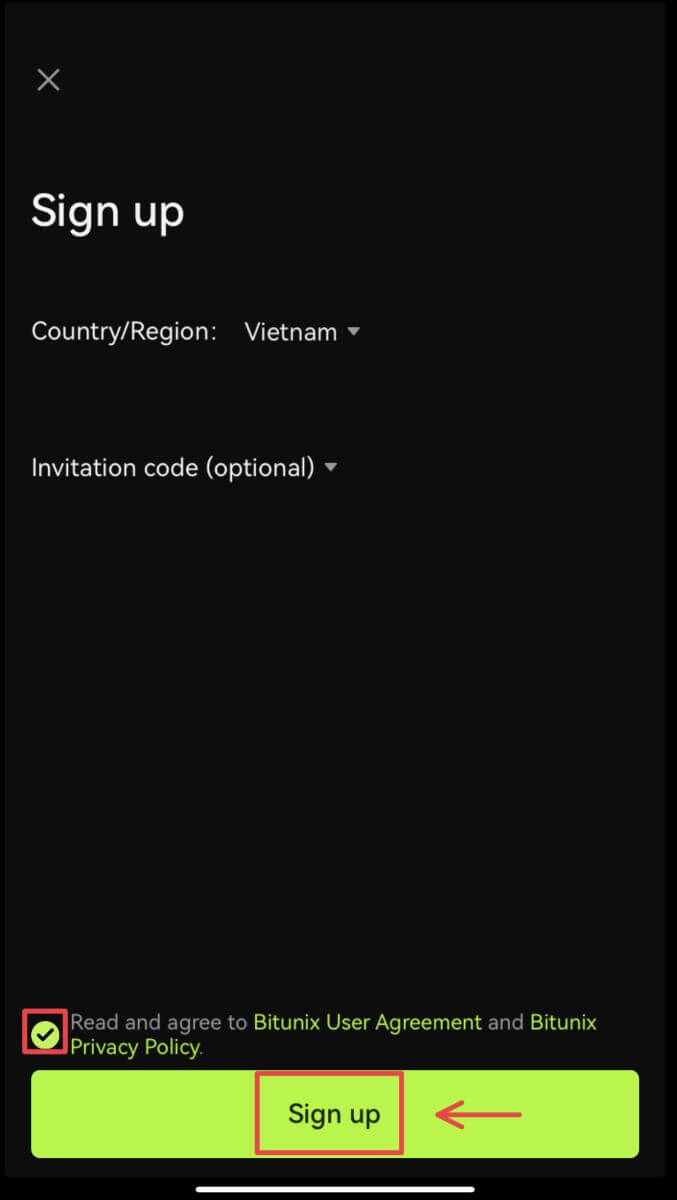 6. You’re done with registration and can begin to trade on Bitunix.
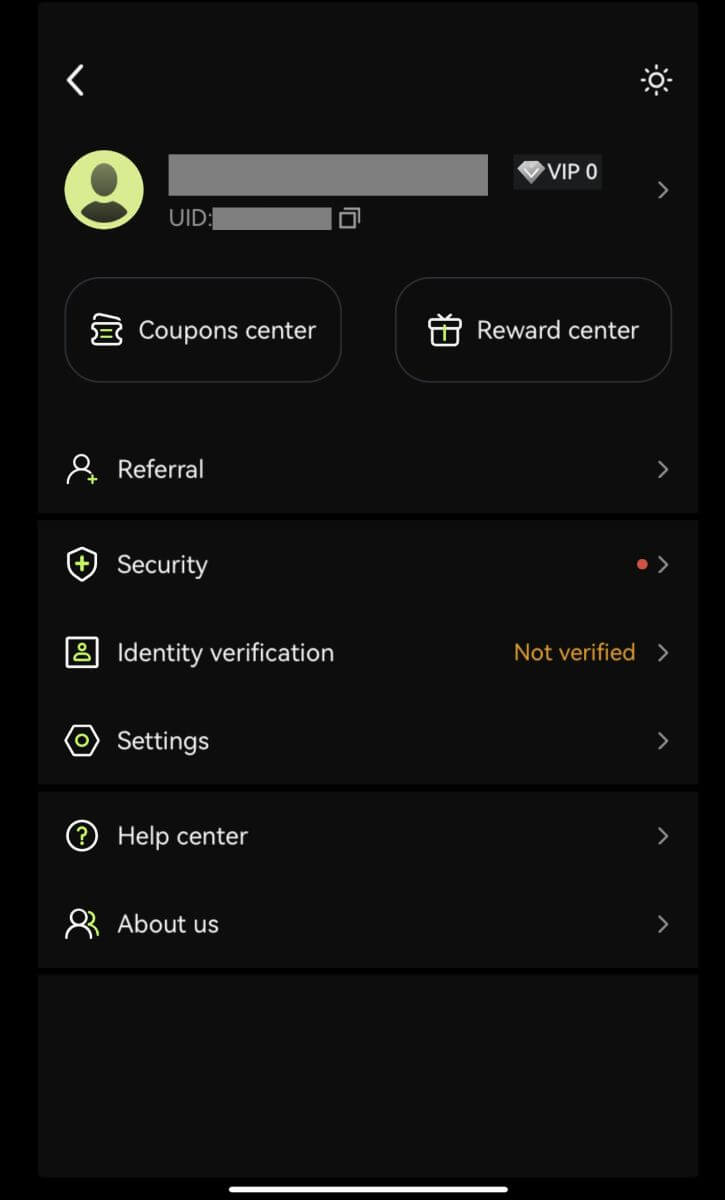
Sign up with your Apple account:
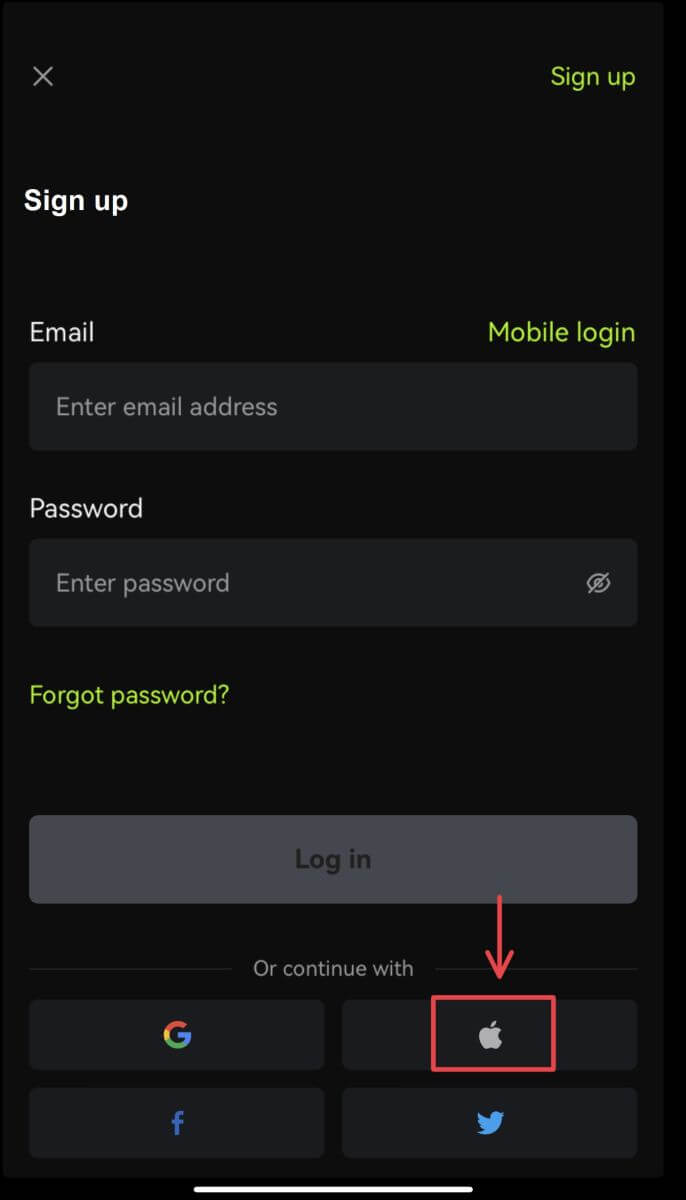
3. Select [Apple]. You will be prompted to sign in to Bitunix using your Apple account. Tap [Continue with Passcode].
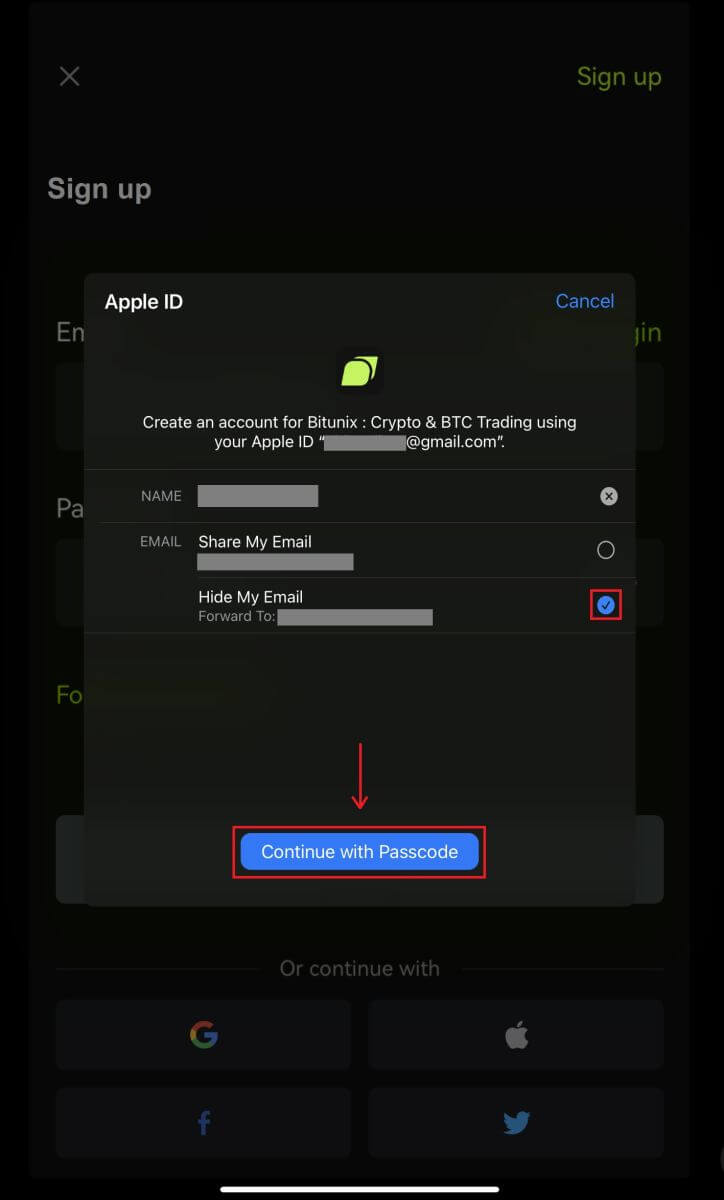 4. Fill in your information. Agree to the terms and click [Sign up].
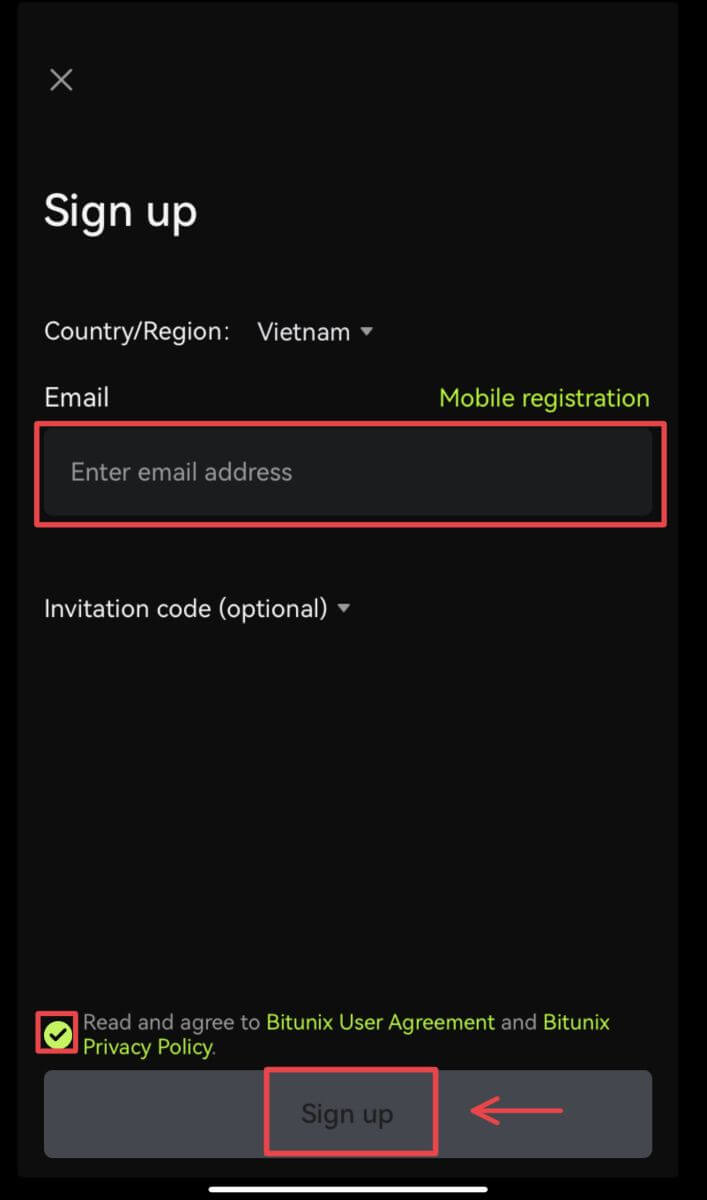
5. You’re done with registration and can begin to trade on Bitunix.
How to Verify Account on Bitunix
Where can I get my account verified?
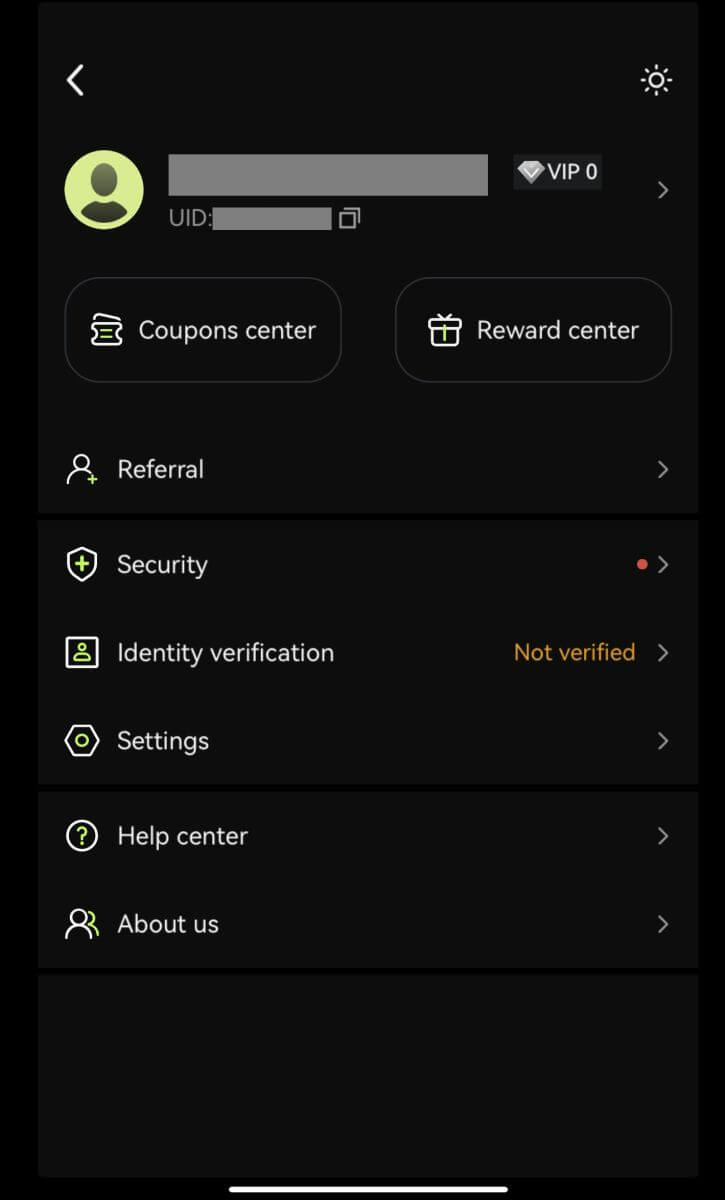
You can access the Identity Verification from your [Avatar] - [KYC]. You can check your current verification level on the page, which determines the trading limit of your Bitunix account. To increase your limit, please complete the respective Identity Verification level.
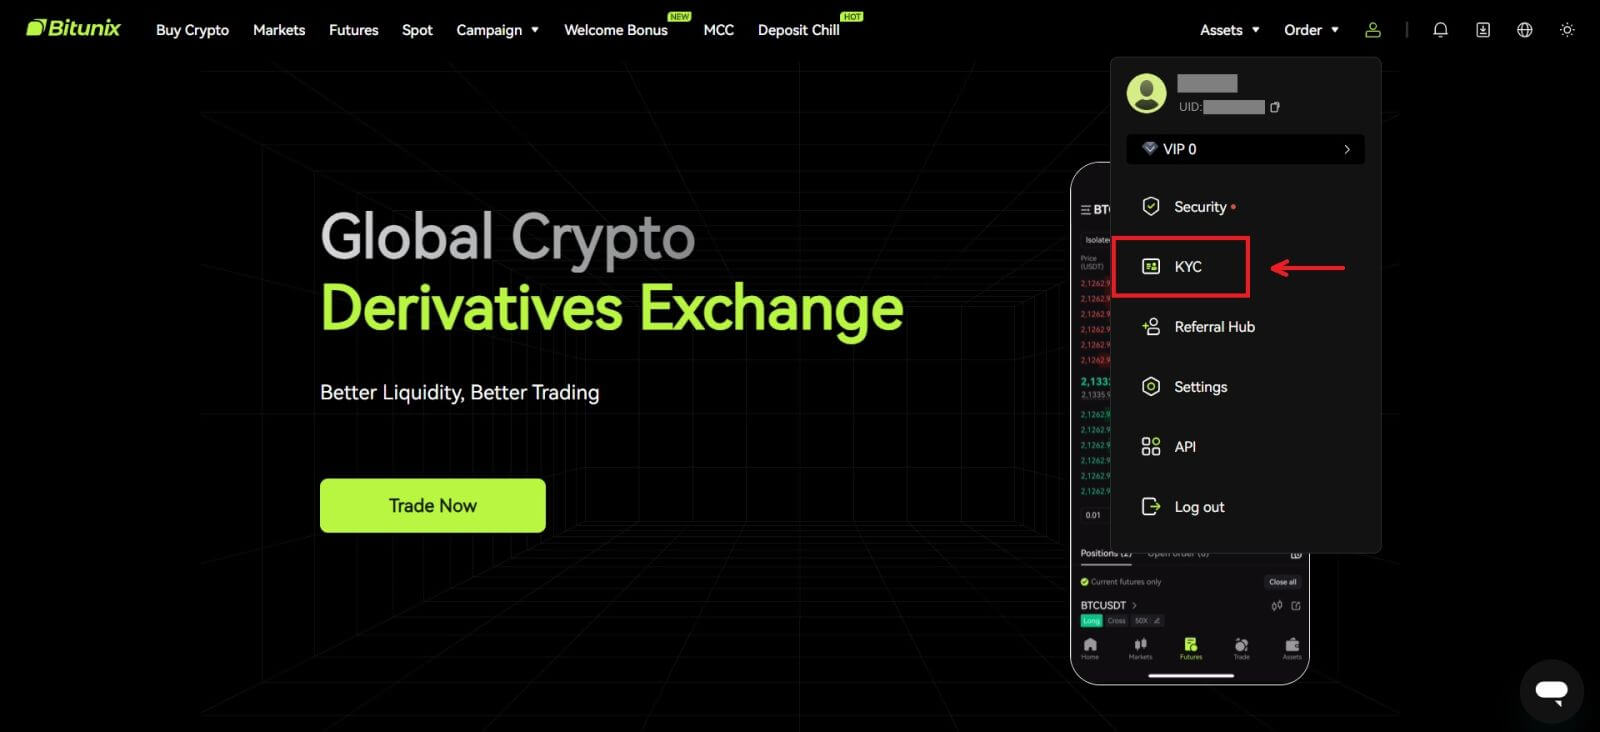
How to complete Identity Verification? A step-by-step guide
Basic Verification
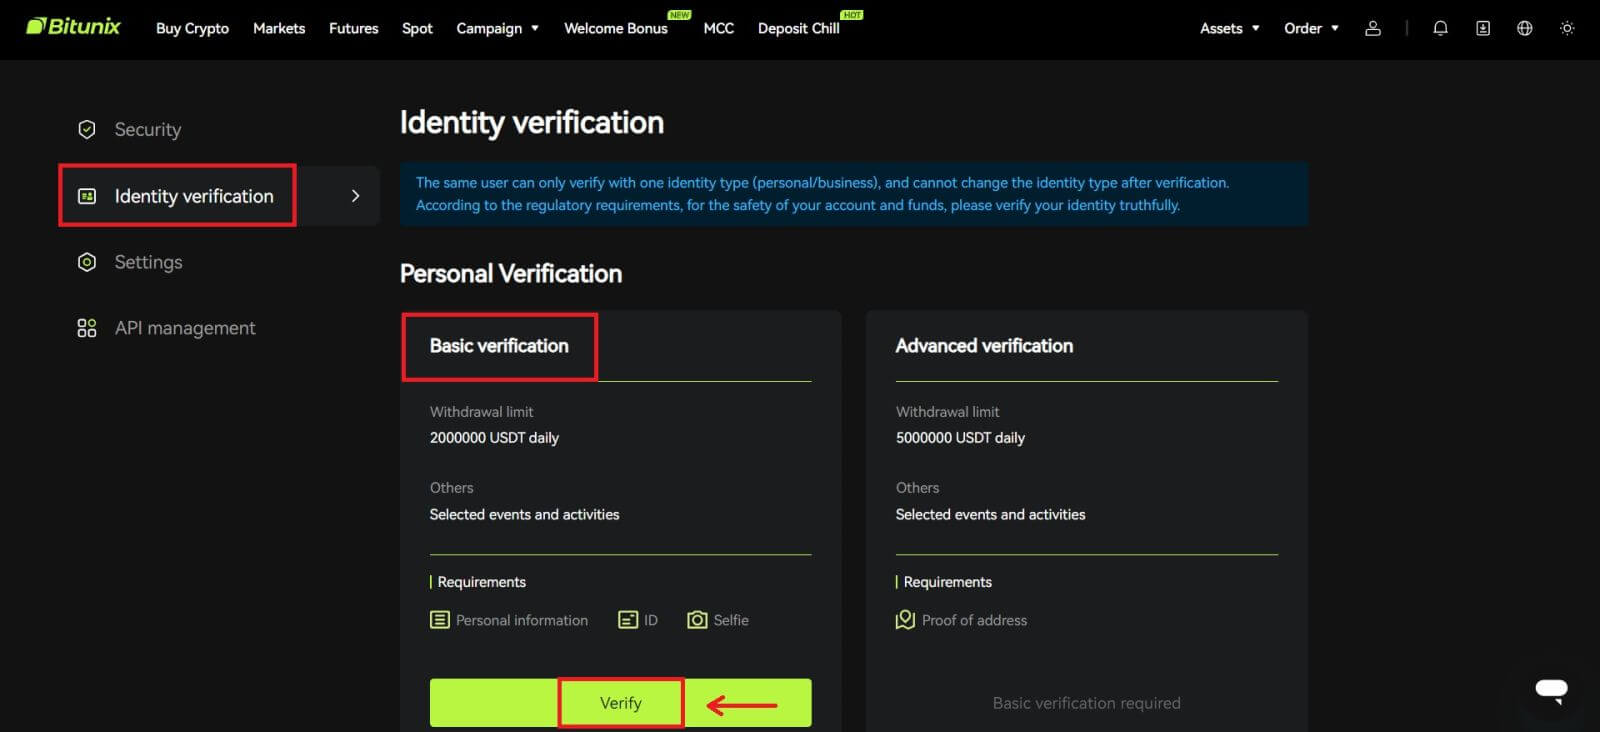
1. After landing on the “Identity verification” page, select “Basic Verification”, or “Advanced Verification” (Completing basic verification is required before advanced verification). Click [Verify].
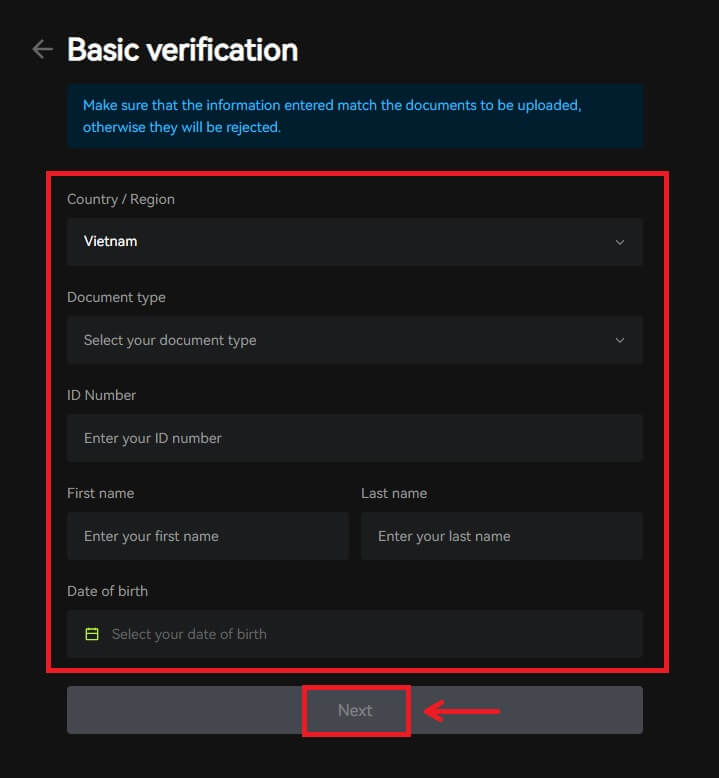
2. Select country or region, ID type, and enter your ID number, name and date of birth following the instructions, click [Next].
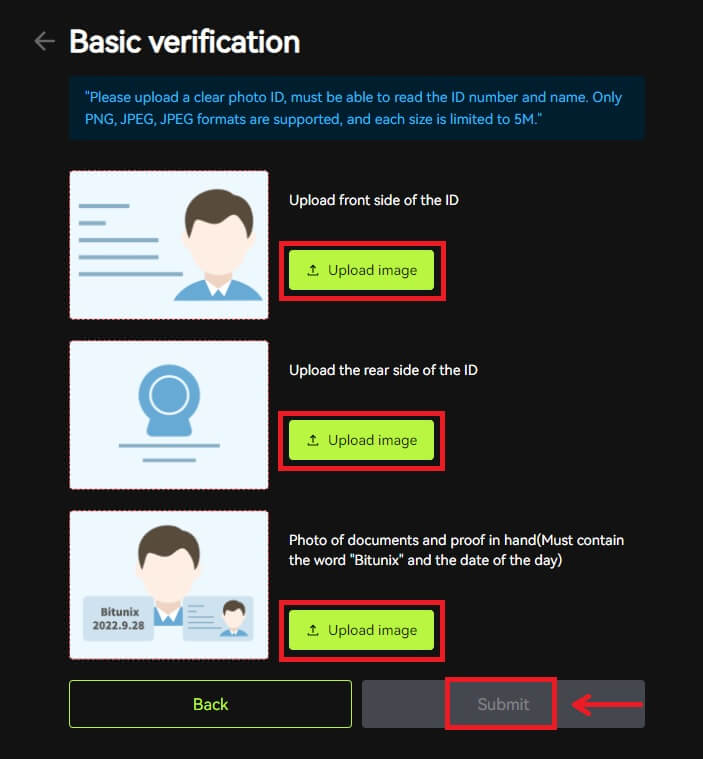
3. Upload the front and the back of your selected ID, as well as a photo of you holding your ID and a paper with Bitunix and the current date written, click [Submit]. KYC verification will be completed after Bitunix reviews the documents and the information you have submitted.
Advanced Verification
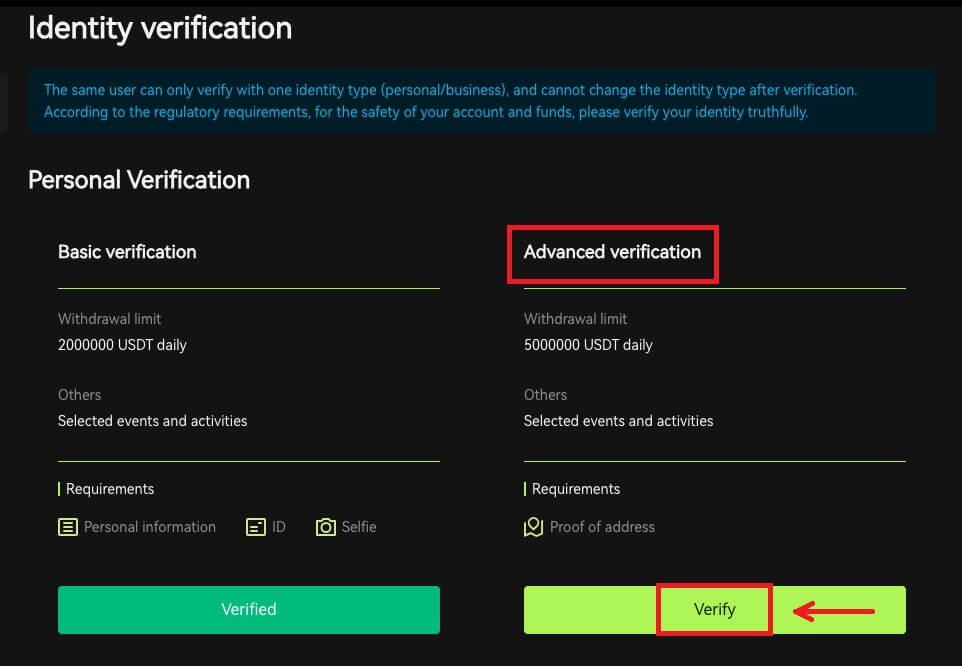
1. After completing the basic verification, you can now verify for advanced verification. Click [Verify] to start.
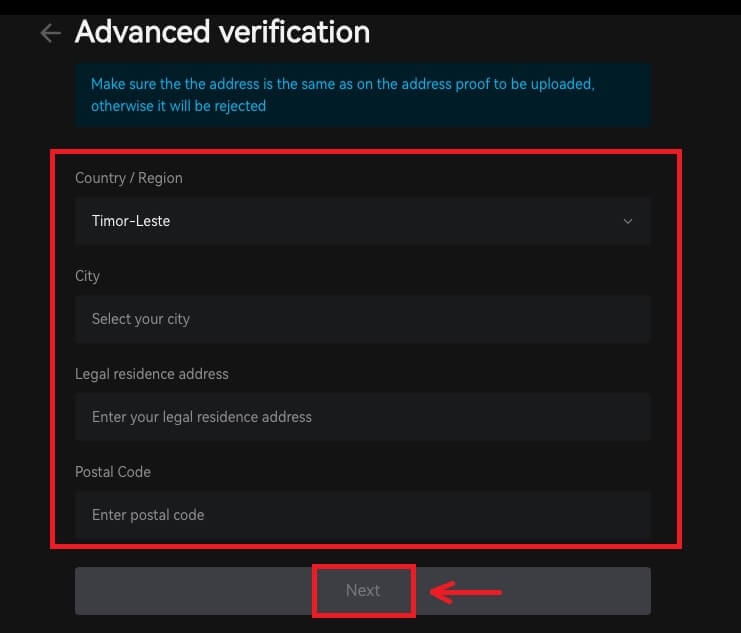
2. Select the country/region, and enter the city, legal residence address and postal code, click [Next].
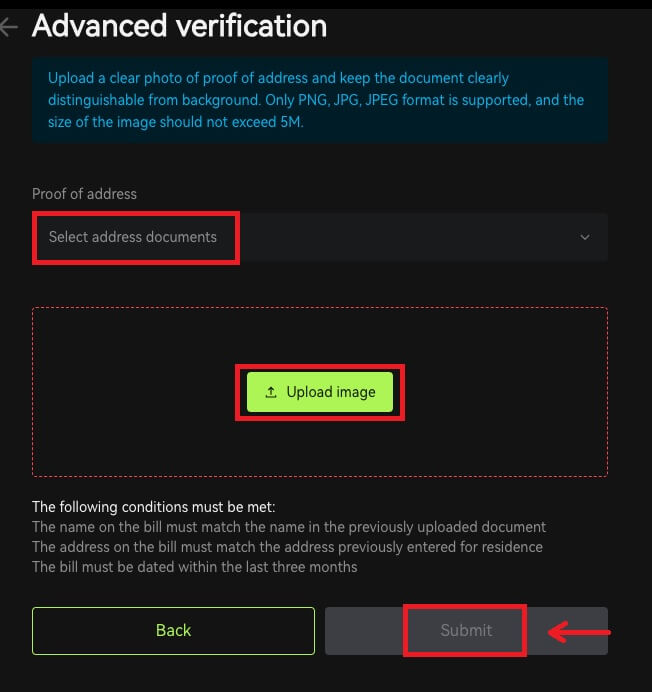
 3. Upload a valid proof of address following the instructions, click [Submit]. Advanced KYC verification will be completed after Bitunix reviews the documents and the information you have submitted.
Note
1. Identity Cards must have a photo with both sides. Please provide official English translation for Non-Roman Letters.
2. Please provide a photo of you holding your passport or photo ID. In the same picture, you need to write down the date - and a note with the word ’Bitunix’. Make sure your face is clearly visible and that all information on the ID is clearly readable.
3. Proof of address (a statement such as a utility bill, letter from a government dept., tax statement outside of your banking information no older than 90 days - clearly indicating your name and residential address. The document must be in Roman Lettering, or a certified English translation should be uploaded in addition to the original document.
4. Accepted document types: JPG /PNG/JPEG, and the maximum size of the files is 5M.
How to Deposit on Bitunix
How to Buy Crypto with Credit/Debit Card on Bitunix via Third-party
Buy Crypto with Credit/Debit Card (Web)
1. Log in to your Bitunix account and click [Buy Crypto].
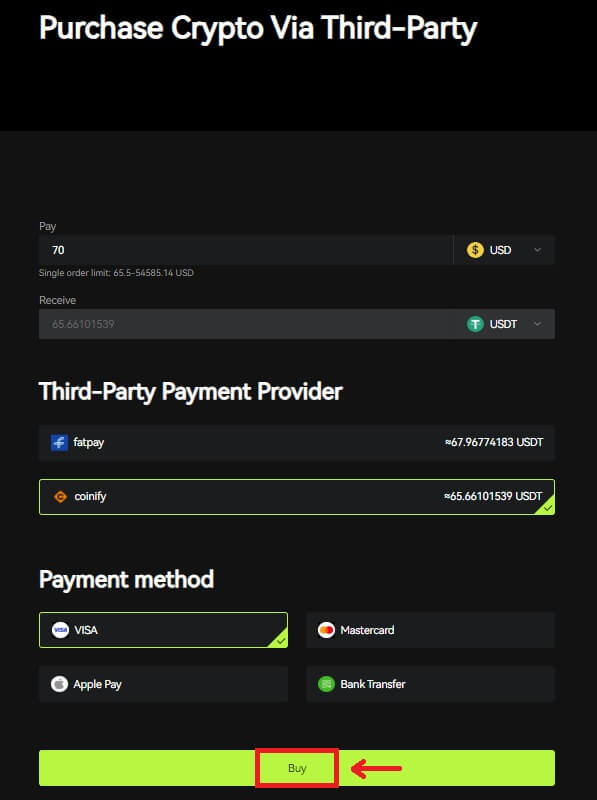
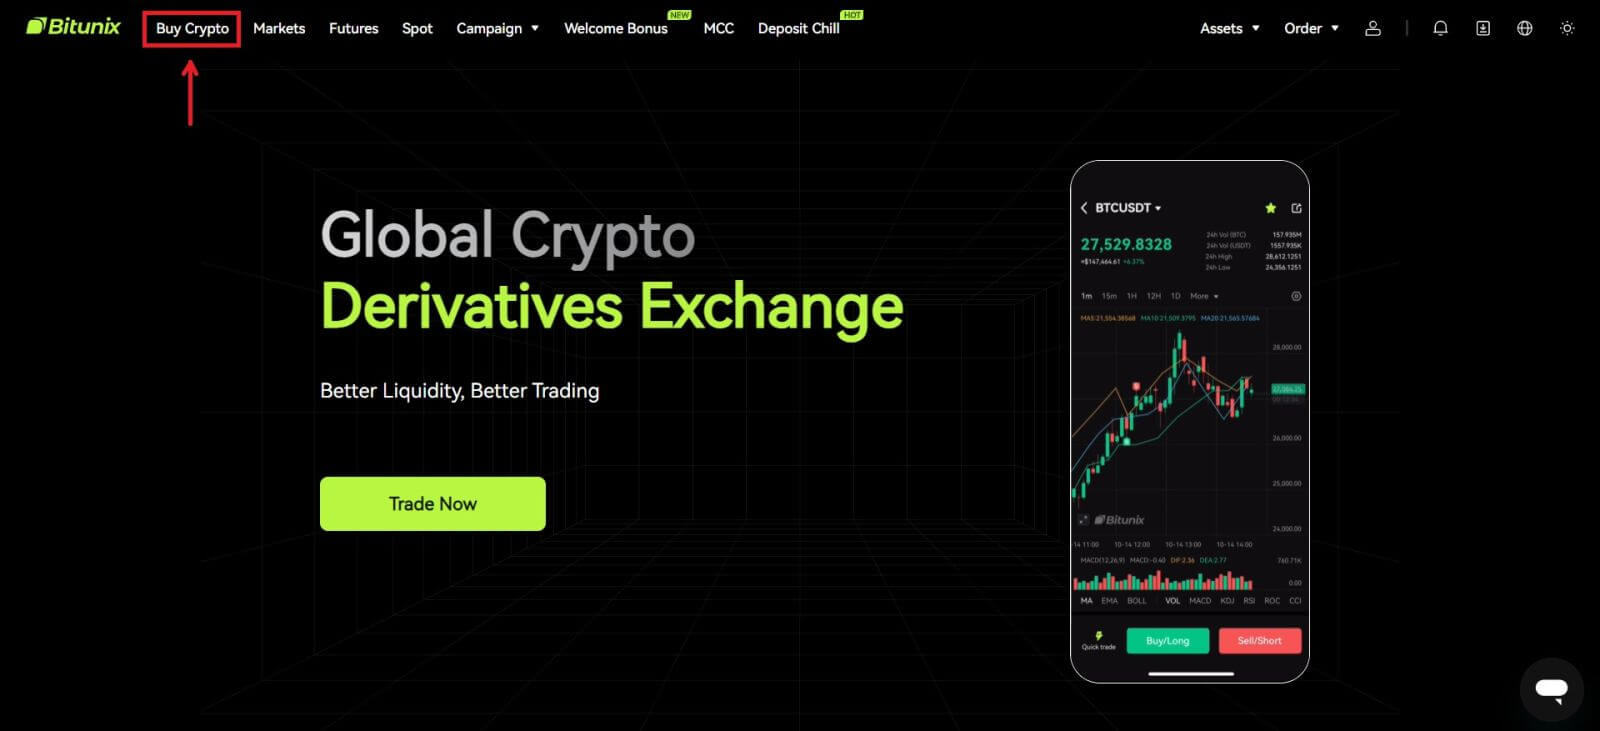 2. For the time being, Bitunix only supports buying crypto via third-party providers. Enter the amount you want to spend and the system will automatically display the amount of crypto you can get. Choose your preferred Third-party provider and Payment method. Then click [Buy].
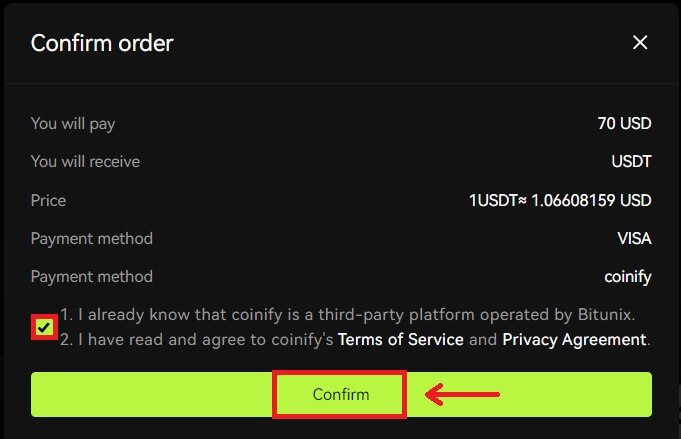
 3 Check your order, tick the Acknowledge box and [Confirm].
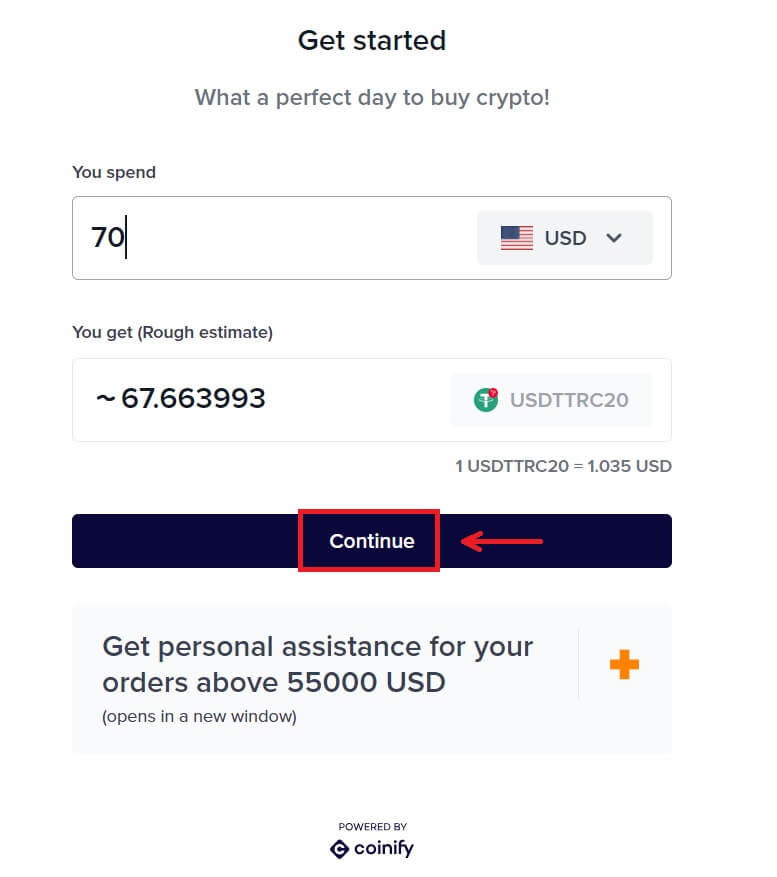
 4. You will be directed to the provider’s page, click [Continue].
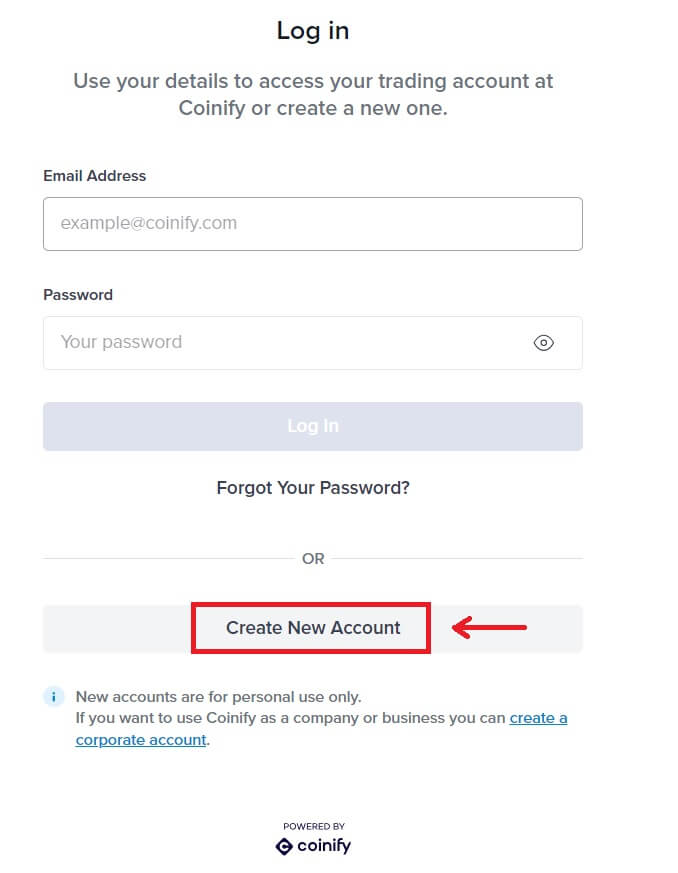
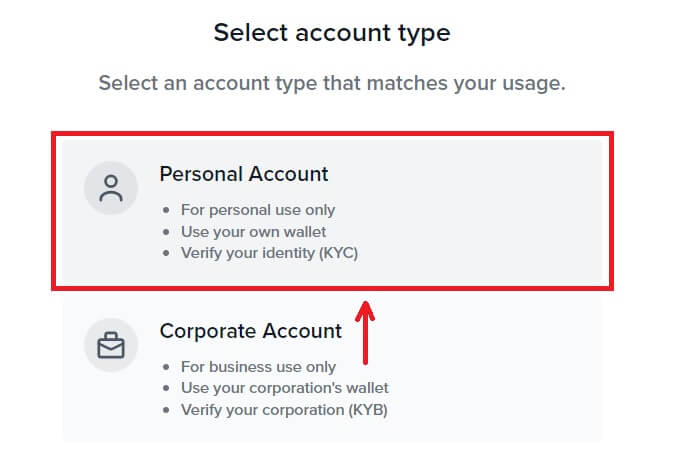
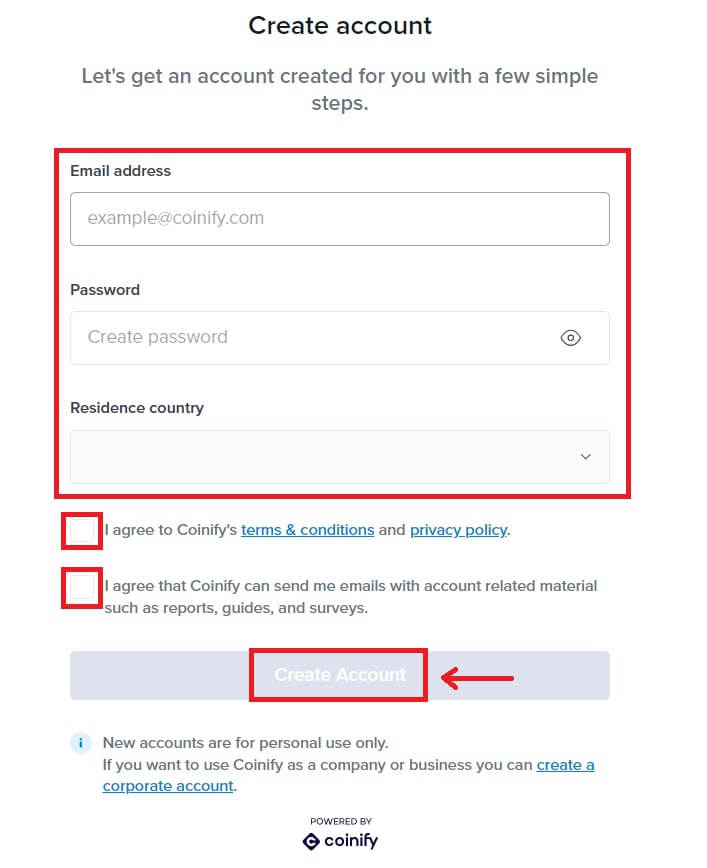
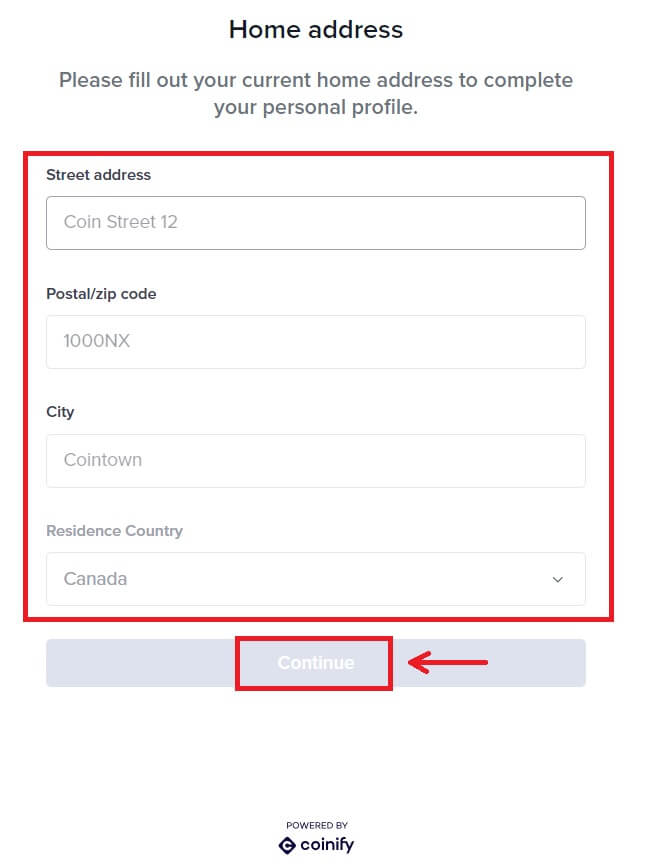
 5. You need to create an account on the provider’s page. Click [Create New Account] - [Personal Account].
Fill in all the required information.
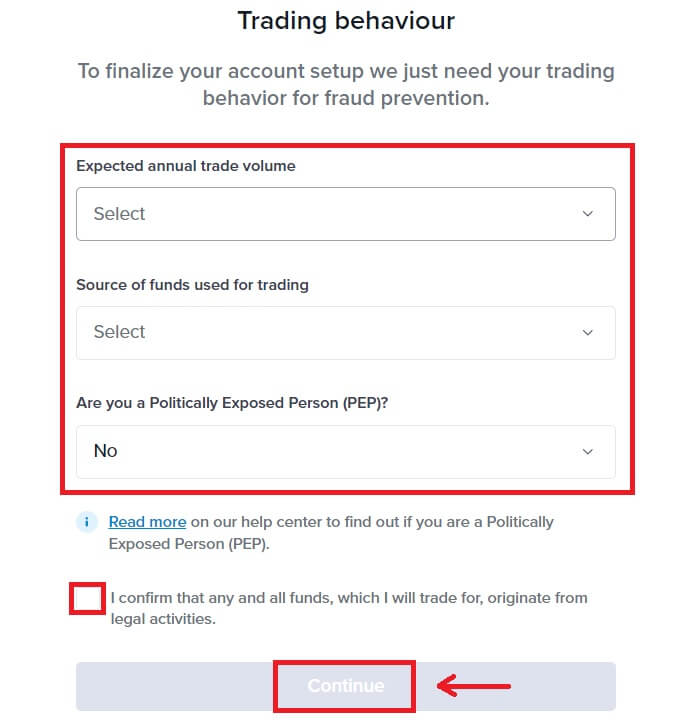
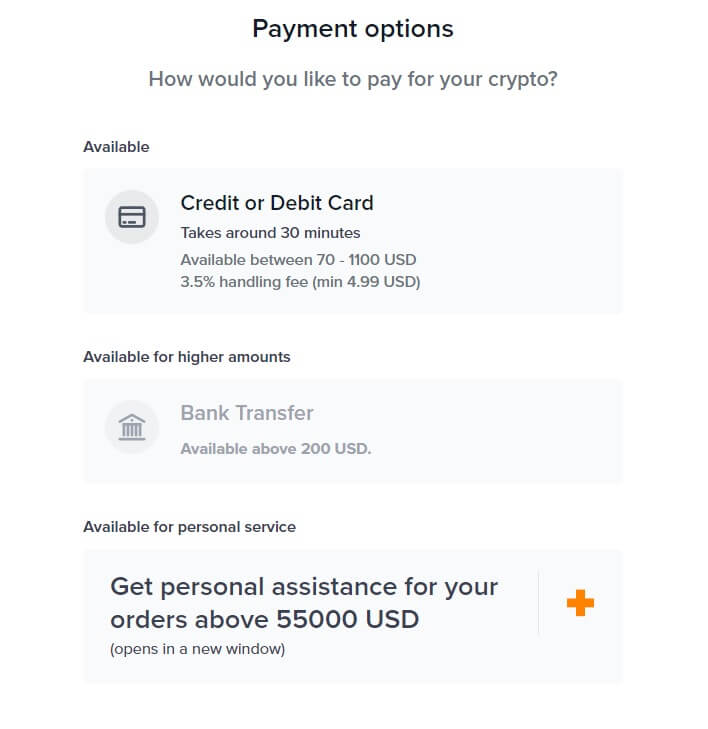
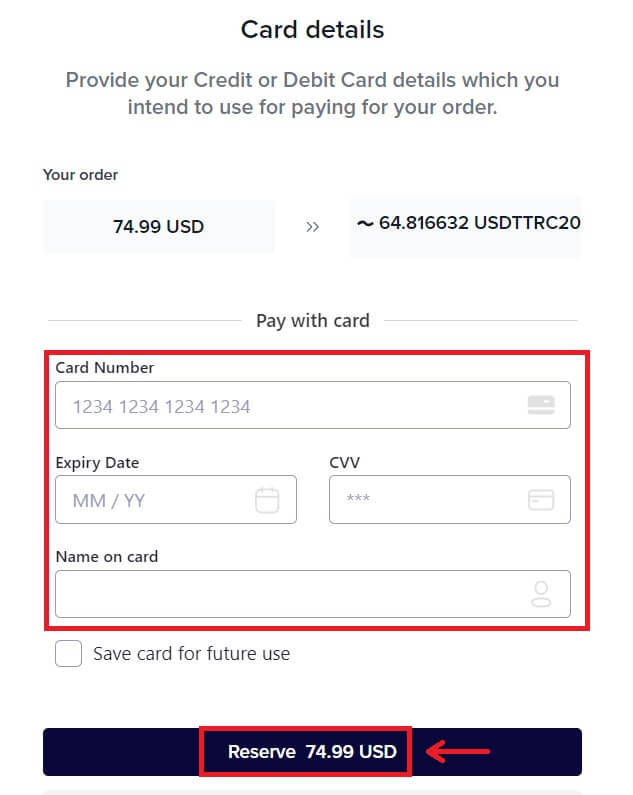
6. Choose your preferred payment method. Fill in the information of your card. Then click [Reserve].
 7. Wait for your order’s transaction.
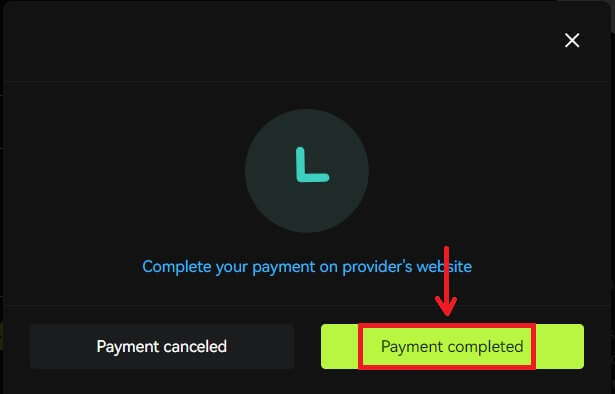
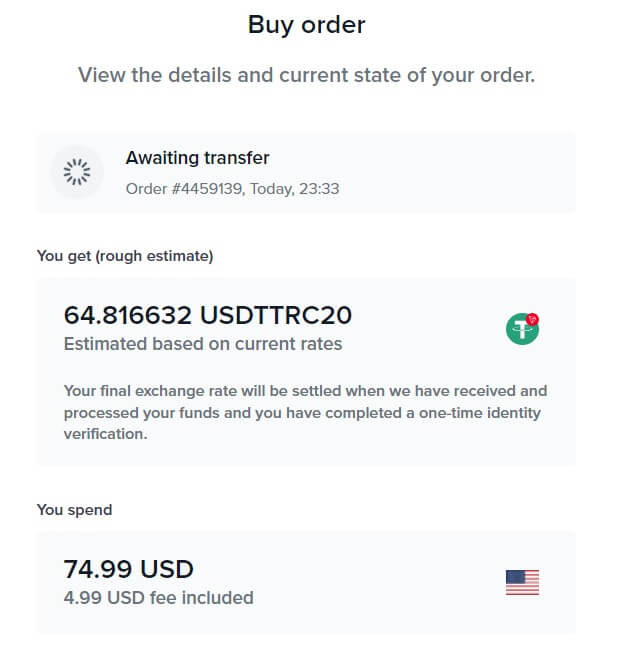 8. Go back to Bitunix and click [Payment completed].
Buy Crypto with Credit/Debit Card (App)
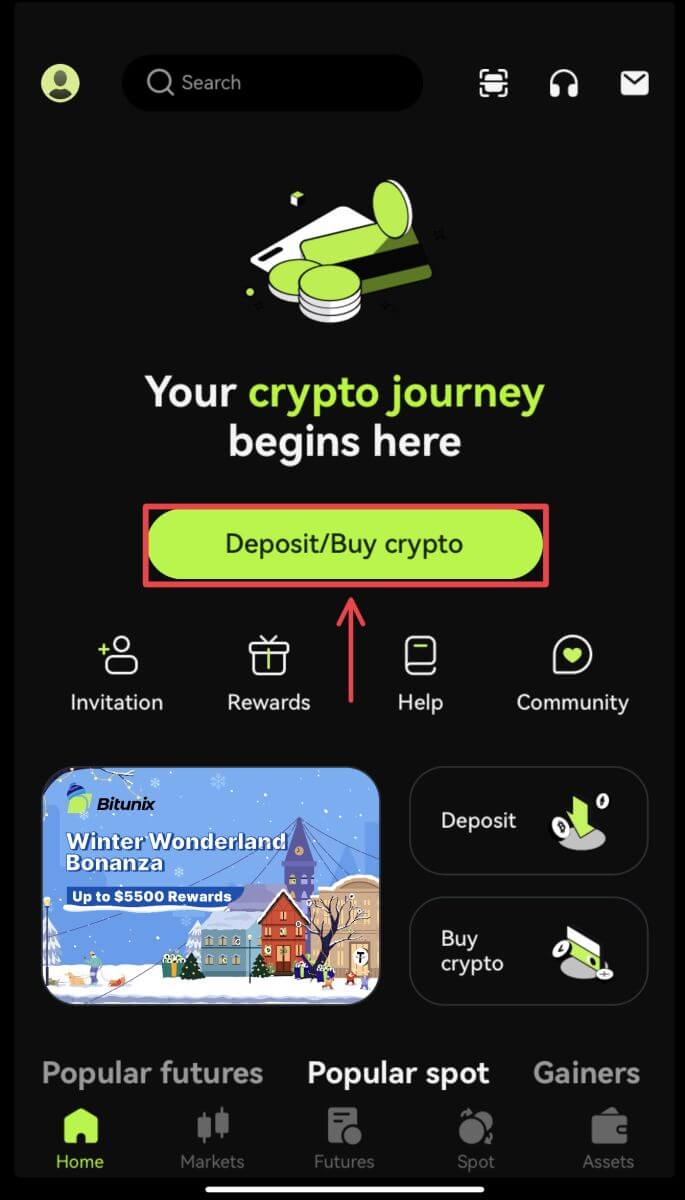
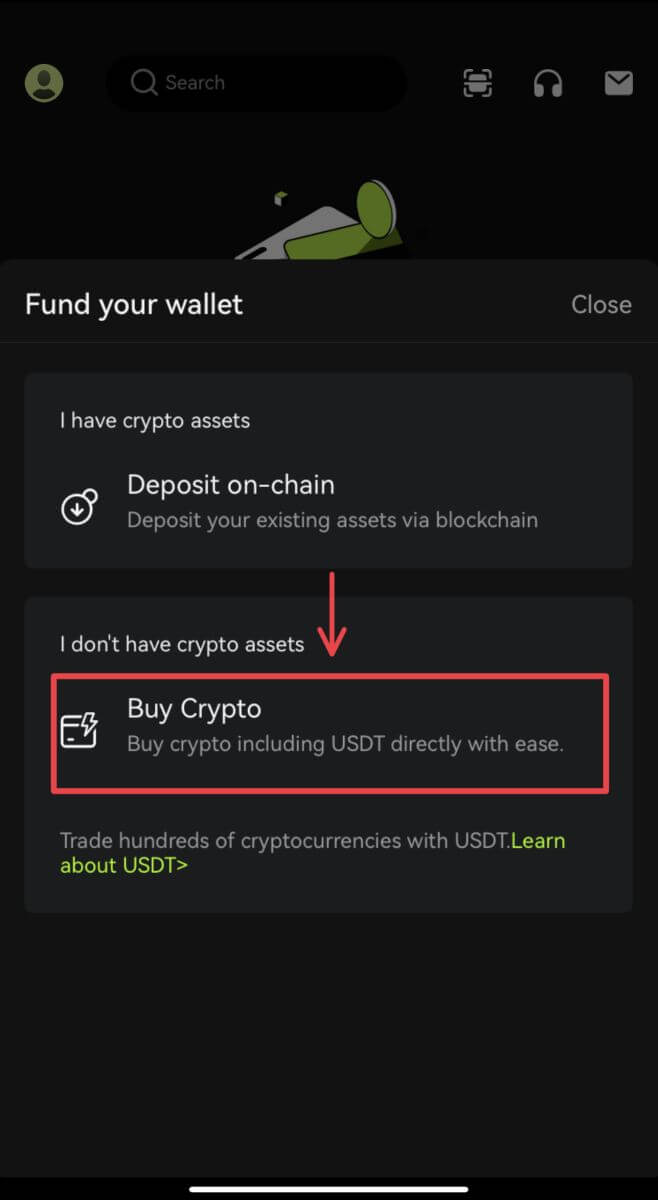
1. Log in to your account, click [Deposit/Buy crypto] - [Buy crypto].
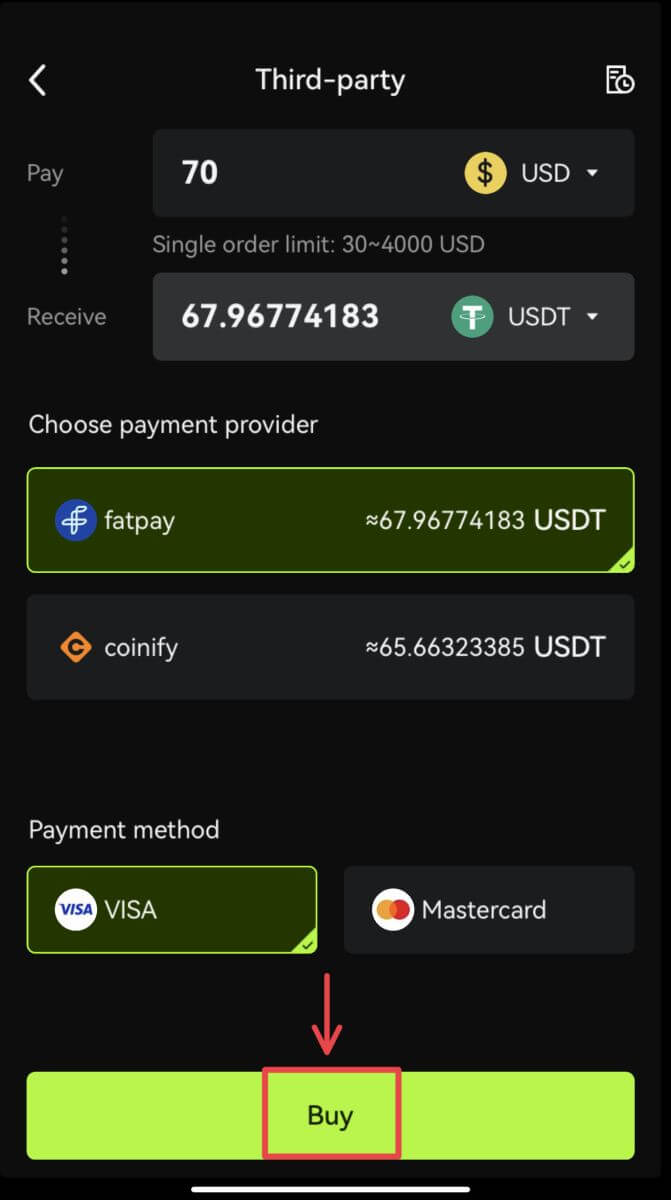
 2. Enter the amount you want to spend and the system will automatically display the amount of crypto you can get. Choose your preferred Third-party provider and Payment method. Then click [Buy].
 3. Confirm your order and the redirect notification. You will be guided to the third-party provider page. Fill in the required information.
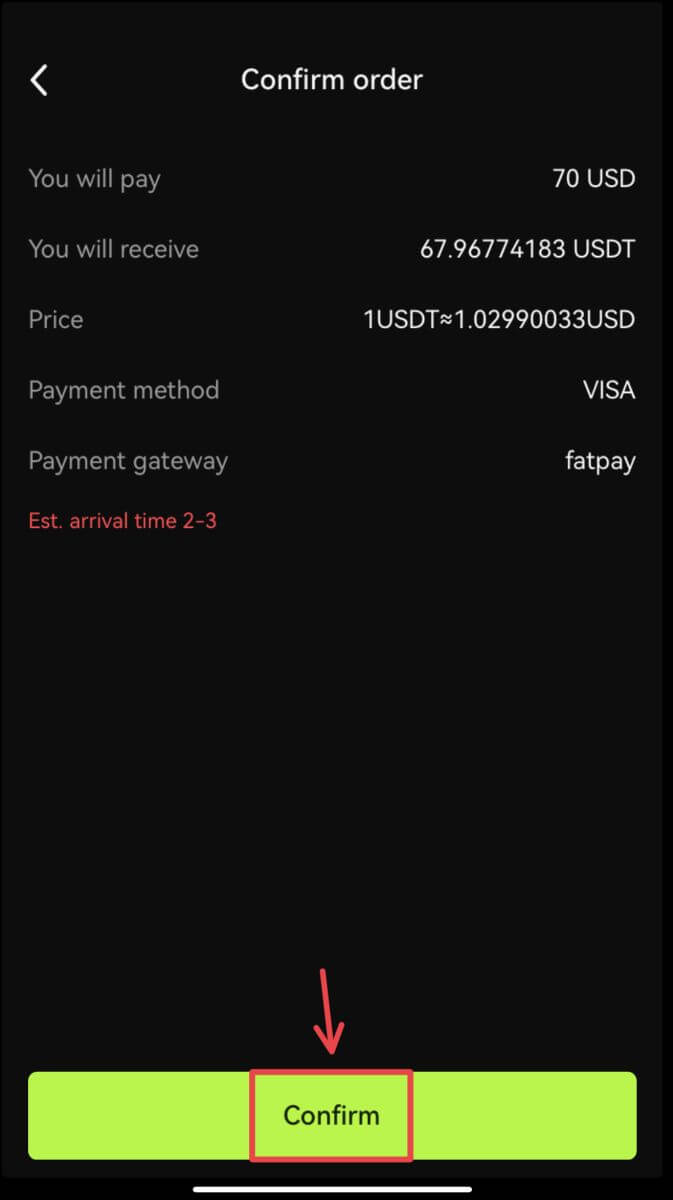
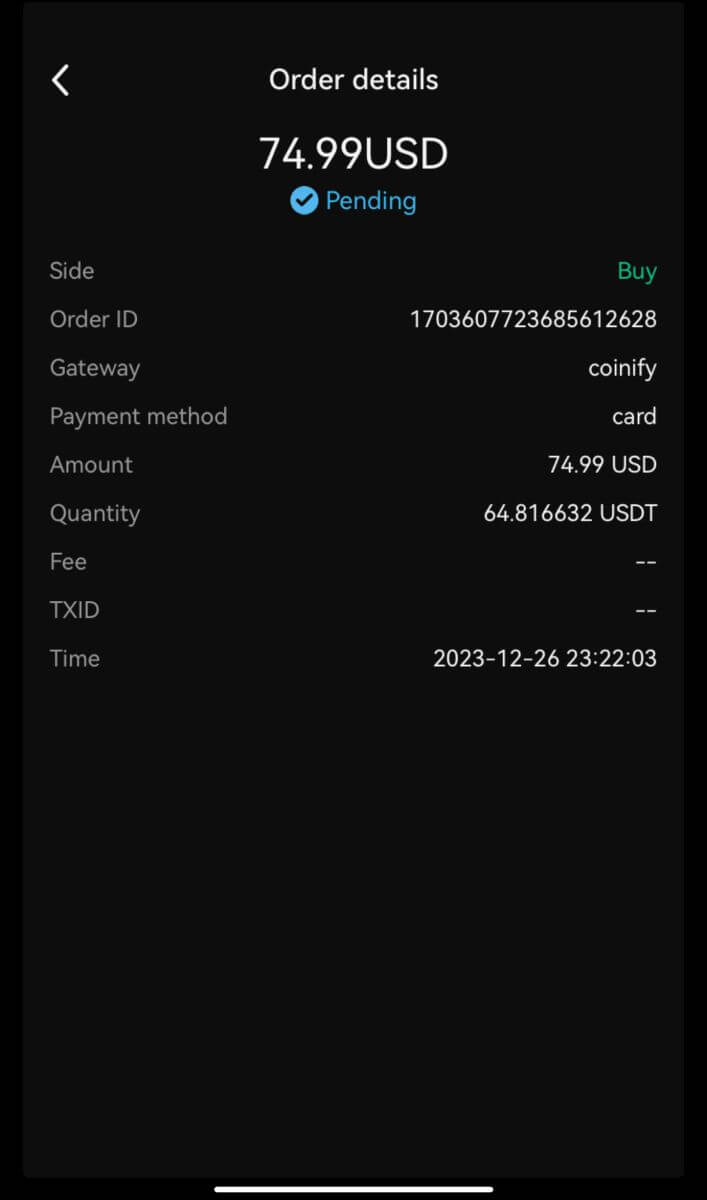
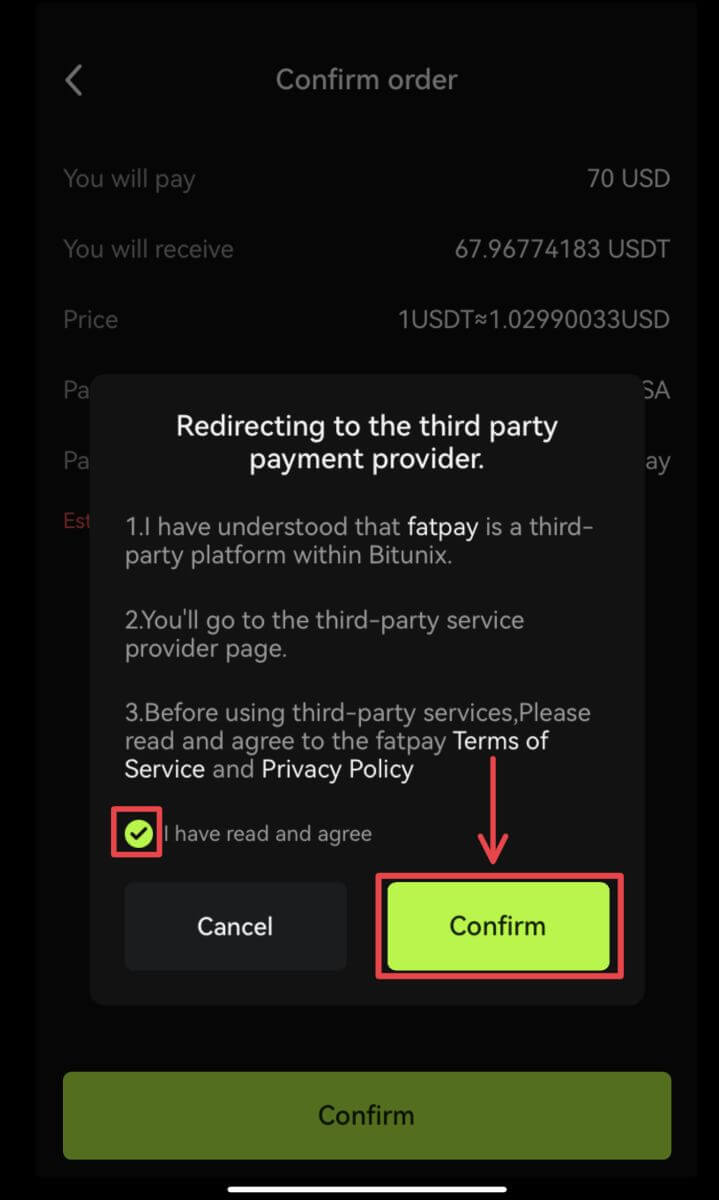 4. Go back to Bitunix app and wait for the order to be completed.
How to Deposit Crypto on Bitunix
Deposit Crypto on Bitunix (Web)
Deposit refers to transferring your digital assets such as USDT, BTC, ETH, from your wallet or your account of other exchanges to your Bitunix account.
1. Log in to your account on Bitunix, click [Deposit] under [Assets].
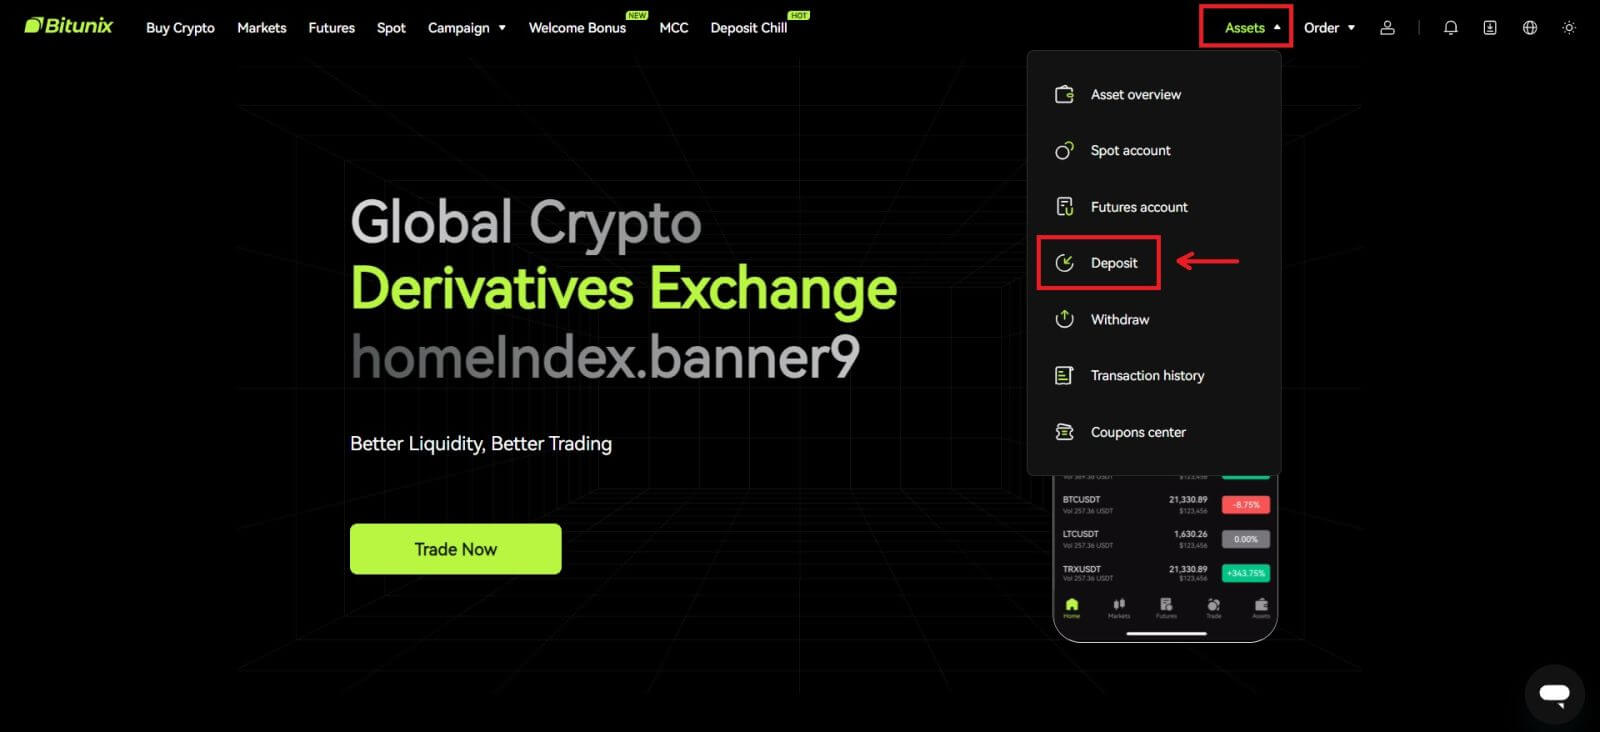 2. Confirm the coin you want to deposit, then select the network you are using for deposit, then copy the address or save the QR code. For some tokens or networks, such as XRP, there will be a MEMO or TAG shown from the deposit screen.
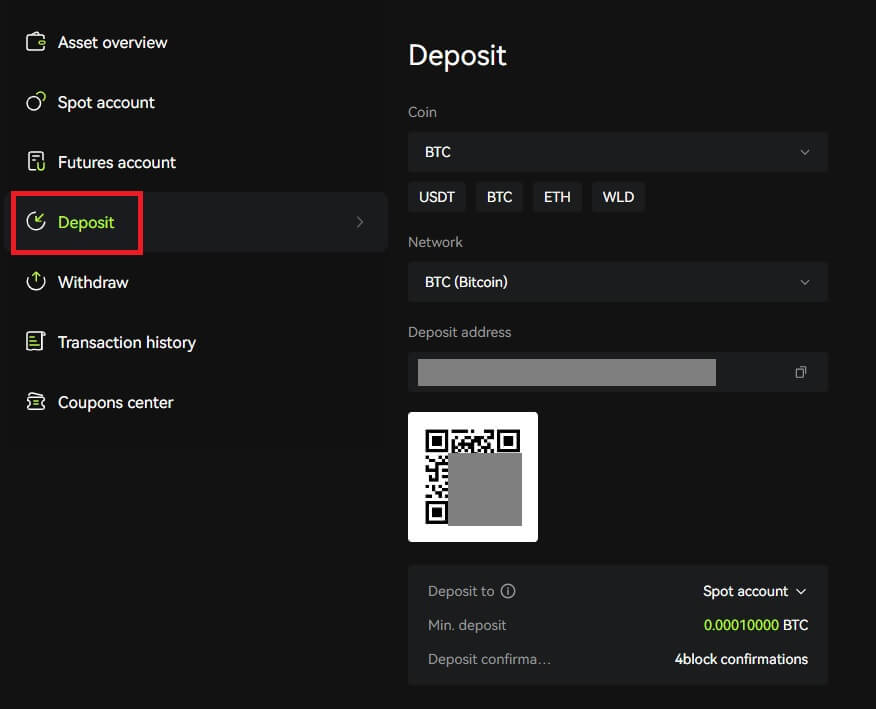 3. On your wallet or withdrawal page of other exchanges, type in the address you copied, or scan the QR code generated to complete the deposit. Patiently wait for the confirmation from the network before the deposit is confirmed.
Note
Please double check the asset that you are going to deposit, the network you are going to use and the address you are depositing to.
The deposit will firstly need to be confirmed on the network. It could take 5-30 minutes depending on the network status.
Usually, your address for deposit and QR code won’t change frequently and they can be used multiple times. If there are any changes, Bitunix will notify our users through announcements.
Deposit Crypto on Bitunix (App)
1. Log in to your account in Bitunix App, click [Deposit/Buy crypto] - [Deposit on-chain].
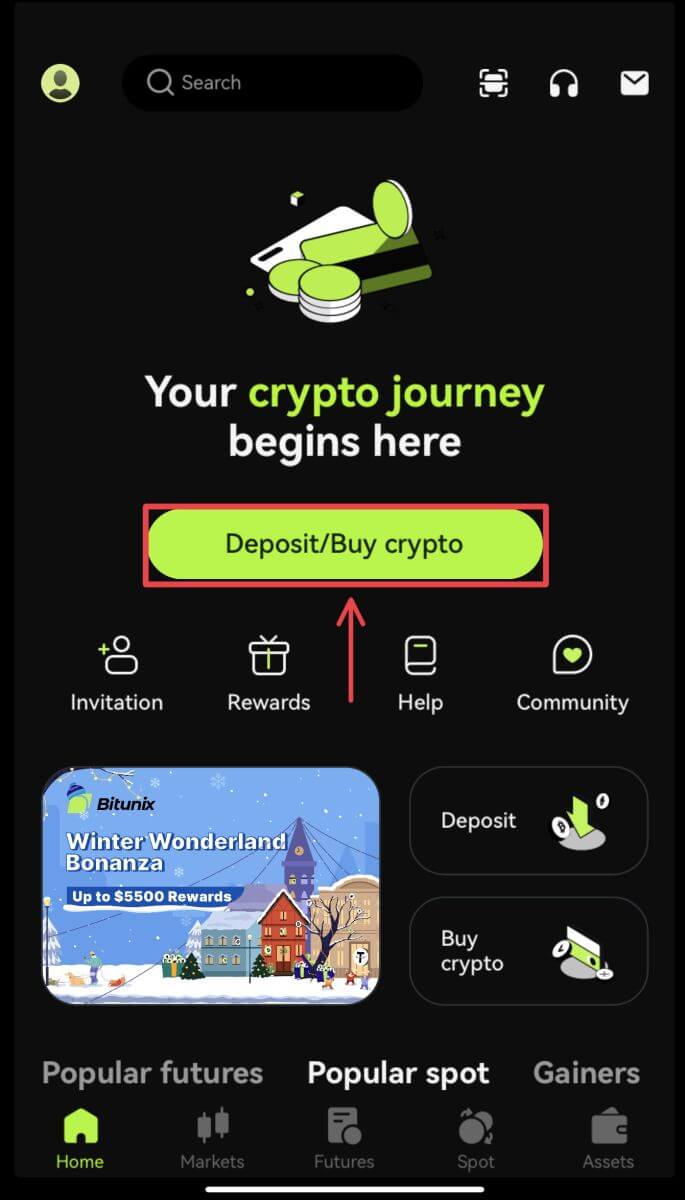
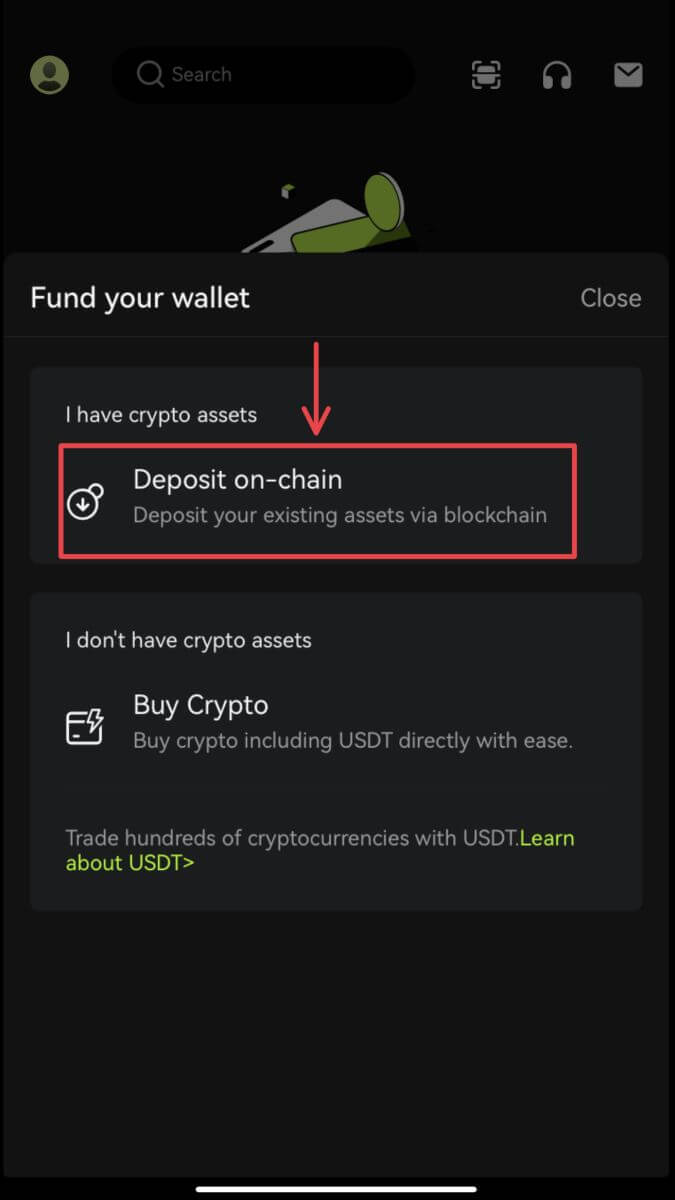 2. Select the asset you want to deposit.
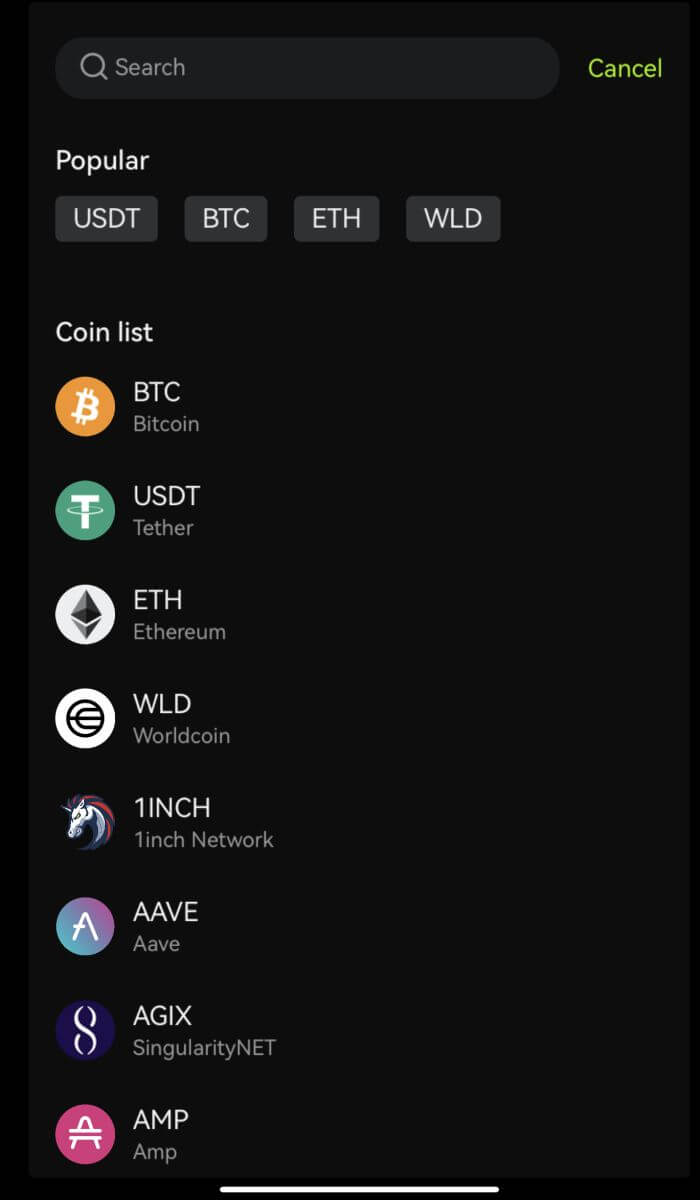 3. On your wallet or withdrawal page of other exchanges, type in the address you copied, or scan the QR code generated to complete the deposit. Some tokens, such as XRP, will require you to enter a MEMO when depositing.
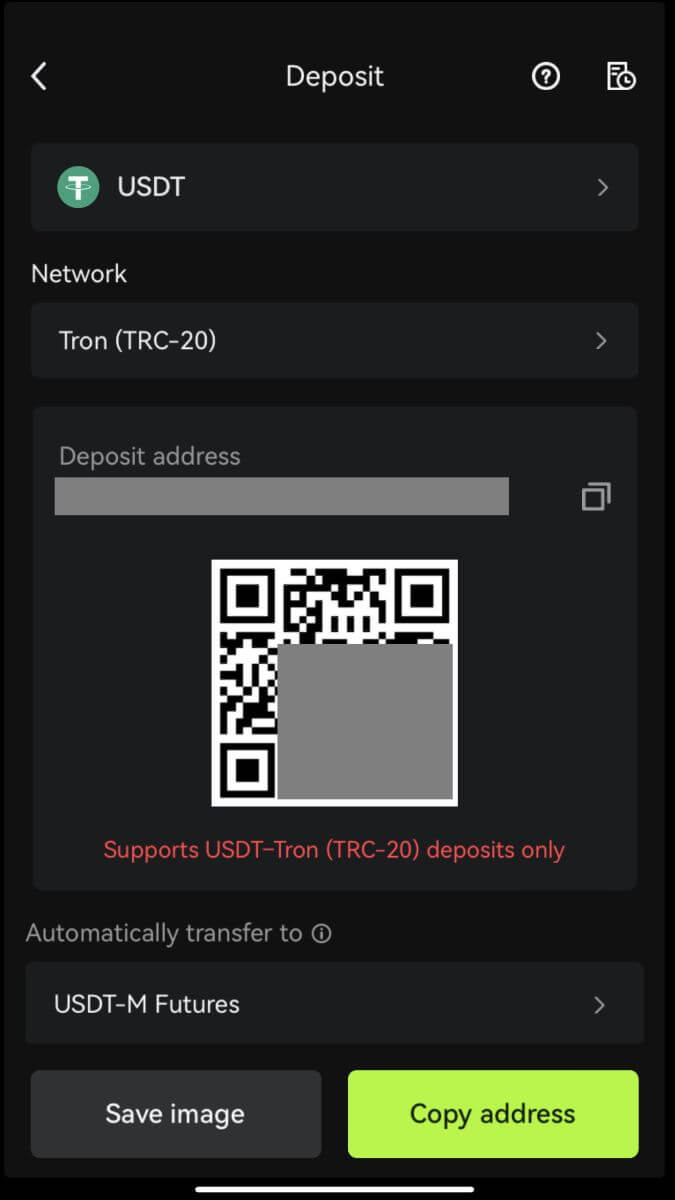 4. Patiently wait for the confirmation from the network before the deposit is confirmed.
How to Trade Crypto on Bitunix
How to Trade Spot On Bitunix (Web)
What is Spot trading?
Spot trading is between two different cryptocurrencies, using one of the currencies to purchase other currencies. The trading rules are to match transactions in the order of price priority and time priority, and directly realize the exchange between two cryptocurrencies. For example, BTC/USDT refers to the exchange between USDT and BTC.
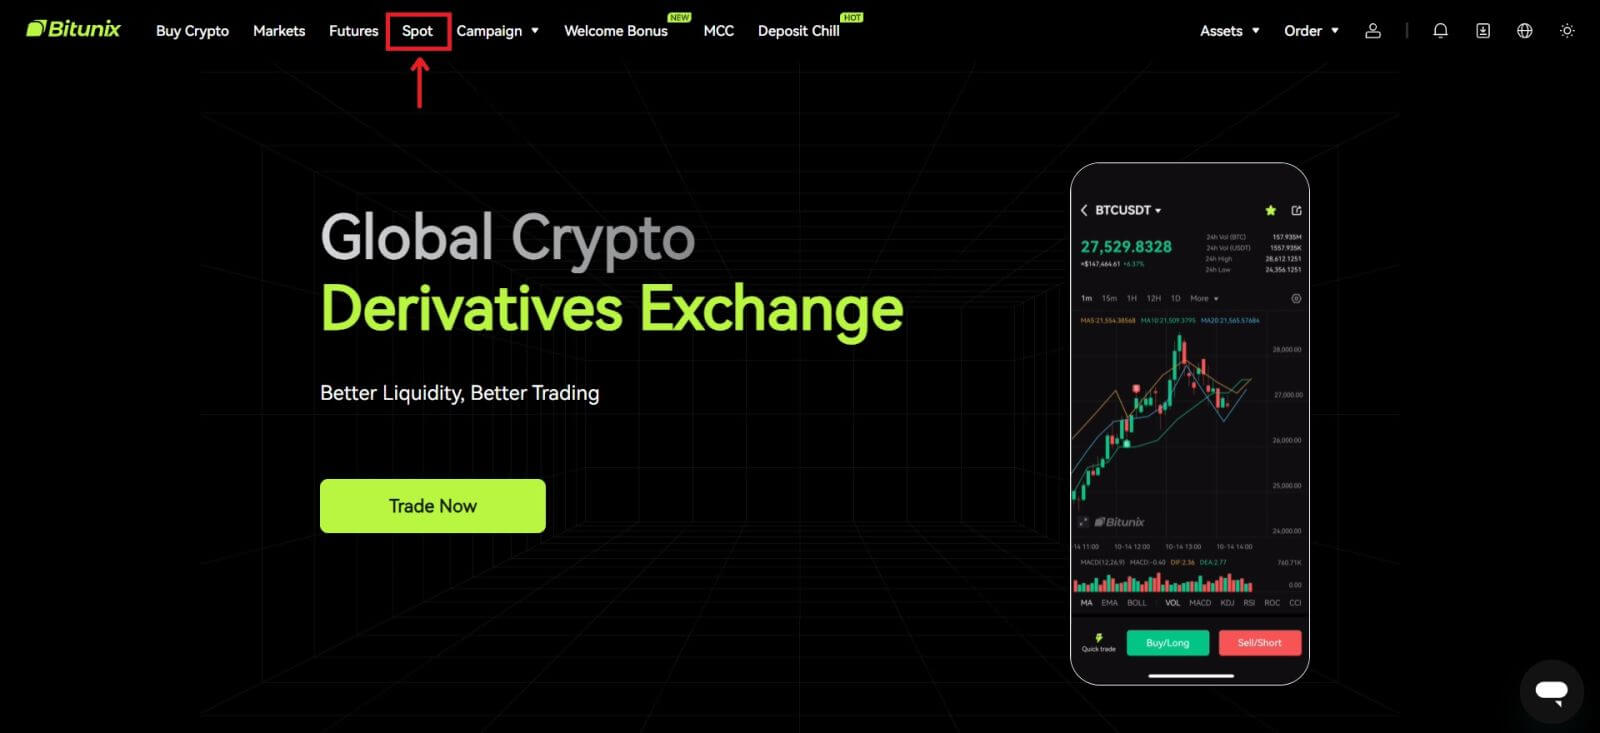
1. Log in to your account on Bitunix, click [Spot].
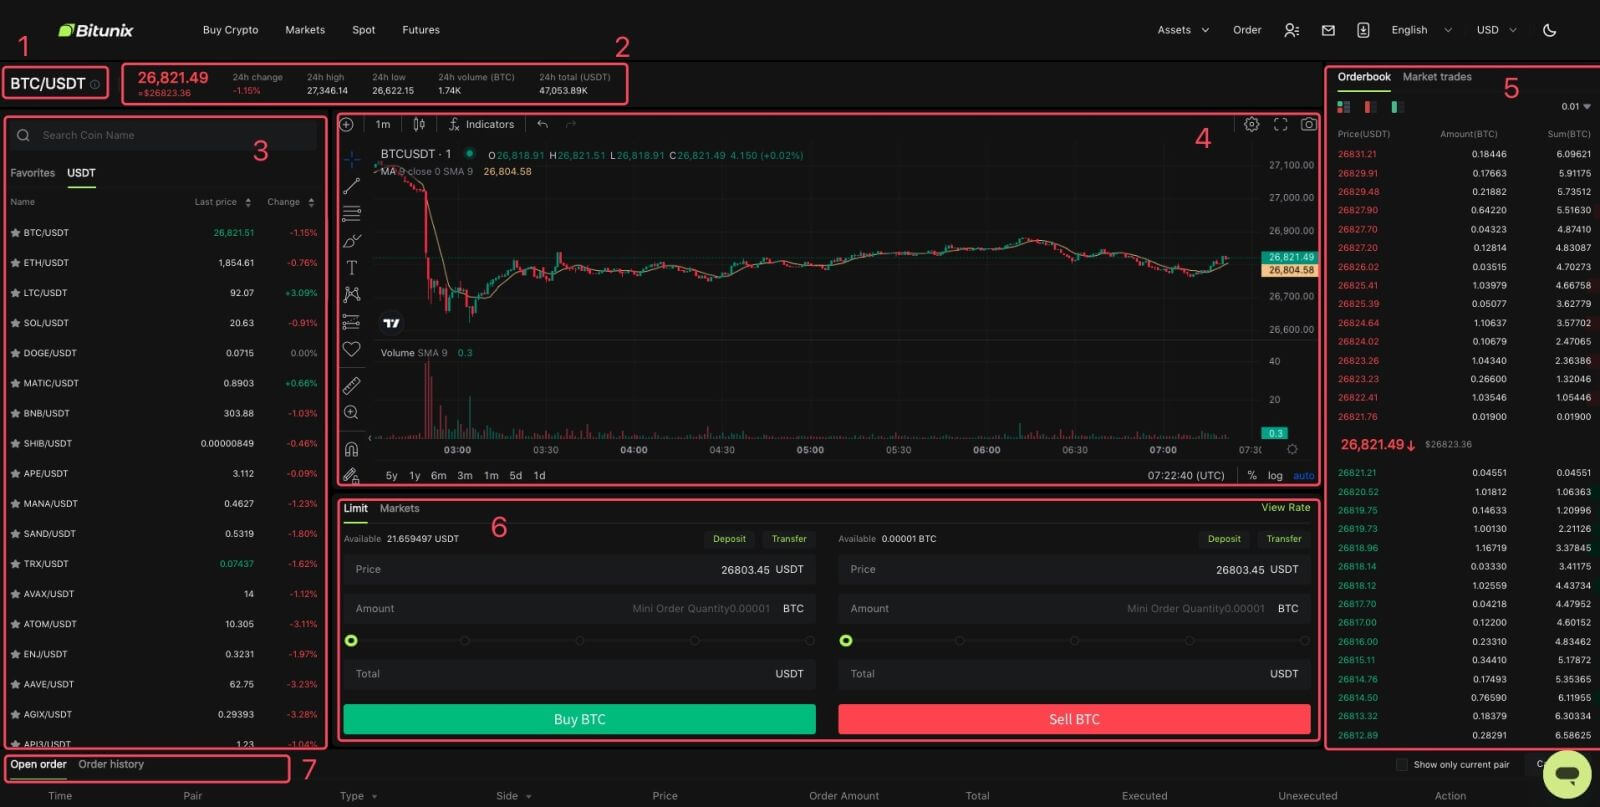
 Spot trading interface:
1. Trading pair: Shows the current trading pair name, such as BTC/USDT is the trading pair between BTC and USDT.
2. Transaction data: the current price of the pair, 24 hours price change, highest price, lowest price, transaction volume and transaction amount.
3. Search area: users can use the search bar or directly click the list below to switch the cryptos to be traded
4. K-line chart: the current price trend of the trading pair, Bitunix has a built-in TradingView view and drawing tools, allowing users to select different indicators for technical analysis
5. Orderbook and Market trades: real-time order book order book and trading situation of the current trading pair.
6. Buy and Sell panel: users can enter price and amount to buy or sell, and can also choose to switch between limit or market price trading.
7. Order information: users can view the current open order and order history for previous orders.
2. On the left side, search BTC, or click BTC/USDT in the list.
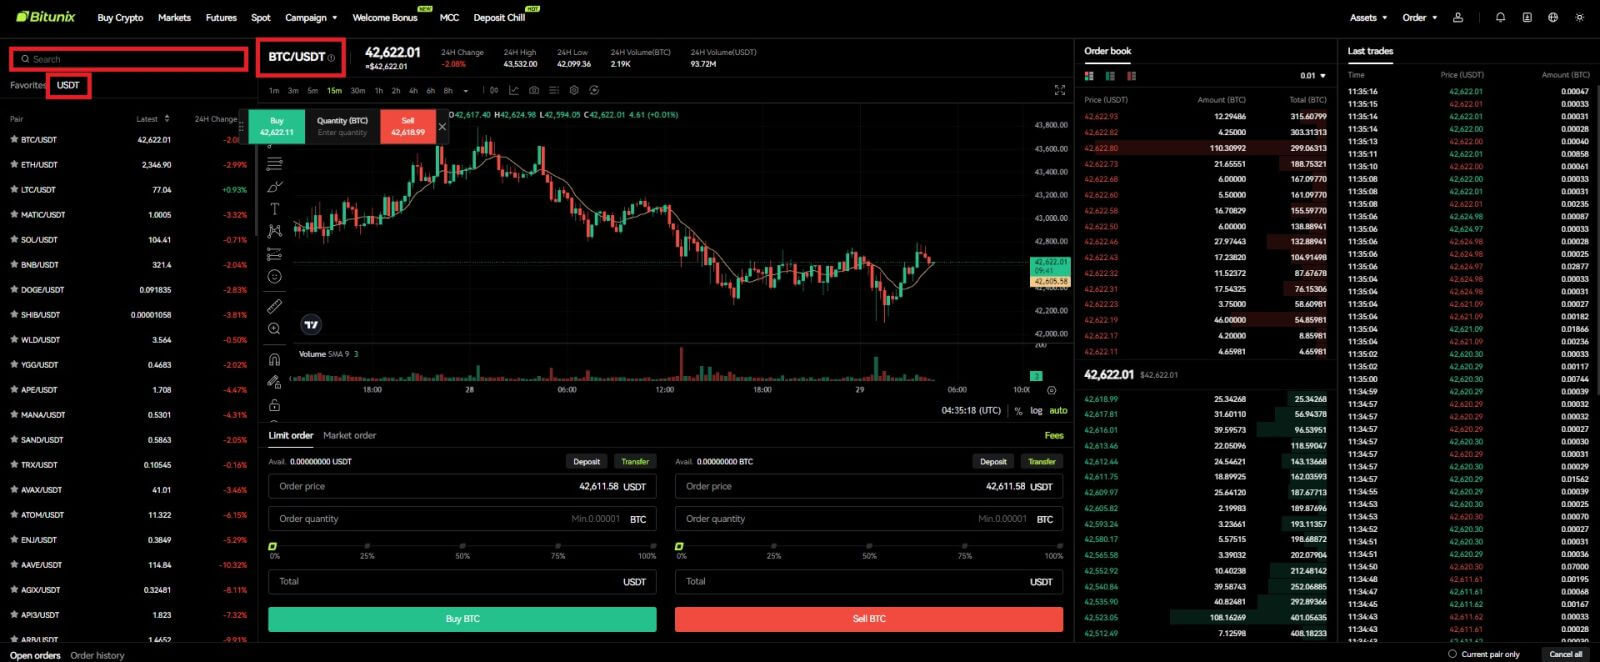
3. At the lower part of the page, select “Limit” or "Markets" order.
If users choose the limit order, then they need to enter both price and amount before they can place the order.
If users choose the market order, then they are only required to enter the total value in USDT as the order will be placed under the latest market price. If users choose to sell with market order, only the amount of BTC to sell is required.
To buy BTC, enter the price and amount for limit order, or just enter the amount for market order, click [Buy BTC]. If you are selling your BTC for USDT, then you should use the one on the right and click [Sell BTC].
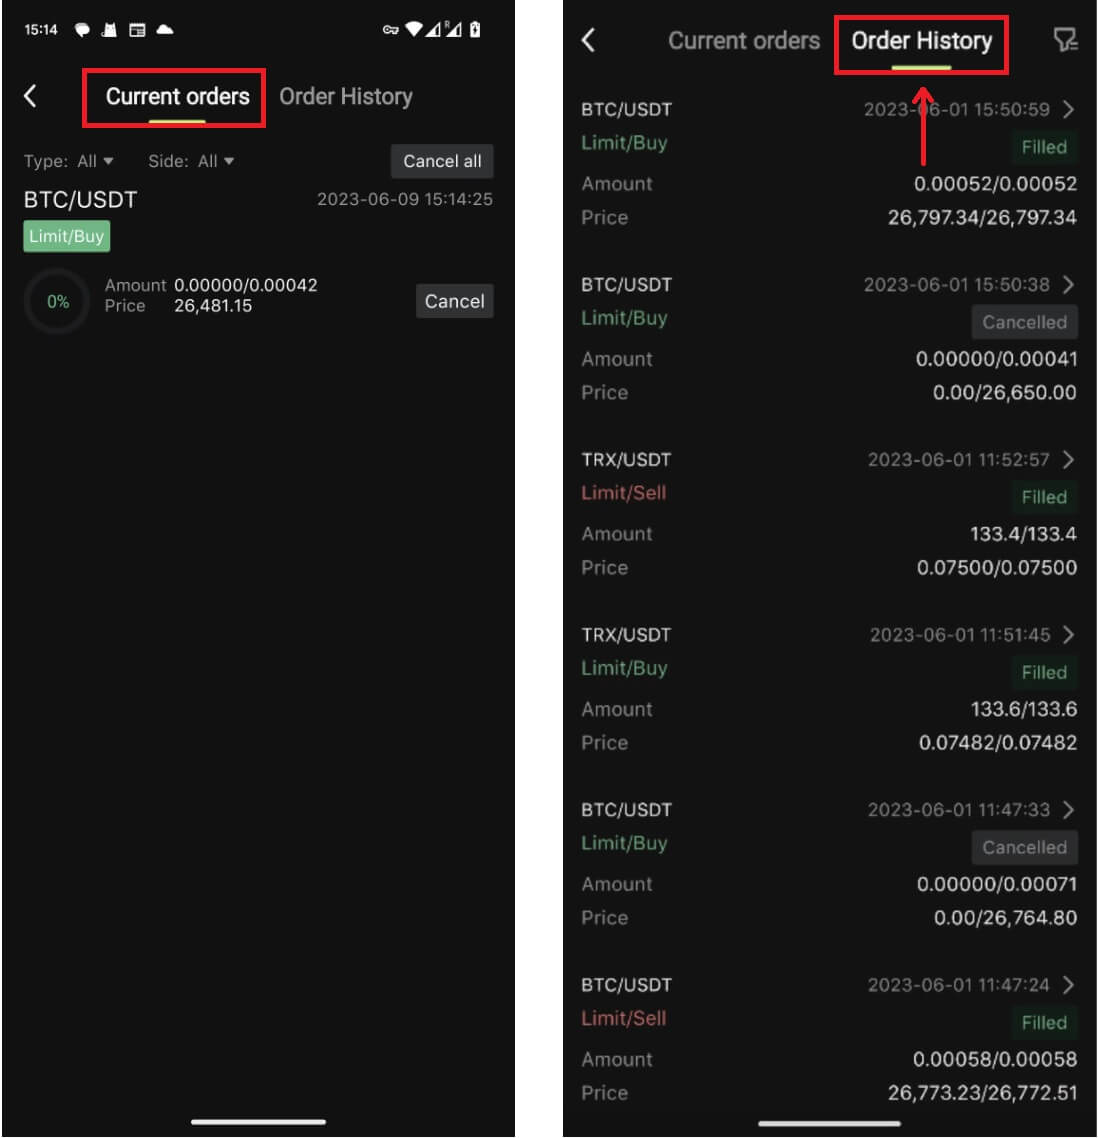
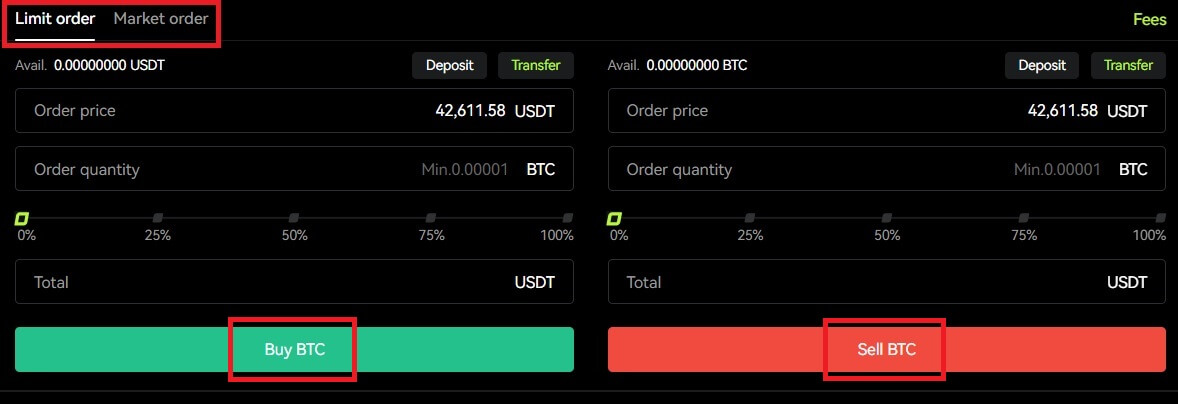 4. If a limit order is not filled immediately, you can find it under "Open Order", and cancel it by clicking [Cancel].
 5. Under “Order History”, users are able to view all their previous orders including their price, amount, and status, under “Details”, users are also able to view the fee and the price filled.

How to Trade Spot On Bitunix (App)
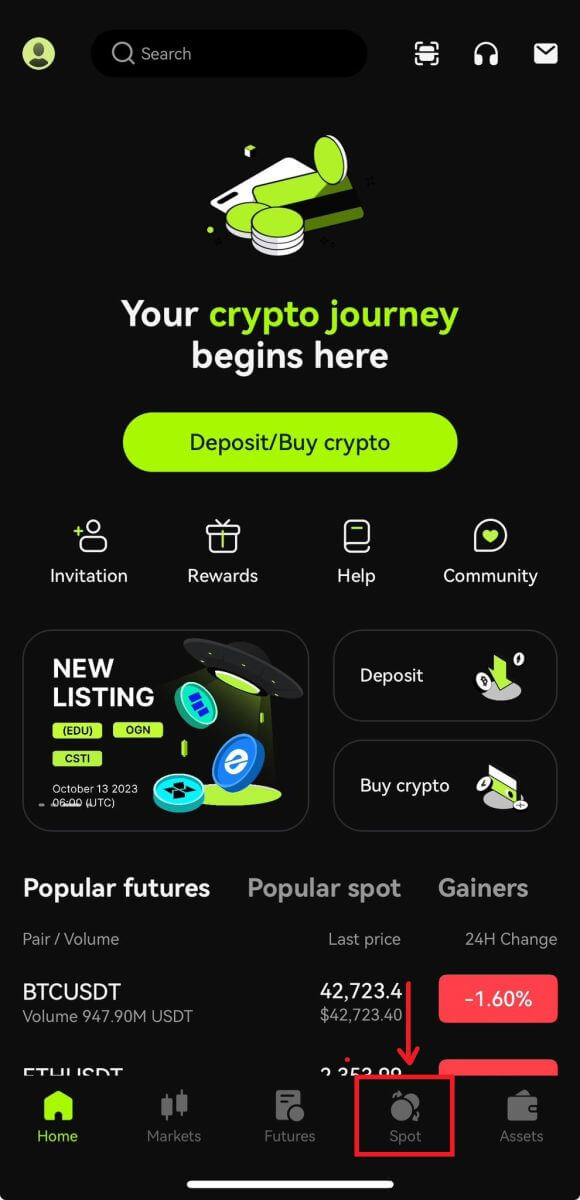
1. Login to your Bitunix account on the mobile application, select [Trade] at the bottom.
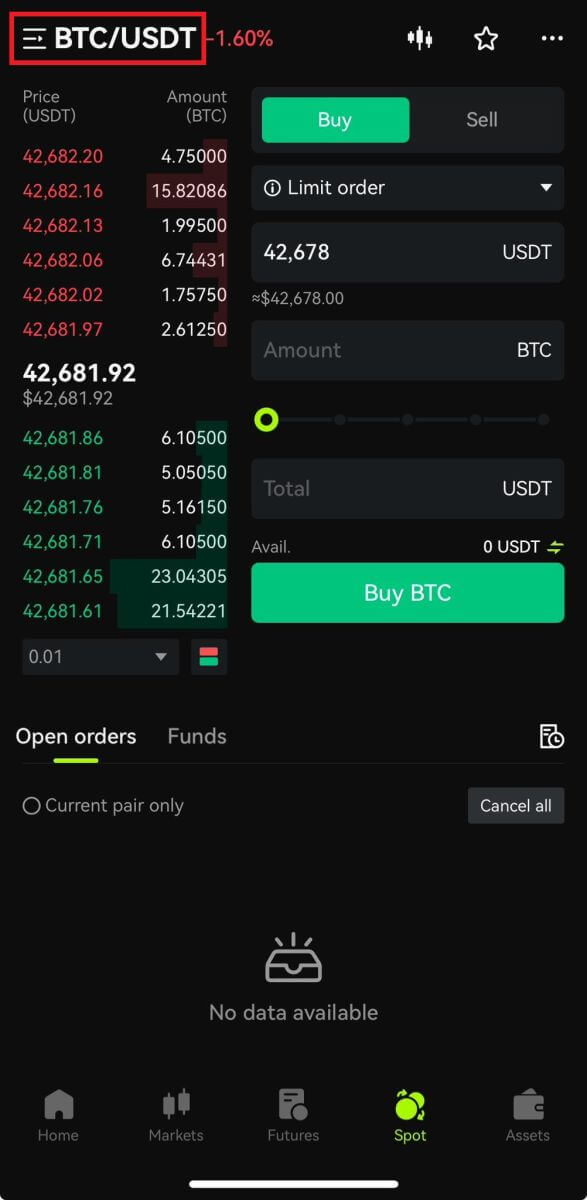
 2. Click [BTC/USDT] on the top left to change trading pairs.
 3. Select your order type on the right side of the page.
If you choose limit order, you need to enter the buy price and quantity in turn, and click buy to confirm.
If you choose market order to buy, you only need to enter the total value and click Buy BTC. If you want to sell with market order, you will need to enter the amount you are selling.
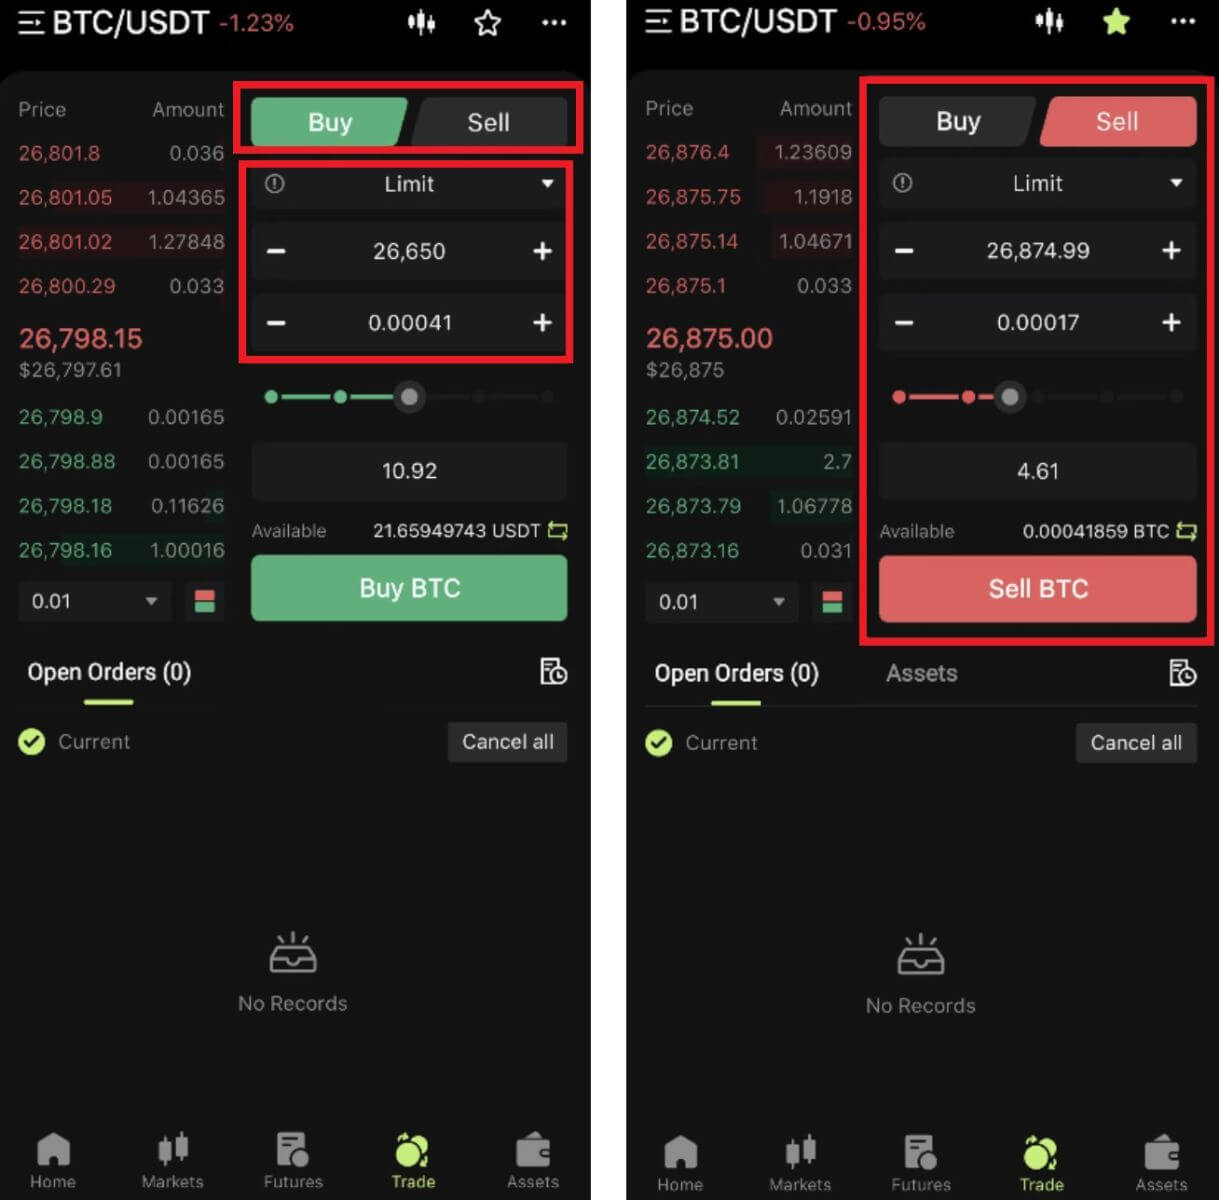 4. After placing the order, it will appear in Open Orders at the bottom of the page. For unfilled orders, users can click [Cancel] to cancel the pending order.
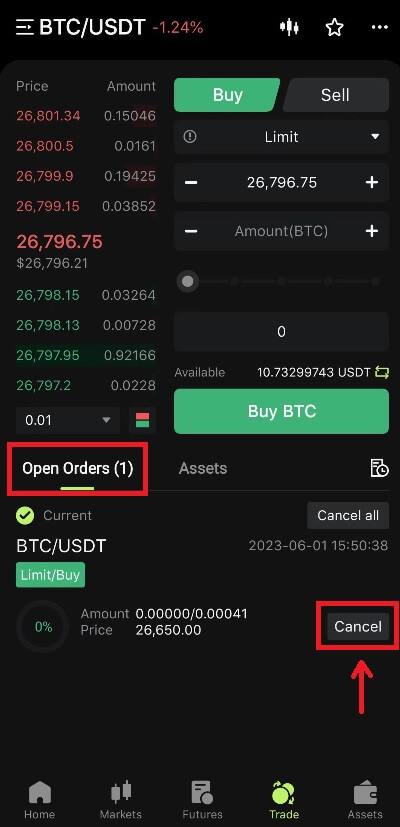
5. Enter the order history interface, the default display current unfilled orders. Click Order History to view past order records.
 What are limit order and market order
Limit Order
Users set the buying or selling price by themselves. The order will only be executed when the market price reaches the set price. If the market price does not reach the set price, the limit order will continue to wait for the transaction in the order book.
Market Order
Market order means that no buy price is set for the transaction, the system will complete the transaction based on the latest market price at the time the order is placed, and the user only needs to enter the total amount in USD wants to place. When selling at market price, user needs to enter the amount of the crypto to sell.
How to Withdraw from Bitunix
How to Withdraw Your Assets from Bitunix (Web)
1. Log in to your account on Bitunix’s website, click [Withdraw] under [Assets] on top of the screen.
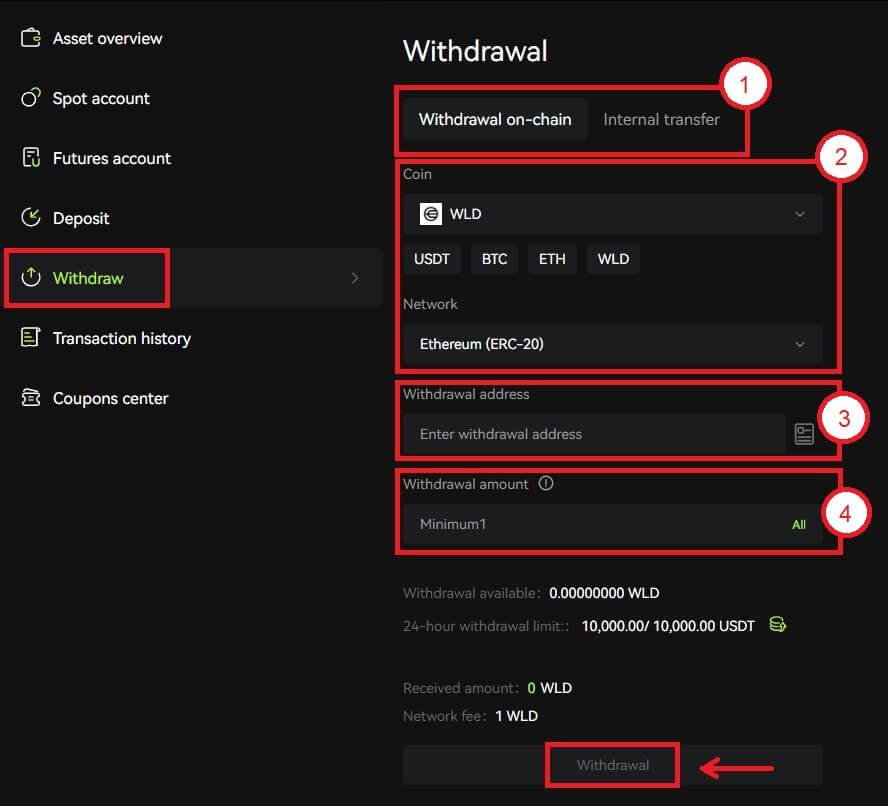
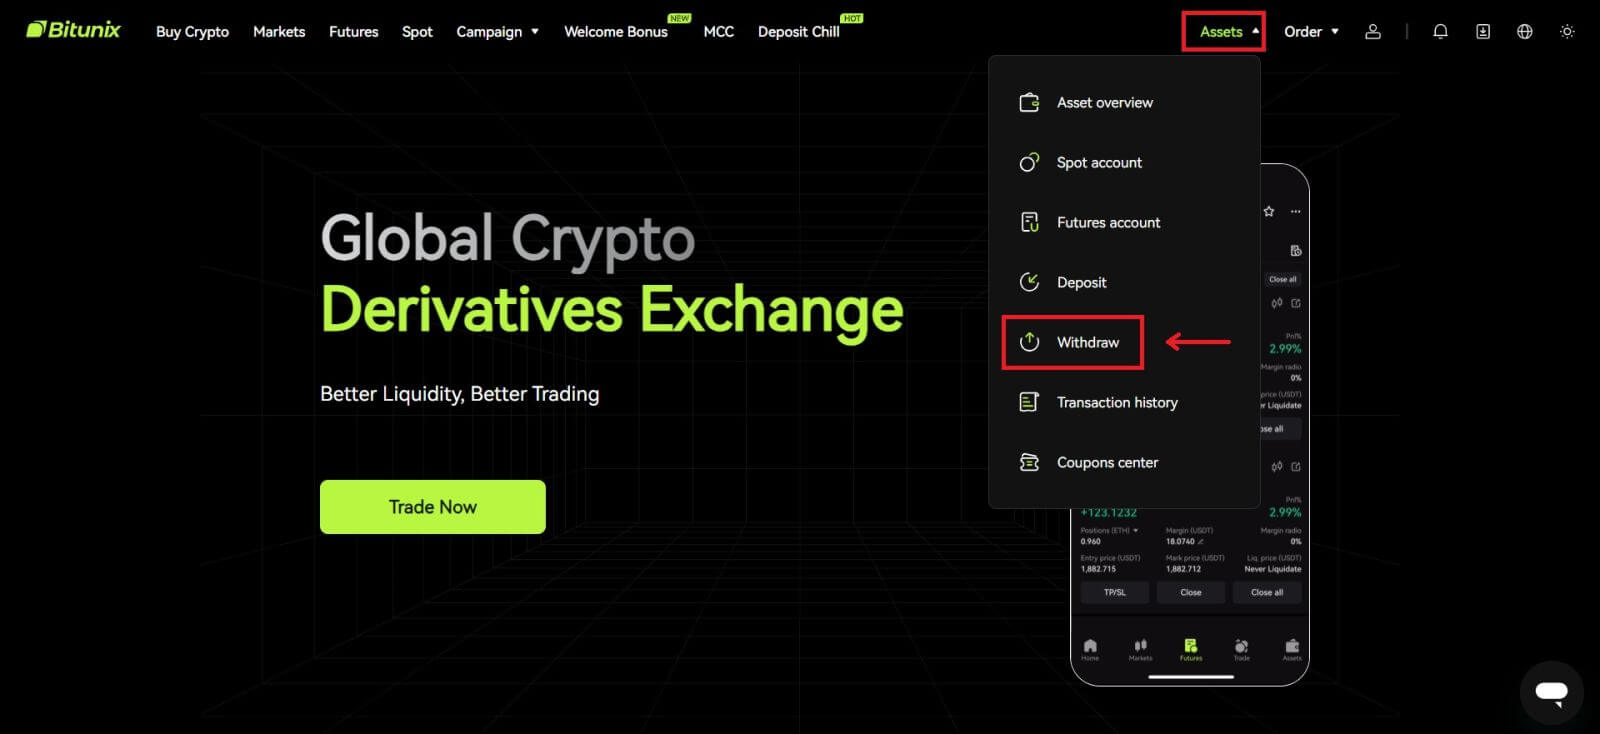 2. Select the assets you want to withdraw. Then select the network you are using, and enter the address and the amount. Click [Withdraw]. Some tokens such as XRP require a MEMO address when you are depositing.
 Note
Note
1. Select the withdrawal type
2. Select the token and network for deposit
3. Enter the withdrawal address
4. Enter the amount for withdrawal. Fees are included in the amount of withdrawal
3. Confirm the network, token and address are correct, then click [Confirm].
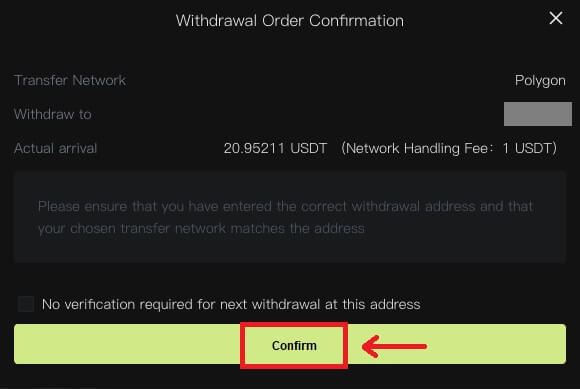 4. Complete security verification by clicking [Get Code]. Click [Submit].
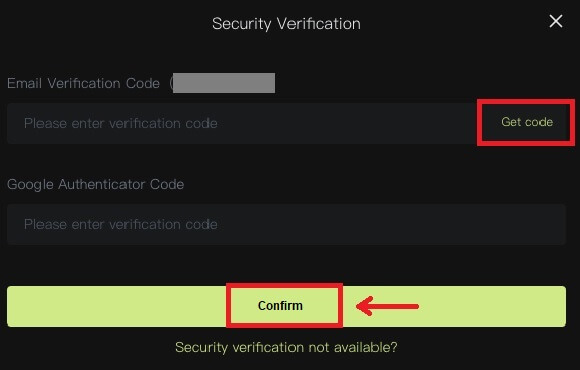 5. Patiently wait for the withdrawal to be completed.
Note
Please double check the asset that you are going to withdraw, the network you are going to use and the address you enter are correct. When you are depositing some tokens such as XRP, a MEMO is required.
Please do not share your password, verification code or Google Authenticator code with anyone.
The withdrawal will firstly need to be confirmed on the network. It could take 5-30 minutes depending on the network status.
How to Withdraw Your Assets From Bitunix (App)
1. Log in to your account in Bitunix App, click [Assets] at the bottom right.
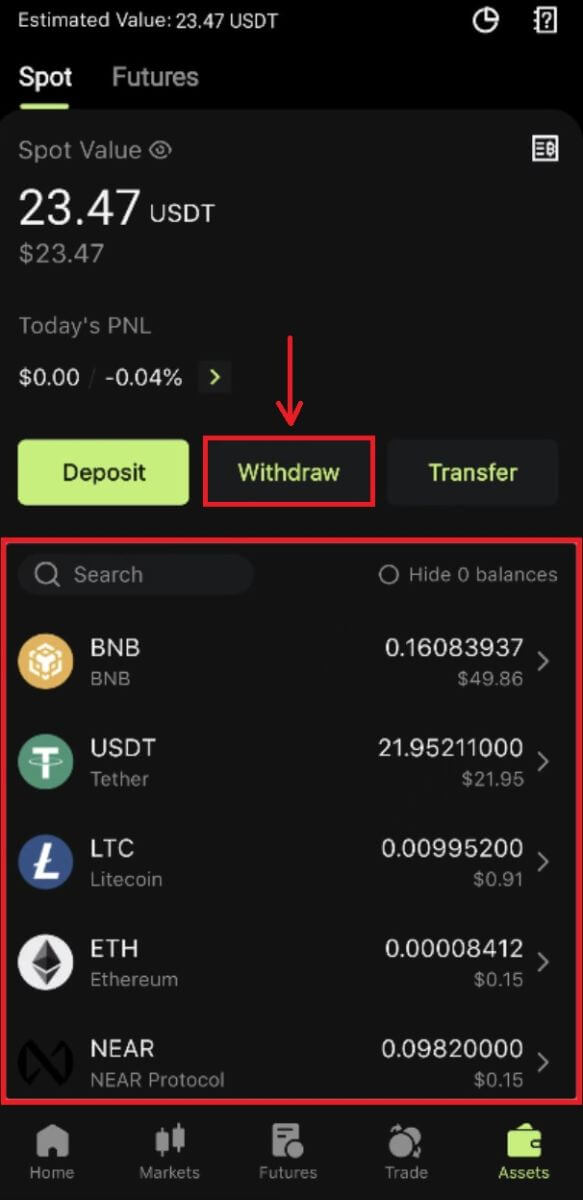
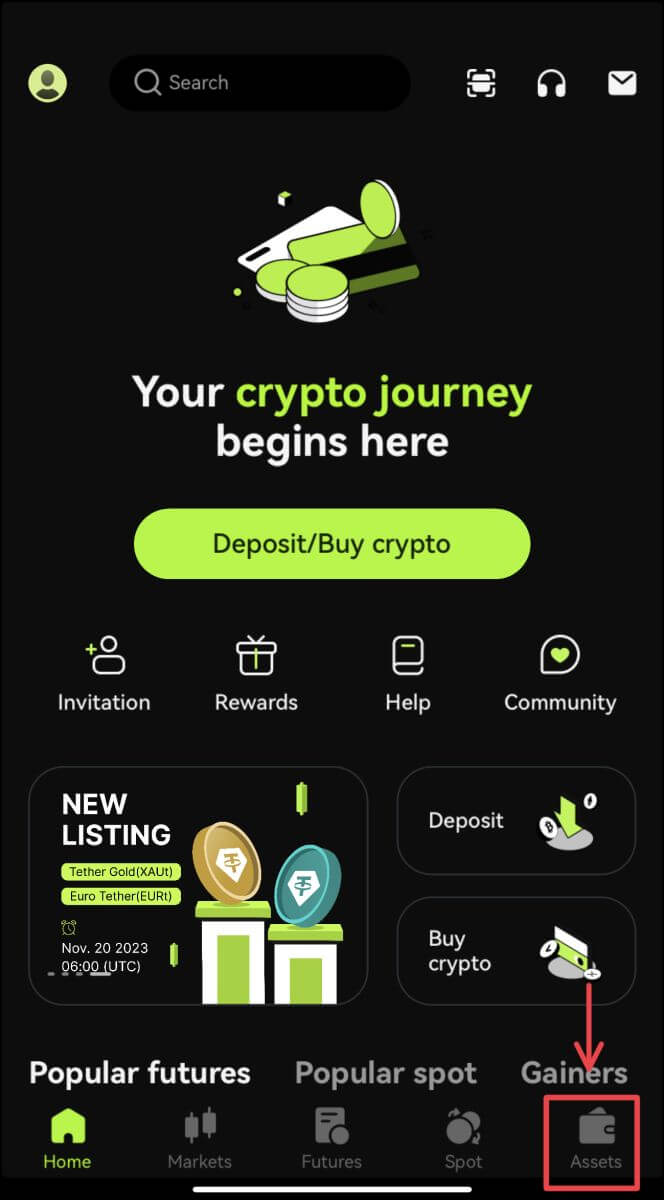 2. Click [Withdraw] and select the coin you are withdrawing.
 3. Select the network you are using to withdraw, and then enter the address and the amount you are going to withdraw. Some tokens such as XRP, will require a MEMO. Click [Withdraw].
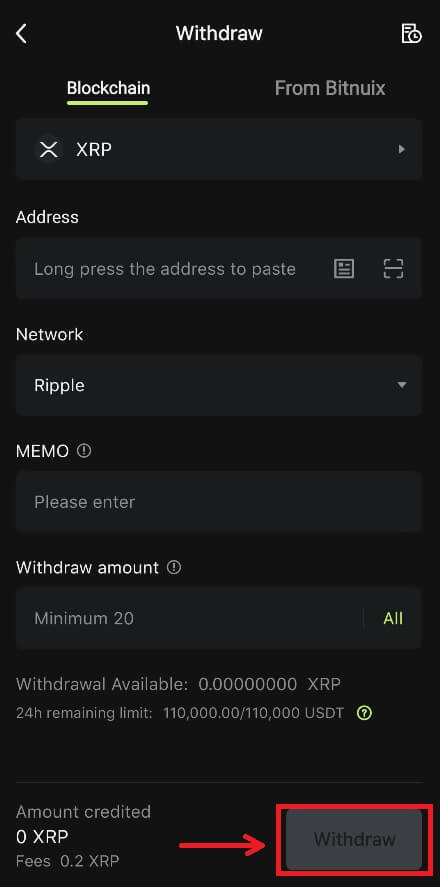
4. Confirm the network, address and the amount, click [Confirm].
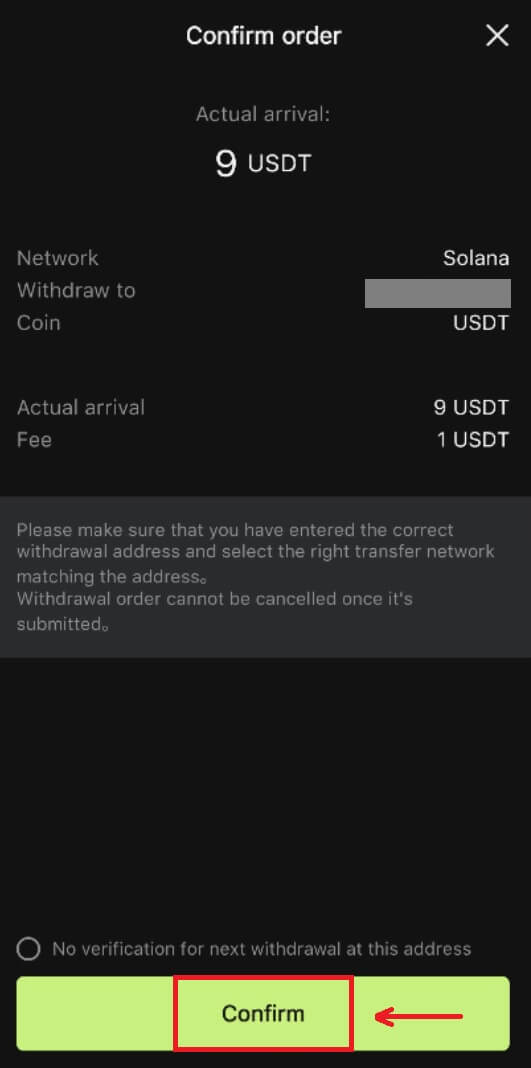
5. Complete the security verification and click [Submit].
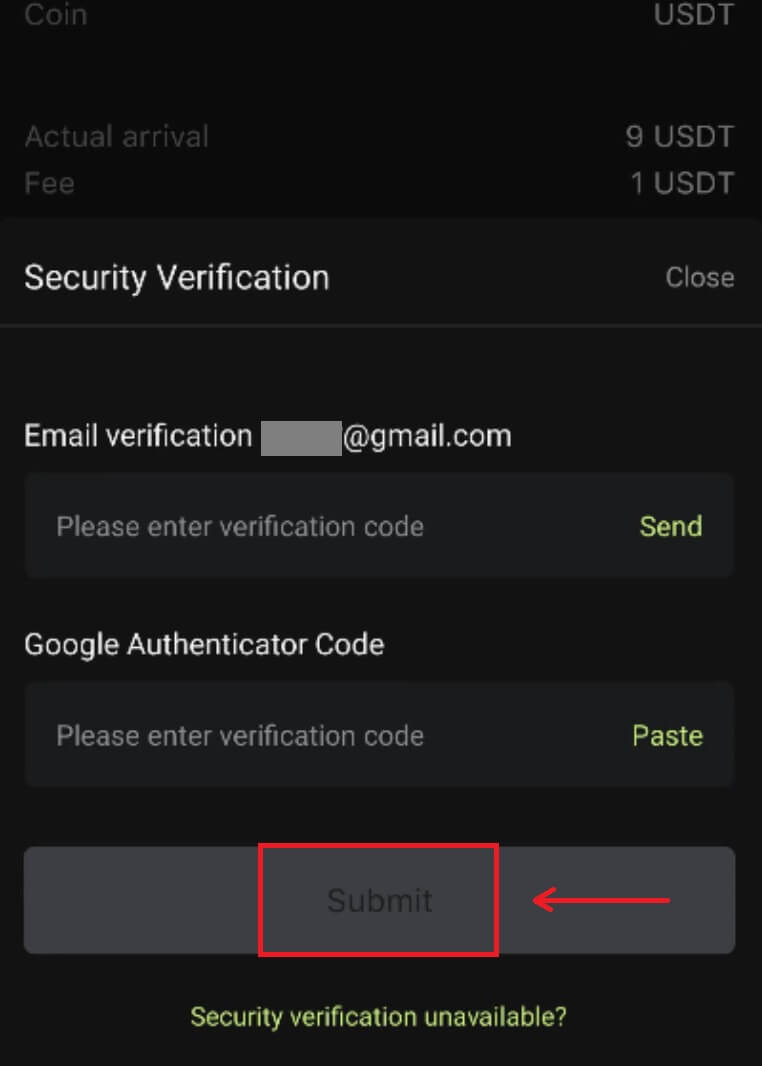 6. Patiently wait for the confirmation from the network before the deposit is confirmed.
Note
Please double check the asset that you are going to withdraw, the network you are going to use and the address you are withdrawing to. For tokens like XRP, a MEMO is required.
Please do not share your password, verification code or Google Authenticator code with anyone.
The withdrawal will firstly need to be confirmed on the network. It could take 5-30 minutes depending on the network status.
Frequently Asked Questions (FAQ)
Account
What are the Bitunix Newcomers Benefits
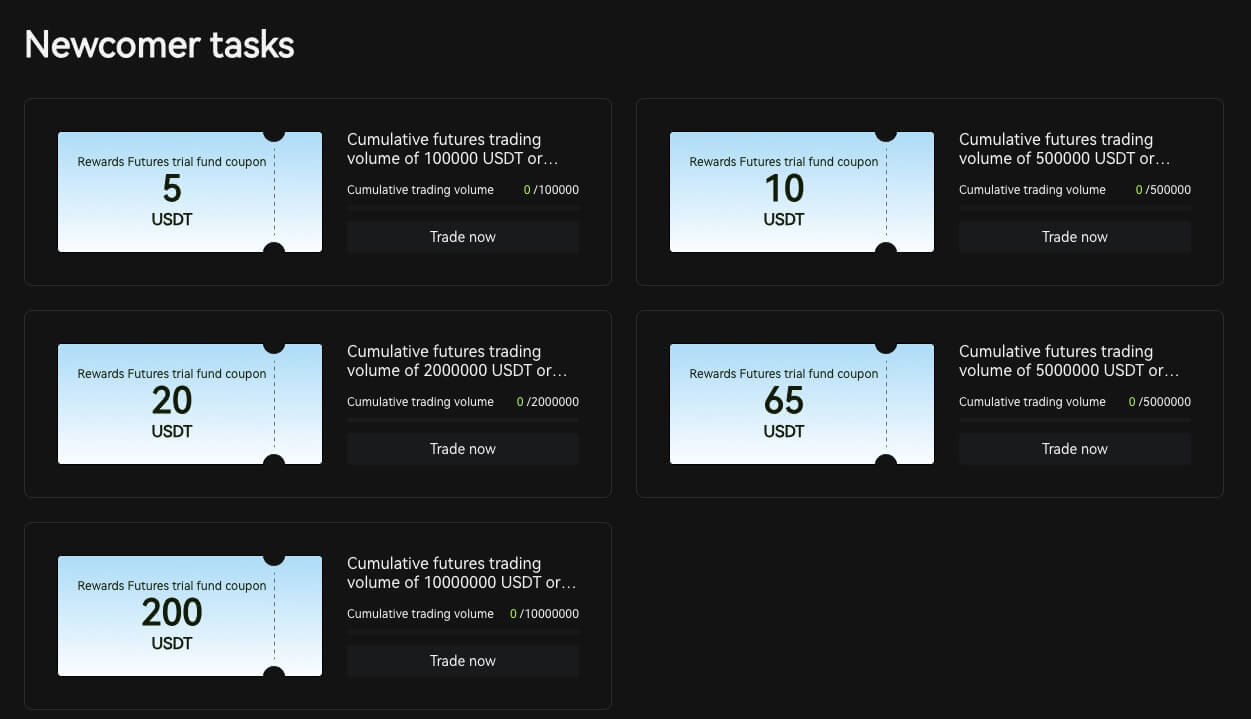
Bitunix offers a series of exclusive newcomer tasks for newly registered users, including registration tasks, deposit tasks, trading tasks, and so on. By completing the tasks following the instructions, new users will be able to receive up to 5,500 USDT worth of benefits.
How to check newcomers’ tasks and benefits
Open the Bitunix website and click Welcome bonus on the top of the navigation bar, then check your task status.
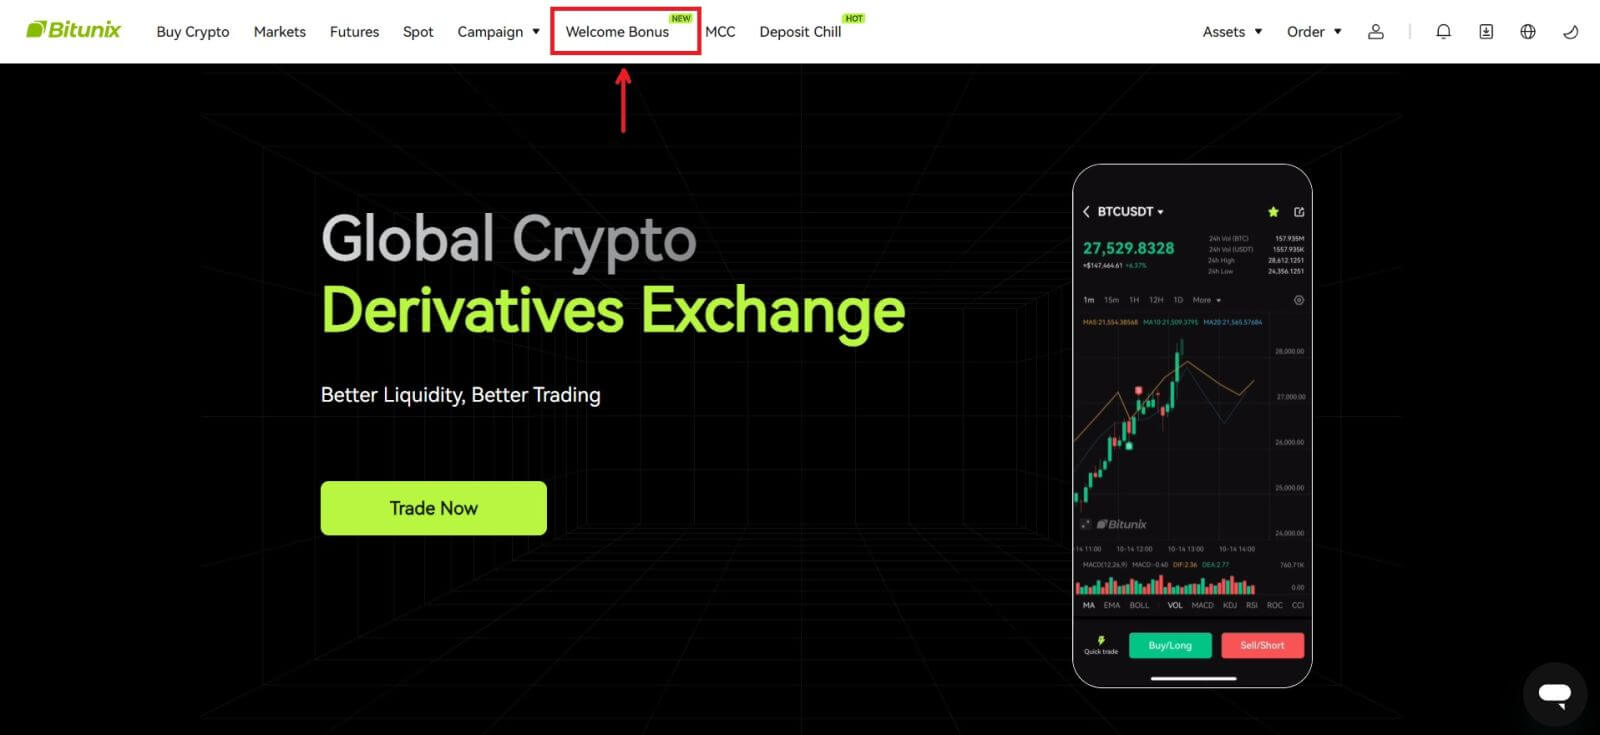
Mystery box tasks
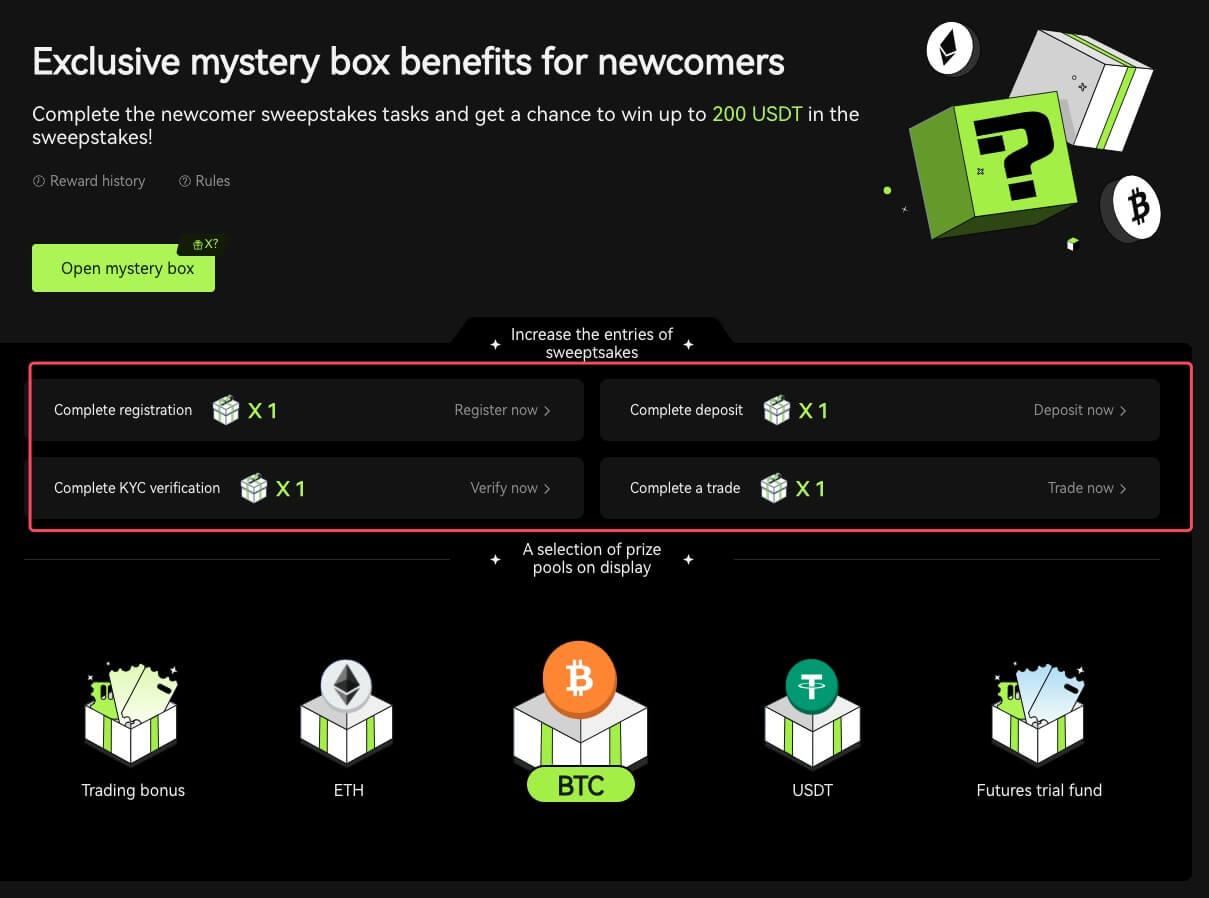
These include complete registration, complete deposit, complete real name verification and complete trading. Mystery box rewards: include USDT, ETH, BTC, futures bonus, etc.
To open a mystery box: Click on Open mystery box to participate in the sweepstakes. To open a mystery box, you need to earn an entry first. The more tasks you complete, the more entries you will receive to open the box.
Newcomer trading task
After completing the registration and futures trading, the system will automatically calculate the accumulated futures trading volume. The higher the cumulative futures trading volume, the more futures bonus you can get.
 Why Can’t I Receive SMS Verification Codes
If you are unable to enable SMS Authentication, please check our Global SMS coverage list to see if your location is covered. If your location is not shown, please use Google Authentication as your primary two-factor authentication instead.
If you’ve activated SMS Authentication or live in a nation or region covered by our Global SMS coverage list but are still unable to receive SMS codes, please take the following steps:
1. Check that your phone has a strong network signal.
2. Disable any anti-virus, firewall, and/or call blocker software on your mobile phone that may be blocking our SMS Codes number.
3. Restart your smartphone.
4. Use voice verification.
Verification
Why should I get my account identity verified?
Users are required to verify their identity at Bitunix by going through our KYC process. Once your account is verified, users can apply to raise the withdrawal limit for a specific coin if the current limit cannot satisfy their needs.
With a verified account, users can also enjoy a faster and more smooth deposit and withdrawal experience. Getting the account verified is also an important step to enhance the security of your account.
What are the KYC Tiers and Benefits
KYC policy (Know Your Customer Well) is an enhanced scrutiny of account holders and is the institutional basis for anti-money laundering used to prevent corruption, and is a series of procedures by which financial institutions and cryptocurrency exchanges verify the identity of their customers as required. Bitunix uses KYC to identify customers and analyze their risk profile. This certification process helps prevent money laundering and the financing of illegal activities, while KYC certification is also required for users to increase their BTC withdrawal limits.
The following table lists the withdrawal limits at different KYC levels.
| KYC Tier | KYC 0 (No KYC) | KYC Tier 1 | KYC Tier 2 (Advanced KYC) |
| Daily Withdrawal Limit* | ≦500,000 USDT | ≦2,000,000 USDT | ≦5,000,000 USDT |
| Monthly Withdrawal Limit** | - | - | - |
*Daily withdrawal limit updated every 00:00AM UTC
**Monthly Withdrawal Limit = Daily Withdrawal Limit * 30 days
Common Reasons and Solutions for KYC Verification Failures
The following are common reasons and solutions for KYC verification failures:
| Rejected Reason | Possible Scenario | Solutions Tips |
| Invalid ID | 1. The system has detected that your full name/date of birth on the profile is incorrect, missing or unreadable. 2. The uploaded document does not contain your face photo or the photo of your face is not clear. 3. The uploaded Passport does not contain your signature. |
1. Your Full name, Date of Birth, and Validity date need to be shown clearly and readable. 2. Your facial features need to be clearly displayed. 3. If you are uploading a Passport image, please make sure the passport has your signature. Accepted Proof of Identity Documents include: Passport, National Identity Card, Residence Permit, Driving License; Unaccepted Proof of Identity Documents include: Student Visa, Working Visa, Travel Visa |
| Invalid document photo | 1. The quality of uploaded documents may be blurred, cropped or you have masked your identity information. 2. Uploaded irrelevant photos of identity documents or proof of address. |
1. Your Full name, Date of Birth, and Validity date need to be readable and make sure that all the corners of the document are shown clearly. 2. Please reupload any acceptable identity documents such as your Passport, National identity card, or Driving license. |
| Invalid proof of address | 1. The proof of address provided is not within the last three months. 2. The proof of address provided shows another person’s name instead of your name. 3. An unacceptable document for proof of address submitted. |
1. The proof of address must be dated/issued within the last three months (documents older than three months will be rejected). 2. Your name must be clearly shown on the documents. 3. It cannot be the same document as Proof of Identity. Accepted Proof of Address Documents include:Utility bills Official bank statementsResidential proof issued by the governmentInternet/cable TV/house phone line billsTax returns/Council tax bills Unaccepted Proof of Address Documents include: ID card, Driver’s license, Passport, Mobile phone statement, Tenancy agreement, Insurance document, Medical bills, Bank transaction slip, Bank or company referral letter, Handwritten invoice, Receipt for purchases, Border passes |
| Screenshot / Not original document | 1. The system detects a screenshot, scan copy, or printed document that are not acceptable. 2. The system detects a paper copy instead of the original document. 3. The system detects black and white photos of documents. |
1. Please make sure the uploaded document is the original file/PDF format. 2. Please make sure the photo uploaded has not been edited with image processing softwares (Photoshop, etc) and it is not a screenshot. 3. Please upload a colored document/photo. |
| Missing document page | Some pages from uploaded documents are missing. | Please upload a new photo of the document with all four corners visible and a new photo of the document (front and back sides). Please ensure that the document page with important details is included. |
| Damaged document | The quality of the uploaded document is poor or damaged. | Make sure that the entire document is visible or readable; not damaged and there is no glare on the photo. |
| Expired document | The date on the uploaded identity document is expired. | Make sure that the identity document is still within the validity date and not yet expired. |
| Unrecognized language | The document is uploaded in unsupported languages such as Arabic, Sinhala, etc. | Please upload another document with Latin characters or your international passport. |
Deposit
What if I deposit at the wrong address?
Assets will be directly credited to the recipient address once the transaction is confirmed on the blockchain network. If you deposit into an outsider wallet address, or deposit via wrong network, Bitunix will be unable to provide any further assistance.
Funds are not credited after deposit, what should I do?
There are 3 steps a blockchain transaction must go through: request - validation - funds credited
1. Request: if the withdrawal status on the sending side says "completed" or "succeeded", it means the transaction has been processed, and is sent to blockchain network for validation. However, it doesn’t mean that the funds have successfully been credited to your wallet on Bitunix.
2. Validation: It takes time for the blockchain to validate each transaction. The funds will only be sent to the recipient platform after the token’s required confirmations are reached. Please patiently wait for the process.
3. Funds credited: Only when the blockchain validates the transaction and the required minimum confirmations are reached, will the funds arrive at the recipient address.
Forgot to fill in a tag or a memo
When withdrawing currencies like XRP and EOS, users must fill in a tag or memo in addition to the recipient address. If the tag or memo is missing or incorrect, the currencies may be withdrawn but will probably not arrive at the recipient address. In this case, you need to submit a ticket, a correct tag or memo, TXID in text format, and screenshots of the transaction on the sender platform. When the provided information is verified, the funds will be manually credited to your account.
Deposit a token that’s unsupported on Bitunix
If you have deposited unsupported tokens on Bitunix, please submit a request and provide the following information:
-
Your Bitunix account email and UID
-
Token name
-
Deposit amount
-
Corresponding TxID
-
The wallet address you deposit to
Trading
What is the candlestick chart?
A candlestick chart is a type of price chart used in technical analysis that displays the high, low, open, and closing prices of a security for a specific period. It is widely applicable to the technical analysis of stock, futures, precious metals, cryptocurrencies, etc.The high, low, open, and closing prices are the four key data of a candlestick chart that show the overall price trend. Based on different time intervals, there are one-minute, one-hour, one-day, one-week, one-month, one-year candlestick charts and so on.
When the closing price is higher than the open price, the candlestick will be in red/white (supposing red for rise and green for fall, which can be different based on different customs), suggesting that the price is bullish; while the candlestick will be in green/black when the price comparison is the other way around, indicating a bearish price.
How to View Transaction History
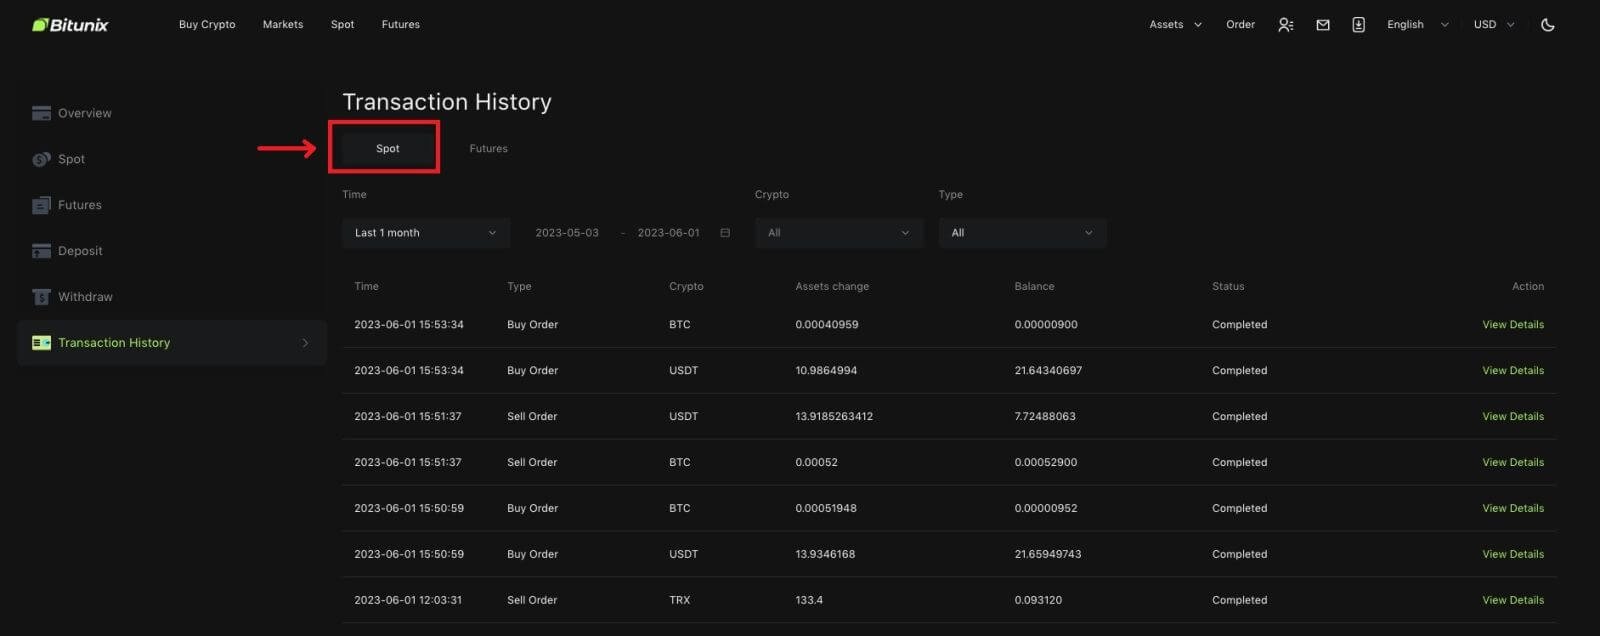
1. Log in to your account on Bitunix website, click [Transaction History] under [Assets].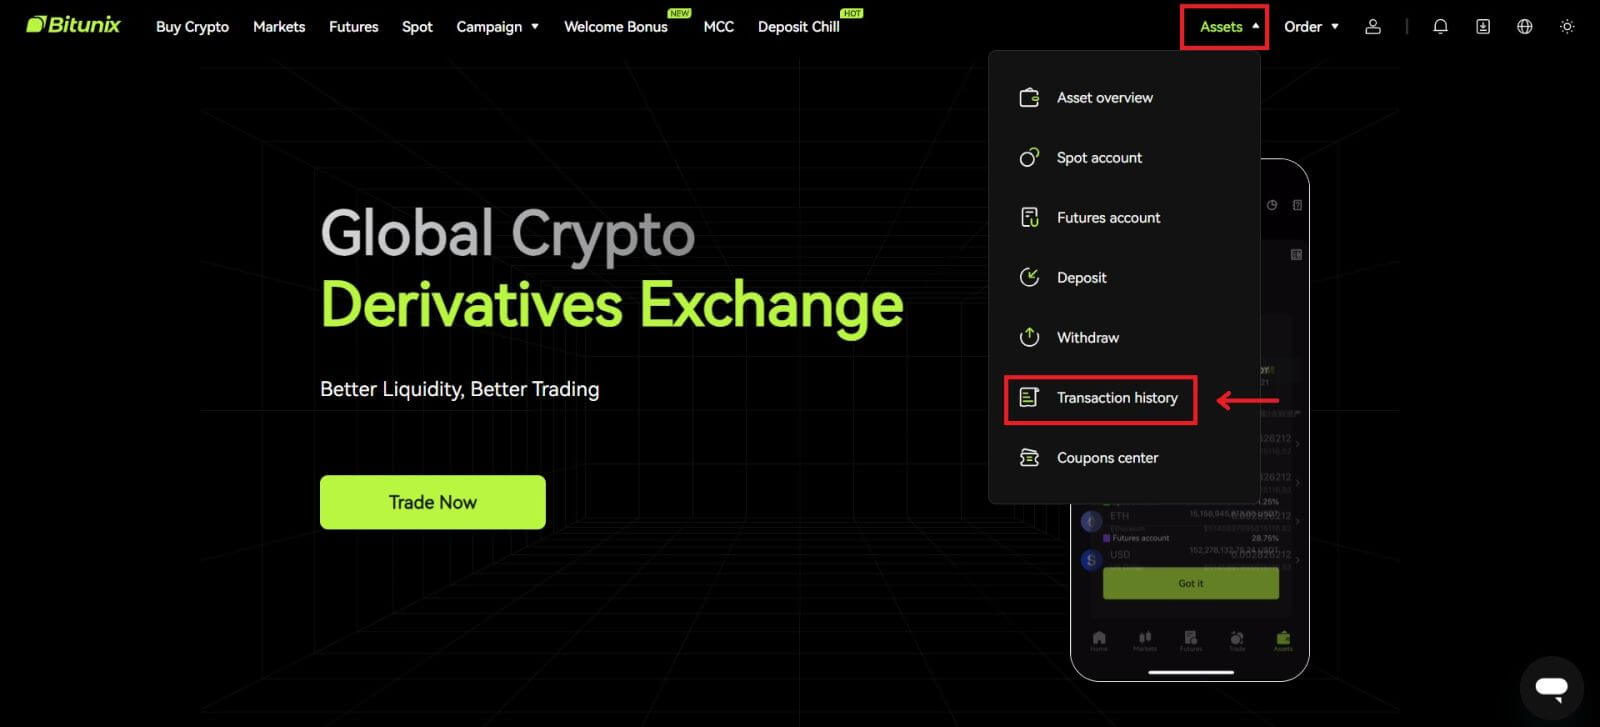 2. Click [Spot] to view transaction history for spot account.
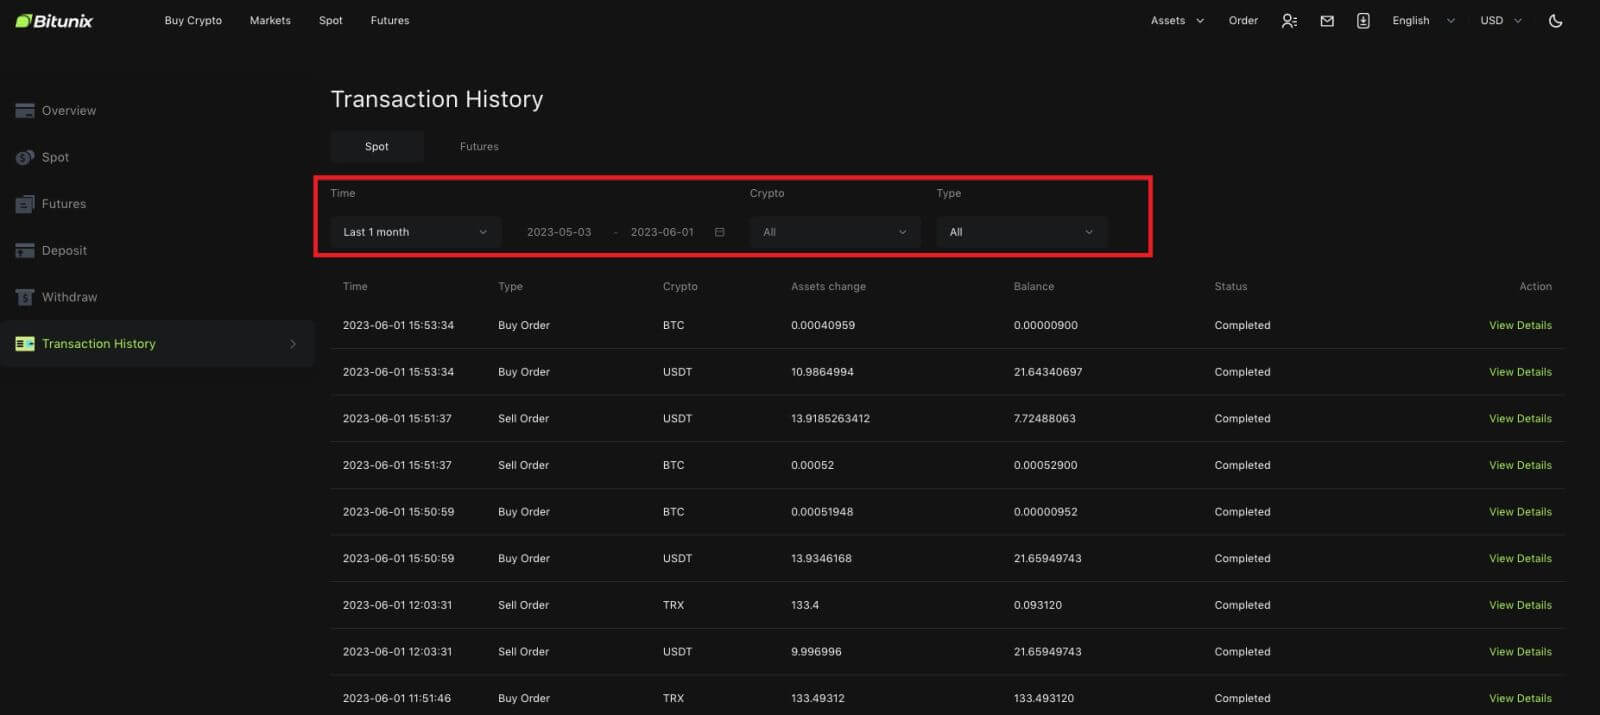
 3. Users can select time, crypto and transaction type to filter.
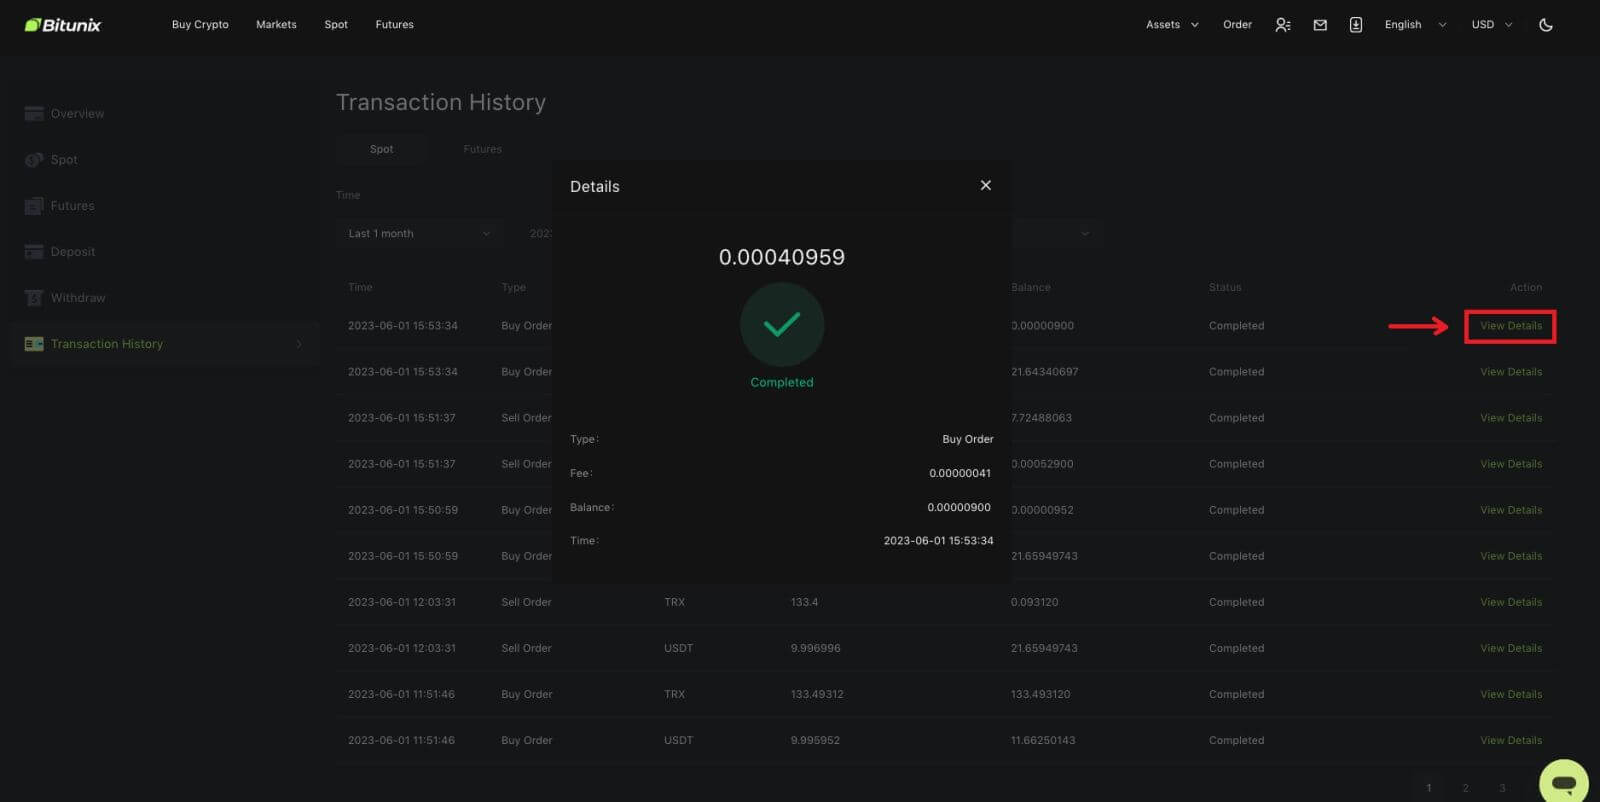
4. Click [View Details] to check the details of a specific transation.
Withdrawal
I put in the wrong withdrawal address
If the address rules are met, but the address is wrong (someone else’s address or a non-existent address), the withdrawal record will show "Completed". The withdrawn assets will be credited to the corresponding wallet in the withdrawal address. Due to the irreversibility of blockchain, we cannot help you to retrieve the assets after successful withdrawal, and you need to contact the address recipient to negotiate.
How to withdraw tokens that are delisted?
Usually, Bitunix will make an announcement about delisting certain tokens. Even after delisting, Bitunix will still provide withdrawal service for a certain amount of time, usually 3 months. Please submit a request if you are trying to withdraw such tokens after the withdrawal service has ended.
The withdrawn tokens are not supported by the recipient’s platform
Bitunix only confirms whether the address format is correct, but cannot guarantee whether the recipient’s address supports the withdrawn currency. For solutions, you need to communicate with the recipient’s platform. If the recipient’s platform has agreed to return the funds, you can provide them with your Bitunix deposit address.
If they only agree to return the funds to the sender address, in which case the funds cannot be transferred directly to your Bitunix account, please contact the recipient to request the TxID of the transaction. Then submit a request on Bitunix with TxID, the communication record of you and the recipient’s platform, your Bitunix UID and your deposit address. Bitunix will help you transfer the funds into your account. If the recipient’s platform has other solutions which require our assistance, please submit a request or start a live chat with our customer service to inform us of the matter.
Why Is My Withdraw-able Amount Less Than My Actual Balance
There are usually 2 conditions where your withdraw-able amount will be less than your actual balance:
A. Unexecuted orders on the market: Assuming you have 10 ETH in your wallet, while you also have 1 ETH for the sell order on the market. In this case, there will be 1 ETH frozen, making it unavailable for withdrawal.
B. Insufficient confirmations for your deposit: Please check if there are any deposits, pending for more confirmations to reach the requirement on Bitunix, for these deposits need enough required confirmations so that the withdraw-able amount can match its actual balance.
